Now that you have all your hardware, it’s time to hook it all up. In this chapter, you’ll learn how to connect your equipment to your computer, how to create a proper layout for your MainStage concert, and how to map your physical hardware to their virtual counterparts.
How to Connect Everything
The first step is to connect pedals to your keyboard. The sustain pedal should be plugging into the sustain or damper port. The volume pedal should be plugged into one of the auxiliary ports that support continuous MIDI data. The patch change pedal should be plugged into another auxiliary or footswitch port. The nomenclature of these ports differ across different brands, so refer to the keyboard’s manual for more precise instructions.
Now you’re ready to connect your keyboard to your computer. In most cases, you’ll have two choices — MIDI or USB. If your audio interface has a MIDI input, I recommend connecting your keyboard to that for maximum compatibility. If not, you can use a USB cable to connect your keyboard directly to your computer. If you decide to go the USB route, a driver will likely need to be installed for proper functionality. Consult the manufacturer’s website for information regarding driver downloads and updates.
The next step is to connect your audio interface to your computer. Depending on the model you own, the connection will either be USB, FireWire, or ThunderBolt. Here are a few things to keep in mind…
- USB 3.0 and 2.0 are 99% backwards compatible.
- FW800 to FW400 cables can be purchased if needed.
- ThunderBolt to FW800 adapters can be purchased if needed.
I say USB 3.0 and 2.0 are 99% backwards compatible because everything will work fine most of the time. Occasionally, I’ve had issues connecting certain pieces of USB 2.0 equipment to my MacBook Pro’s USB 3.0 ports. I tend to stay away from FW800 to FW400 adapters because of compatibility issues in the past. I recommend this cable, which has always worked for me. If you own a Retina MacBook Pro, you’ll need a ThunderBolt to FW800 adapter to connect FireWire equipment.
Once you’ve connected your audio interface to your computer, power it on. Some audio interfaces are “bus-powered,” which means power is supplied via USB, FireWire, or ThunderBolt without the need for a power supply. If your bus-powered audio interface also happens to come with a power adapter, the best practice is to plug it in. Bus power isn’t the most consistent source of power, and it’s best to use a dedicated power adapter whenever possible. It’s also important to try to avoid using splitters. While some splitters are powered, un-powered models distribute bus-power to more ports. This might result in stability issues with equipment expecting a constant supply of power.
Creating a Layout in MainStage
With your gear powered on, launch MainStage and open up the default layout. It should look something like this…

Here’s a list of the elements we need for a layout…
- Keyboard, mod/pitch wheels, sustain pedal, volume pedal, and footswitch.
- A volume meter linked to the volume pedal.
- A patch list, and a box showing the current patch number and description.
As you can see, the default layout adds a lot of unnecessary clutter. Let’s get rid of all the elements, and start with a blank slate. To do this, click on Layout Mode in the upper left hand corner of the screen.
To get rid of the existing layout, press Cmd+A to select all the onscreen elements and hit Delete. The Screen Controls Palette at the bottom of the screen contains all of the elements you’ll need to add to your new layout, and is split up into four categories.
- Panel Controls are elements that appear two-dimensionally on a panel. Panel controls can be moved anywhere on the screen except onto a shelf. Panel Controls include buttons, single knobs, volume meters, waveform displays, etc.
- Shelf Controls are elements that can appear three-dimensionally on a shelf. Multiple shelf controls can exist in one shelf. Unlike panel controls, the angle of appearance of shelf controls can be changed due to their three dimensional nature. Shelf controls include keyboards, pedals, and mod or pitch bend wheels.
- Grouped Controls are individual elements grouped together for a functional purpose. Grouped controls include drum pad arrays, amp controls, and organ drawbars.
Now that you are familiar with the different types of available controls, let’s go ahead and create a layout. First, drag a keyboard onto the workspace via the shelf controls.
- You can change the size of the keyboard via the blue outline.
- The top line of the shelf changes the vertical placement of the keyboard.
- The bottom line of the shelf changes the angle of the keyboard.
If you click on the keyboard, you’ll see the Screen Control Inspector appear to the left of the screen. The options in the screen control inspector will change depending on what shelf control you’re configuring. For the keyboard, you’ll see Hardware Input, Settings, and Layer Display.
- The Hardware Input section lets you map a piece of hardware to an onscreen controller. Using the Assign button is the easiest way to accomplish this. Simply click Assign and press a key on your keyboard. If the assignment was successful, you should see the MIDI Port and Channel settings change. Click the Assign button once more to deactivate it.
- The Settings section lets you configure the onscreen controller. For the keyboard shelf control, you have the option to change the name, number of keys, and the lowest key of the keyboard. In most situations, the number of keys should be changed to 88. The lowest key can vary between different brands, so it’s best to Learn it. This process follows the same procedure as the Assign function from the previous section.
- The Layer Display section lets you change the number of layers that appear above the keyboard. I usually just leave it set at three layers.
Now, let’s create a sustain pedal, volume pedal, patch advance footswitch, and a volume meter.
- To create a sustain pedal, go into Shelf Controls and drag a sustain pedal onto the workspace. Assign it to your physical sustain pedal using the method described above.
- To create a volume pedal, go into Shelf Controls and drag a foot pedal onto the workspace. Assign it to your physical expression pedal using the method described above. The Number for the volume pedal should read “11 (Expression).” If it reads something else, consult your keyboard’s manual on how to configure it to transmit CC#11.
- To create a patch advance footswitch, go into Shelf Controls and drag a footswitch onto the workspace. Assign it to your physical footswitch using the method above. It’s best to use a general CC# for the patch change function in MainStage. I typically use CC#87 or 88. Consult your keyboard’s manual on how to configure it to transmit a general CC#.
- To create mod and pitch wheels, go into Shelf Controls and drag two mod/pitch wheels onto the workspace. Assign it to your physical mod/pitch wheels using the method above.
- To create a volume meter, go into Panel Controls and drag a Vertical Meter or Horizontal Meter onto the workspace. Assign it to your physical expression pedal using the method described above. This way, the volume meter will be linked to your expression pedal.
Mapping the onscreen patch advance footswitch to the lowest key on the keyboard is a popular option when a keyboard doesn’t have enough pedal inputs. Alternatively, special 1/4″ to USB adapters can be used to add pedal inputs if needed.
The last two elements we need in a basic layout are the patch list and text boxes for patch number and description.
- To create a patch list, go into Grouped Controls and drag a compact or full height patch list onto the workspace. If needed, you can customize a few display parameters in the screen control inspector.
- To create text boxes, go into Panel Controls and drag a Text box onto the workspace. Feel free to adjust the font, font size, and justification to your liking. To make the background of the text box translucent, uncheck “show frame around text” at the bottom of the screen control inspector.
You should have everything you need for a basic layout now. If you want to fine tune the placement of the onscreen elements, the Layout Mode toolbar to the left of the workspace can be quite useful. These tools allow you to perform the following functions…
- Align the selected items along their top edges.
- Align the selected items along their vertical centers.
- Align the selected items along their bottom edges.
- Align the selected items along their left edges.
- Align the selected items along their vertical centers.
- Align the selected items along their right edges.
- Evenly distribute items vertically.
- Evenly distribute items horizontally.
- Group the selected items.
- Ungroup the selected grouped items.
Transferring a layout to another MainStage concert is really easy. Click on the gear icon on the right hand side of the workspace, and select Export. This will generate a .layout file that you can import in any other concert file. Keep in mind that importing a layout is permanent, and you can’t easily undo it.
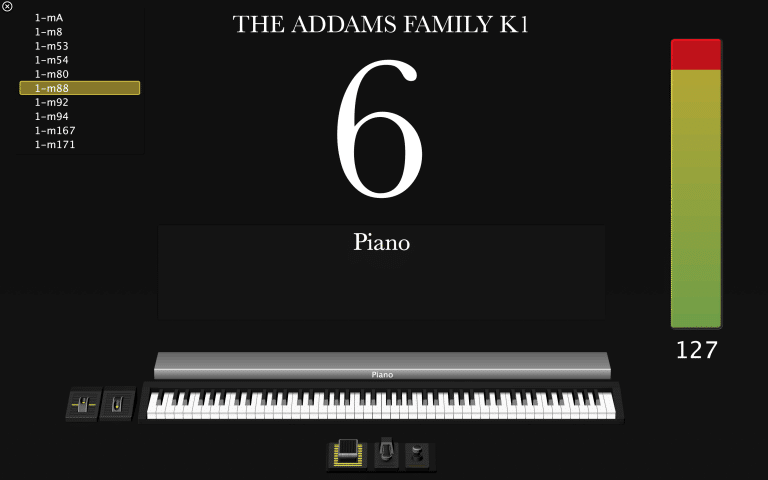
This is the basic layout I use. It presents all the information needed without any excess clutter. In addition to the text boxes for patch number and description, I also added one at the top which displays the name of the show.
By this point, you’ve successfully mapped your physical hardware to their virtual counterparts in Layout Mode. In the next chapter, you’ll learn how to map the virtual onscreen elements to different MainStage functions such as patch advance, volume control, etc. After that, we’ll take an in-depth look at the process of programming a show.
This post is part of the Apple MainStage Keyboard Programming series. The next post in this series is Assigning Controllers to Functions in Apple MainStage.