IK Multimedia’s Amplitube 3 is one of the best sounding guitar amp modeling plugins in the industry. It’s super easy to use in a studio environment where there’s time to audition and record sounds, but Amplitube is a great option for live playing as well. In this tutorial, you’ll learn how to use program changes to select specific presets in Amplitube 3.
First let’s go over the differences between a preset and a patch, and why we want to use program changes to switch between presets. Here’s the official blurb from IK Multimedia…
A Preset contains all of the information for the models selected, the settings for those models and the signal chain that links them together. Presets have names (for example,’60 Brit Crunch).
A Patch is the combination of a preset and its external controller settings (such as master volume, amp gain, delay level, etc.). The new Patch mode shows 4,000 memory locations where you can store patches. Patches have numbers (for example, 200A) AND names. This is because the name of the associated preset contained inside each patch can also be thought of as the name of the patch since the preset contained inside a patch is a unique preset that is only associated with that patch and is not tied to any other preset in AmpliTube. Once you save a preset into a patch, the preset becomes a part of the patch and may be edited independently of the preset from which it came.
In Amplitube 3, a patch contains a preset and information tied to a specific external controller like the StealthPedal and the now discontinued StompIO. A preset itself does not contain this extra information. Program changes can be sent via internal software MIDI routing or with any number of hardware controllers, so that’s why we’ll be using presets in this situation.
Creating a Custom Preset
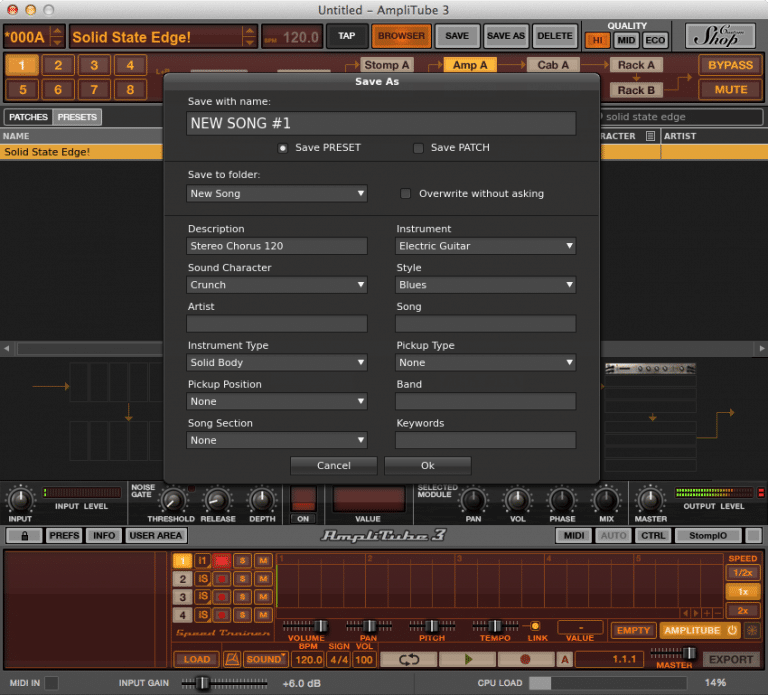
The first thing you’ll have to do is create and save a custom preset. For the purpose of this tutorial, I’ve selected the stock Solid State Edge! preset as a starting point. Once you’re done tweaking, click on SAVE AS at the top of the GUI and you should see something like this.

In the example screenshot, I have rename the preset from Solid State Edge! to **NEW SONG #1. **By default, the new preset will be saved to a stock Amplitube folder. For the purpose of staying organized and making your life easier in the future, it’s best to save custom presets to a new folder. To do this, click on the white triangle to the left of Save to folder:, and create a new folder. In the example screenshot, my folder is called New Song.
The other parameters are optional, but it may be worth configuring them to properly describe your custom preset. Before you hit save, make sure Save PRESET, and not Save PATCH, is selected.
Assigning a Program Change Number to a Preset
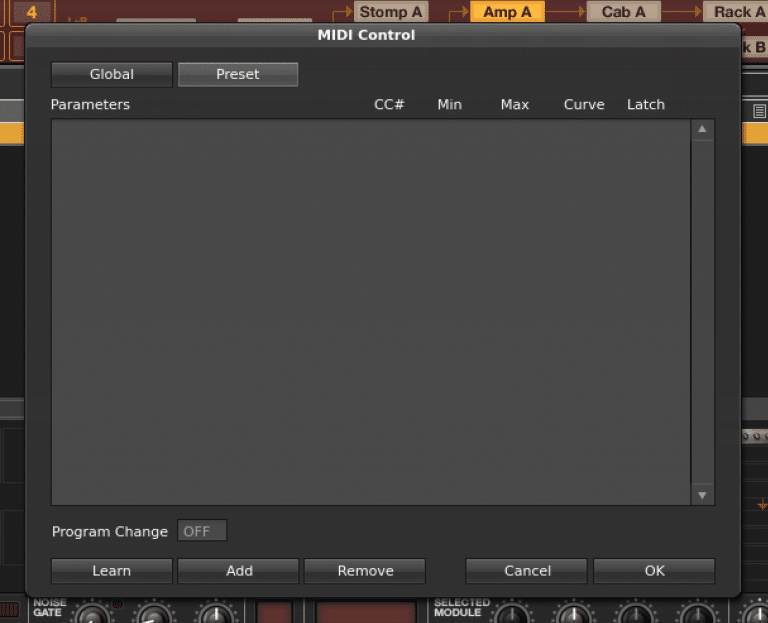
Now that your custom preset has been created, it’s time to assign a program change number to it. To do this, just click on the MIDI button below the volume control module. You’ll be presented with a MIDI Control menu that looks like this.

The only setting you have to change here is the Program Change number. By default, it’s set to OFF. The UI is a little counter-intuitive here. In order to change the setting, you have to click and drag up or down.
After assigning the correct program change number, click OK to exit the menu. After that, click on SAVE at the top of the GUI, and select Replace Preset. The program change number will now be tied to the specific custom preset.
Depending on your particular setup, you’ll now be able to switch between presets by sending program changes to Amplitube. This can be done on a software level via internal MIDI routing, or on a hardware level with a controller like the Behringer FCB1010.