In the world of audio, gain staging refers to optimizing the level of a signal from source to output, while minimizing noise and distortion. The principles of gain staging can be applied to everything from plugging an iPhone into a PA system to recording vocals for Beyoncé’s next album. Proper gain staging is also vital when creating patches in MainStage. In this post, I’ll share a few tips and tricks on how to properly gain stage to maximize dynamic range and sound quality in Apple MainStage.
First, a brief history on gain staging.
A few decades ago, music was recorded with all-analog signal chains. Microphones, preamplifiers, and tape machines. No computers. Tape machines, in particular, were noisy due to their mechanical nature. Thus, it was imperative to record “as hot as possible” to overcome the high noise floor of tape.
According to Wikipedia, the noise floor is the measure of the signal created from the sum of all the noise sources and unwanted signals within a measurement system, where noise is defined as any signal other than the one being monitored.
What’s an audible example of noise floor?
Plug a pair of headphones into your computer, and turn the volume control all the way up, but DON’T PLAY ANY MUSIC1. Depending on how sensitive your headphones are, you should be able to hear a low-level hiss.
That’s the noise floor.
Now put yourself into the shoes of a recording engineer in the 1970s. Your task for the day is to record a pianist playing Chopin’s Ballade in G minor — a piece with a large dynamic range. You decide to capture the performance using two microphones running through a set of preamplifiers on your analog console. The resulting signal gets recorded directly onto tape.
What are the sources of noise in this situation?
- The room has a noise floor. Even with proper soundproofing, no room is 100% free of noise unless you’re recording in space.
- Even the quietest preamps can have an audible noise floor.
- The signal chain inside a console can add a little noise to the signal.
- The transfer to tape can definitely introduce an audible noise floor.
The combination of these noise sources result in the noise floor of this particular audio system.
I’ve never used a tape machine before, but -60dB seems to be a reasonable noise floor for well maintained units. This number is quite high compared to modern digital systems where the noise floor can generally range from -114db to -93dB.
To maximize your signal to noise ratio, or SNR, you decide to record as hot as possible. You ask the pianist to play the loudest section in the piece, so you can set the correct amount of gain to prevent clipping.
This next part might be a little confusing.
Analog and digital audio systems have different measurement standards for signal level. Analog systems use dBU (dB voltage) and digital systems use dBFS (dB full-scale). 0dbU does not equal 0dBFS.
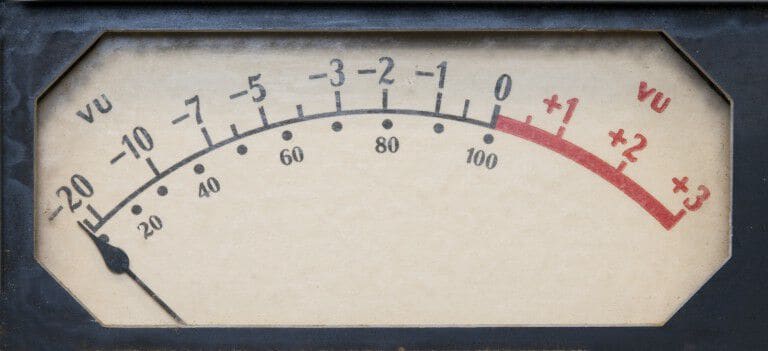
Below is an image of an analog VU (volume unit) meter. A VU meter displays signal level in dBU. As you can see, 0dBU IS NOT the maximum level on this meter.
Now, here’s an image of a digital dBFS meter. As you can see, 0dBFS IS the maximum level on this meter.

Here’s where it gets a little confusing. There is no standardization when it comes to correlating dBU and dBFS. The relationship is entirely dependent on the calibration of your audio system. In other words, 0dBFS=+18dBU and 0dBF=+8dBU are both possible.
The important things to take away here are…
- 0dBFS is the maximum level of a digital system.
- 0dBU is not the maximum level of an analog system.
- A popular calibration standard is 0dBFS=+24dBU
Okay, now back to MainStage.
Look at this signal flow diagram.

This is a simplified version of MainStage’s signal flow.
The signal is generated by EXS24, and it goes through EQ and compression before terminating at the fader. If a signal is distorted coming out of EXS24, it’s going to be distorted for the rest of the signal chain. If you boost a band of frequencies +12dB with an EQ without turning the output gain down, it’ll be distorted going into the compressor and the fader. If you set the makeup gain too high on the compressor, the signal will be distorted going into the fader.
As we established earlier, gain staging requires optimizing level from source to output, while minimizing noise and distortion. Now you see why.
GARBAGE IN = GARBAGE OUT
MainStage runs on a computer, so we’ll call it a digital audio system for simplicity’s sake. Digital systems use the dBFS scale, so it’s important to never cross 0dBFS. Unlike noisy analog gear, modern digital components have very low noise floors. Thus, it’s not important to drive signal levels as close to 100% (0dBFS) as possible.
Instead, we’ll assign a random value to be the new maximum. Let’s use -6dBFS as our new 100%. This effectively gives us 6dB of headroom before clipping at 0dBFS.
Now, let’s discuss metering in MainStage.
By default, MainStage uses post-fader metering.
What does that mean?
The signal level displayed in the meter changes as you move the fader up and down. This type of metering, while useful in some cases, is not what you want to use when programming in MainStage.
Why?
Because it’s misleading.
Imagine a distorted signal peaking at +3dBFS. Bringing the fader down 9dB will result in a signal peaking at -6dBFS. However, the signal, which is now 9dB softer, still sounds distorted.
Why?
Because you’re using post-fader metering — where a signal softer than 0dBFS can still sound distorted.
To solve this issue, simply switch to pre-fader metering. In this metering setup, the signal level you SEE is not affected by the fader. It goes without saying what you HEAR will still be affected by the fader.
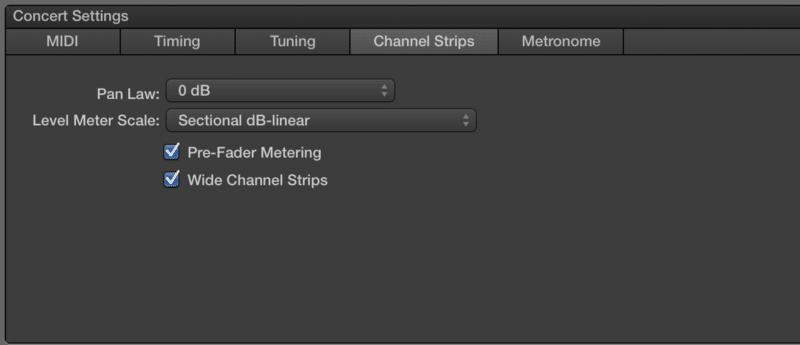
To switch to pre-fader metering in MainStage…
- Click on your Concert (first patch in the patch list).
- Click on Channel Strips in the Concert Settings Inspector.
- Click on the checkbox next to Pre-Fader metering.
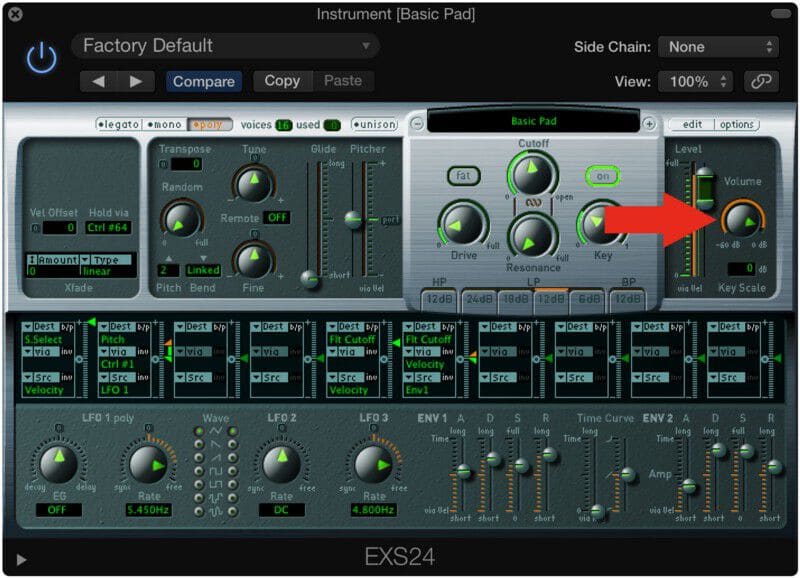
The next step is to ensure all your channel strips are peaking at -6dB. To do this, make volume adjustments with the master volume control inside the software instruments and plugins (EXS24, ES2, etc.), and NOT the fader.
I like to take it one step further and establish a new soft maximum for mixing as well. Moving all my source channel strips, excluding auxiliary and master variants, down to -6dB and treating this as my new maximum pretty much erases any possibility of overloading my master outputs.
If you find your patches to be too soft with this gain staging method, just turn up the volume knob on your audio interface or headphone amp.