Ever since the start of the COVID-19 pandemic, I've seen quite a few of my musician friends host online concerts with Zoom. While I'm probably not going to host concerts myself (I haven't practiced piano in a year), this got me thinking about how to help others to improve the production quality of their online concerts to create a better experience for viewers. In this post, you'll learn how to host a great-sounding Zoom concert with Apple MainStage.
The MainStage template used in the webinar can be downloaded here.
The Problem with Online Zoom Concerts
Before we dive into the technical details, let's identify the problems we're trying to fix. Zoom provides enough bandwidth for decent audio and video quality, so the bottleneck is not software or network-related. Instead, the main issue has to do with the lack of proper recording and mixing techniques.
Most online concerts I've watched on Zoom and Facebook Live are casual in nature. That's perfectly fine if that's the vibe you are going for. From a technical perspective, casual setups will always yield below-average sound quality. The reason for this is simple – singing or playing an instrument through your built-in microphone and Zoom echo cancellation is never going to sound great.
Now, let's talk about how to improve the sound quality of a Zoom concert. To do this, we're going to follow two simple rules.
- For sound sources that require a microphone, always use a decent microphone. In most situations, even a basic Shure SM58 is going to sound much better than the microphone in your computer.
- Don't monitor through speakers – use headphones instead. For example, if you're performing with a digital piano, route audio virtually in software and monitor with headphones. We'll get into how to do this later on in the post.
How to Improve Zoom Concerts
In this example, we'll set up an online concert with the following specifications.
- 1-channel microphone input for a singer.
- 2-channel output for Zoom.
- 2-channel output for a headphone mix.
The microphone input will be routed through MainStage to allow for effects processing – EQ, compression, and limiting. The stereo output for Zoom will consist of a full mix that includes the singer's processed voice, software instruments, and a backing track. Lastly, we'll also create a stereo output for a local headphone mix. A dedicated monitoring mix is important because it allows us to leverage DSP effects for zero-latency vocal monitoring, and provides a way to deliver a click track to the performers only.
How to Set Up a Great-Sounding Zoom Concert
To set all of this up, we only need two apps – Loopback (use coupon code SOCIALDISTANCING for 15% off) and MainStage. Loopback is a macOS app that allows you to route audio between applications with a virtual device.
In this case, we'll use Loopback to route processed audio from MainStage to Zoom. Since we also want to use a physical audio interface for local monitoring as well, we'll need to create an aggregate audio device that combines Loopback and our audio interface – check out the diagram below.
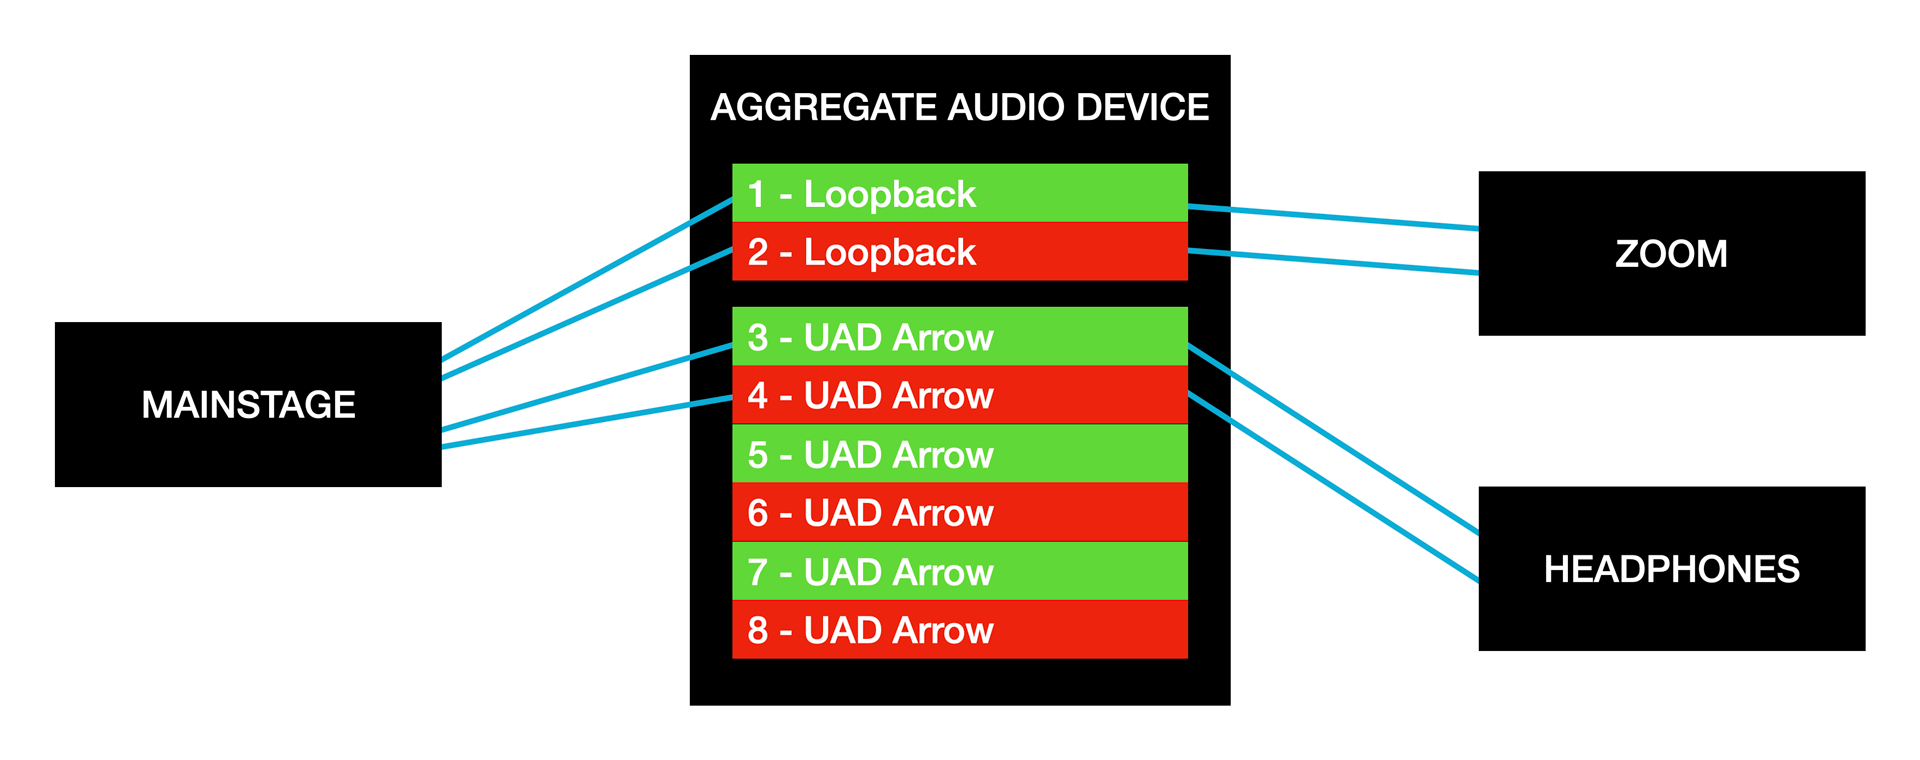
Since I am using a UAD Arrow (super awesome device) as my audio interface, my aggregate audio device will consist of Loopback (1-2) and the UAD Arrow (3-4, 5-6, 7-8). The Loopback audio will be sent to Zoom, and the audio routed through the UAD Arrow will be sent to my headphones. This setup allows us to route a different audio stream to viewers of the online concert.
Configuring Loopback
First, let's configure Loopback. In the "Sources" section, create a "Pass-Thru" device. In the "Output Channels" section, add two channels and connect them to the "Pass-Thru device". That was easy, right?

Create an Aggregate Audio Device
Next, let's create an aggregate audio device that combines the inputs and outputs of Loopback and our physical audio interface. To do this, open the "Audio MIDI Setup" in your "Utilities" folder, click on the "+" button in the lower left, and click "Create Aggregate Device".

Select "Loopback Audio" and your physical audio interface to finish setting up the aggregate audio device. In my case, I selected "Loopback Audio" and "Universal Audio Thunderbolt", which is my UAD Arrow. Make sure "Drift Correction" is checked for both interfaces as well.

Configuring MainStage
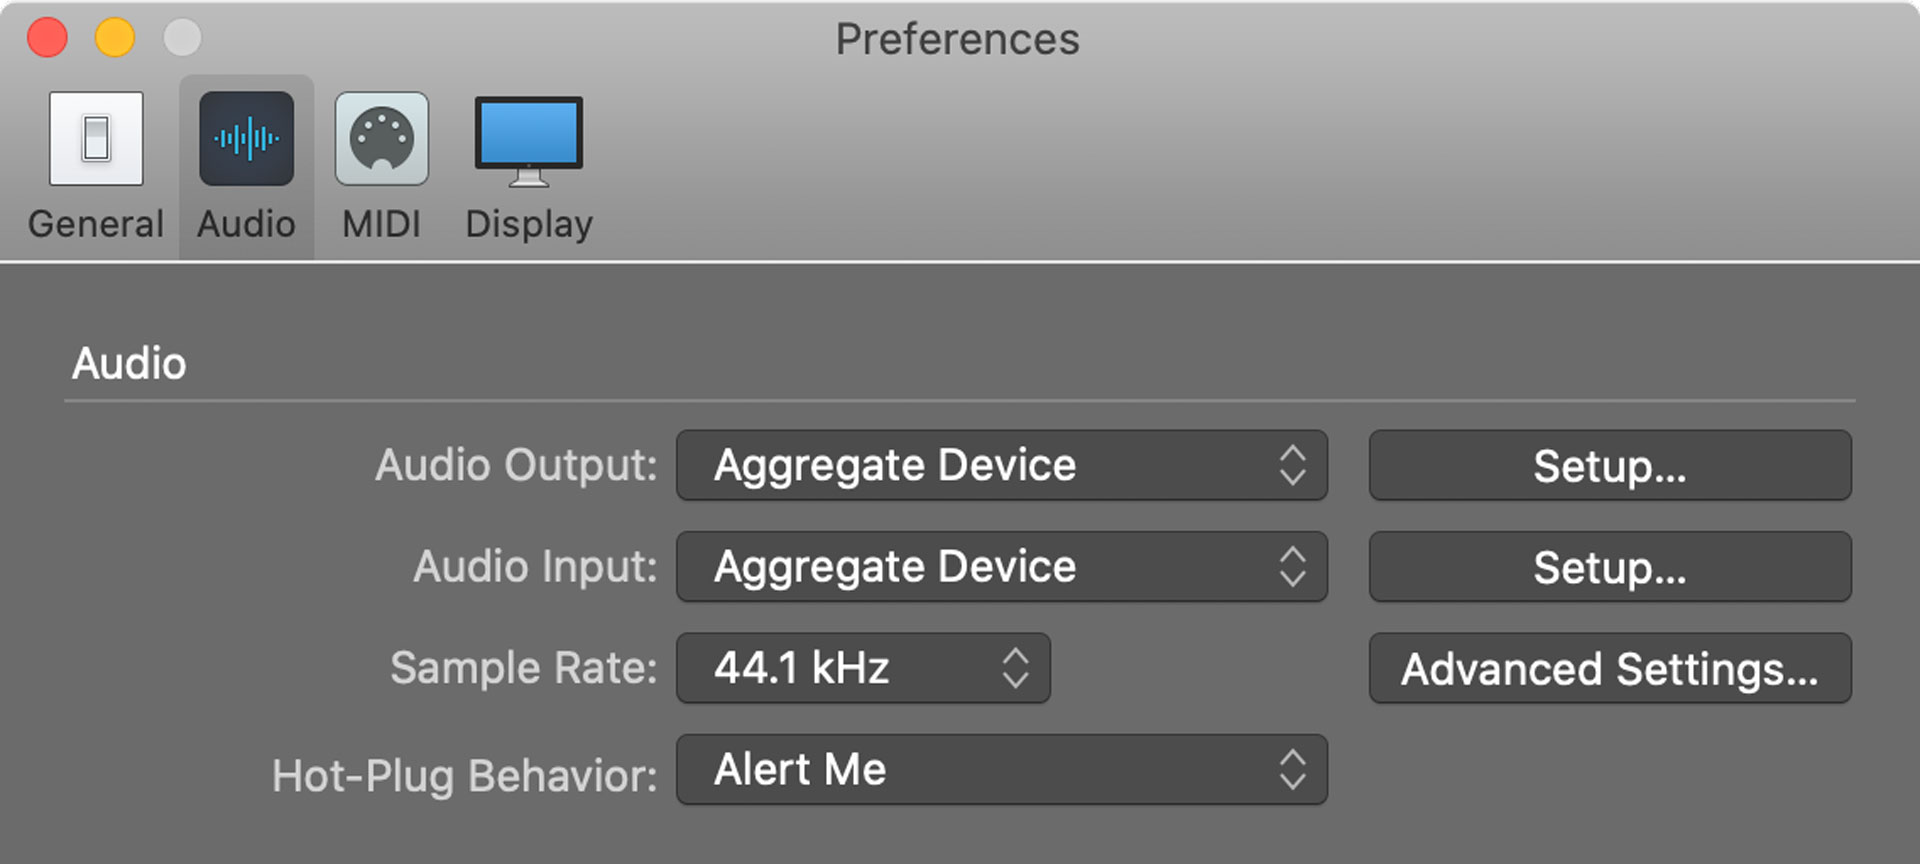
Now the fun begins! Let's set up MainStage to use the aggregate audio device we just created. In MainStage preferences, set the "Audio Input" and "Audio Output" to "Aggregate Device". It's important to set both the input and output to the aggregate audio device to prevent drift from occurring.
As a reminder, our aggregate audio device has the following I/O structure.
Inputs
- MainStage 1-2 = Loopback 1-2
- MainStage 3-4 = Audio Interface 1-2
- MainStage 5-6 = Audio Interface 3-4
- etc...
Outputs
- MainStage 1-2 = Loopback 1-2
- MainStage 3-4 = Audio Interface 1-2
- MainStage 5-6 = Audio Interface 3-4
- etc...
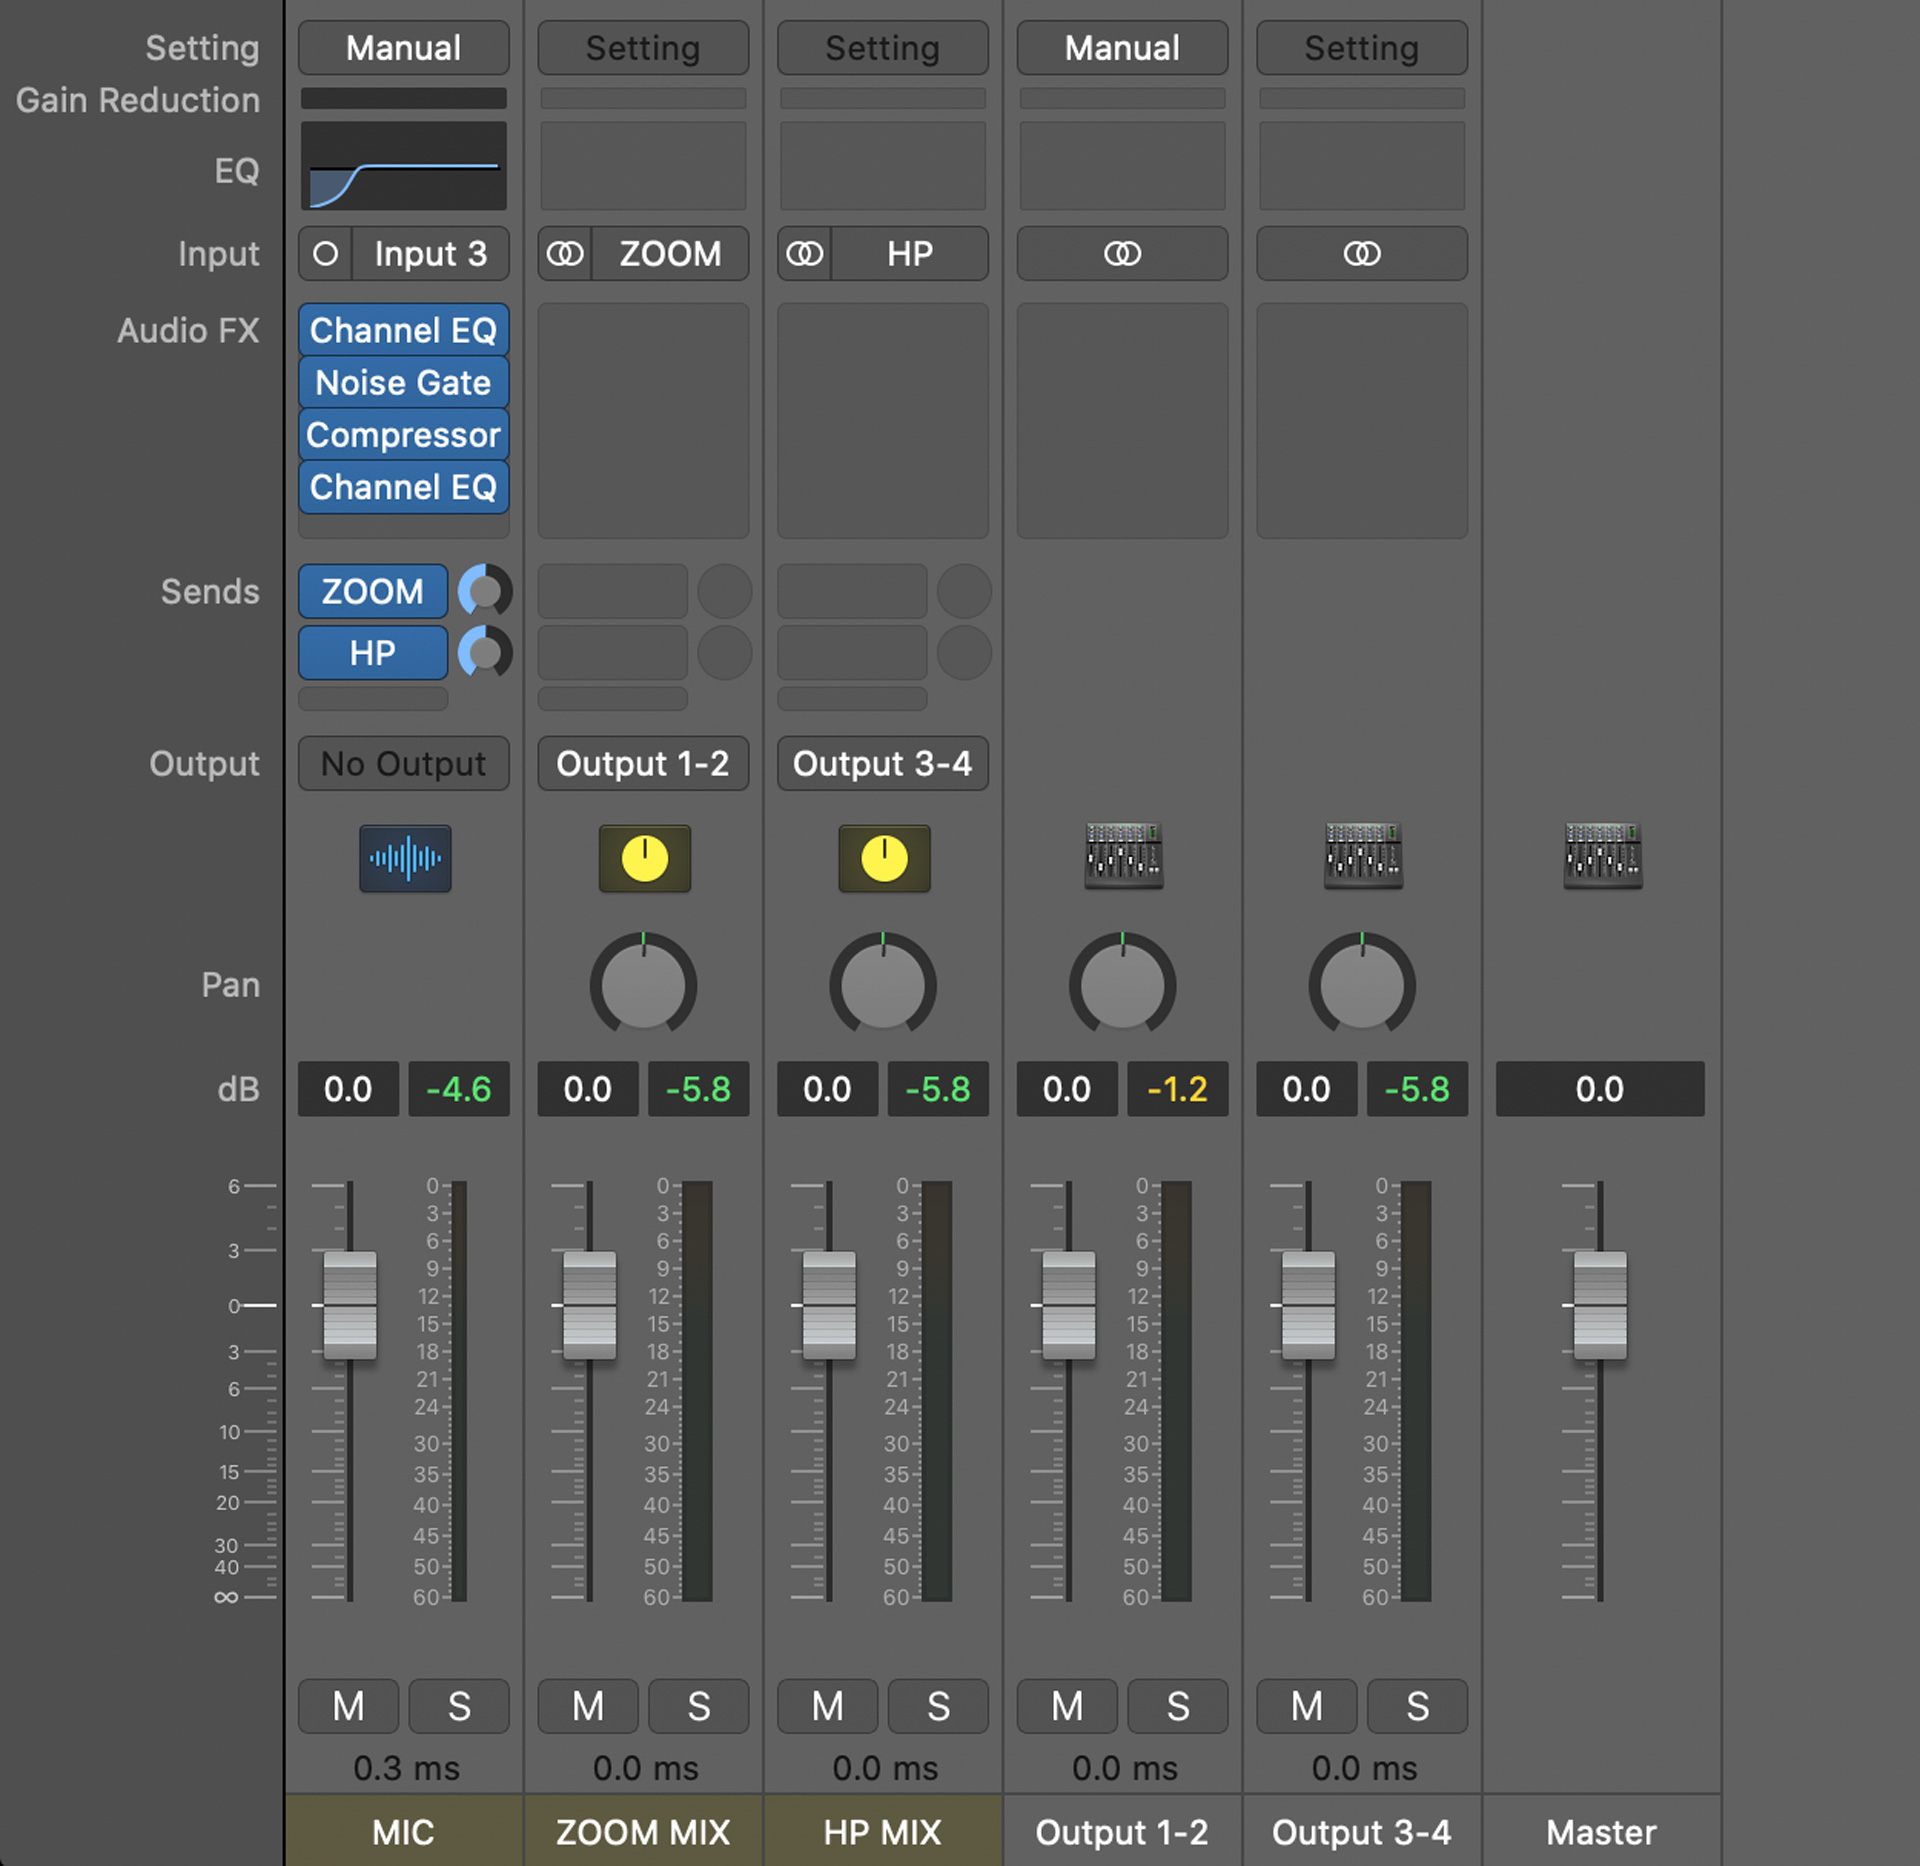
Setting Up the Vocal Channel Strip
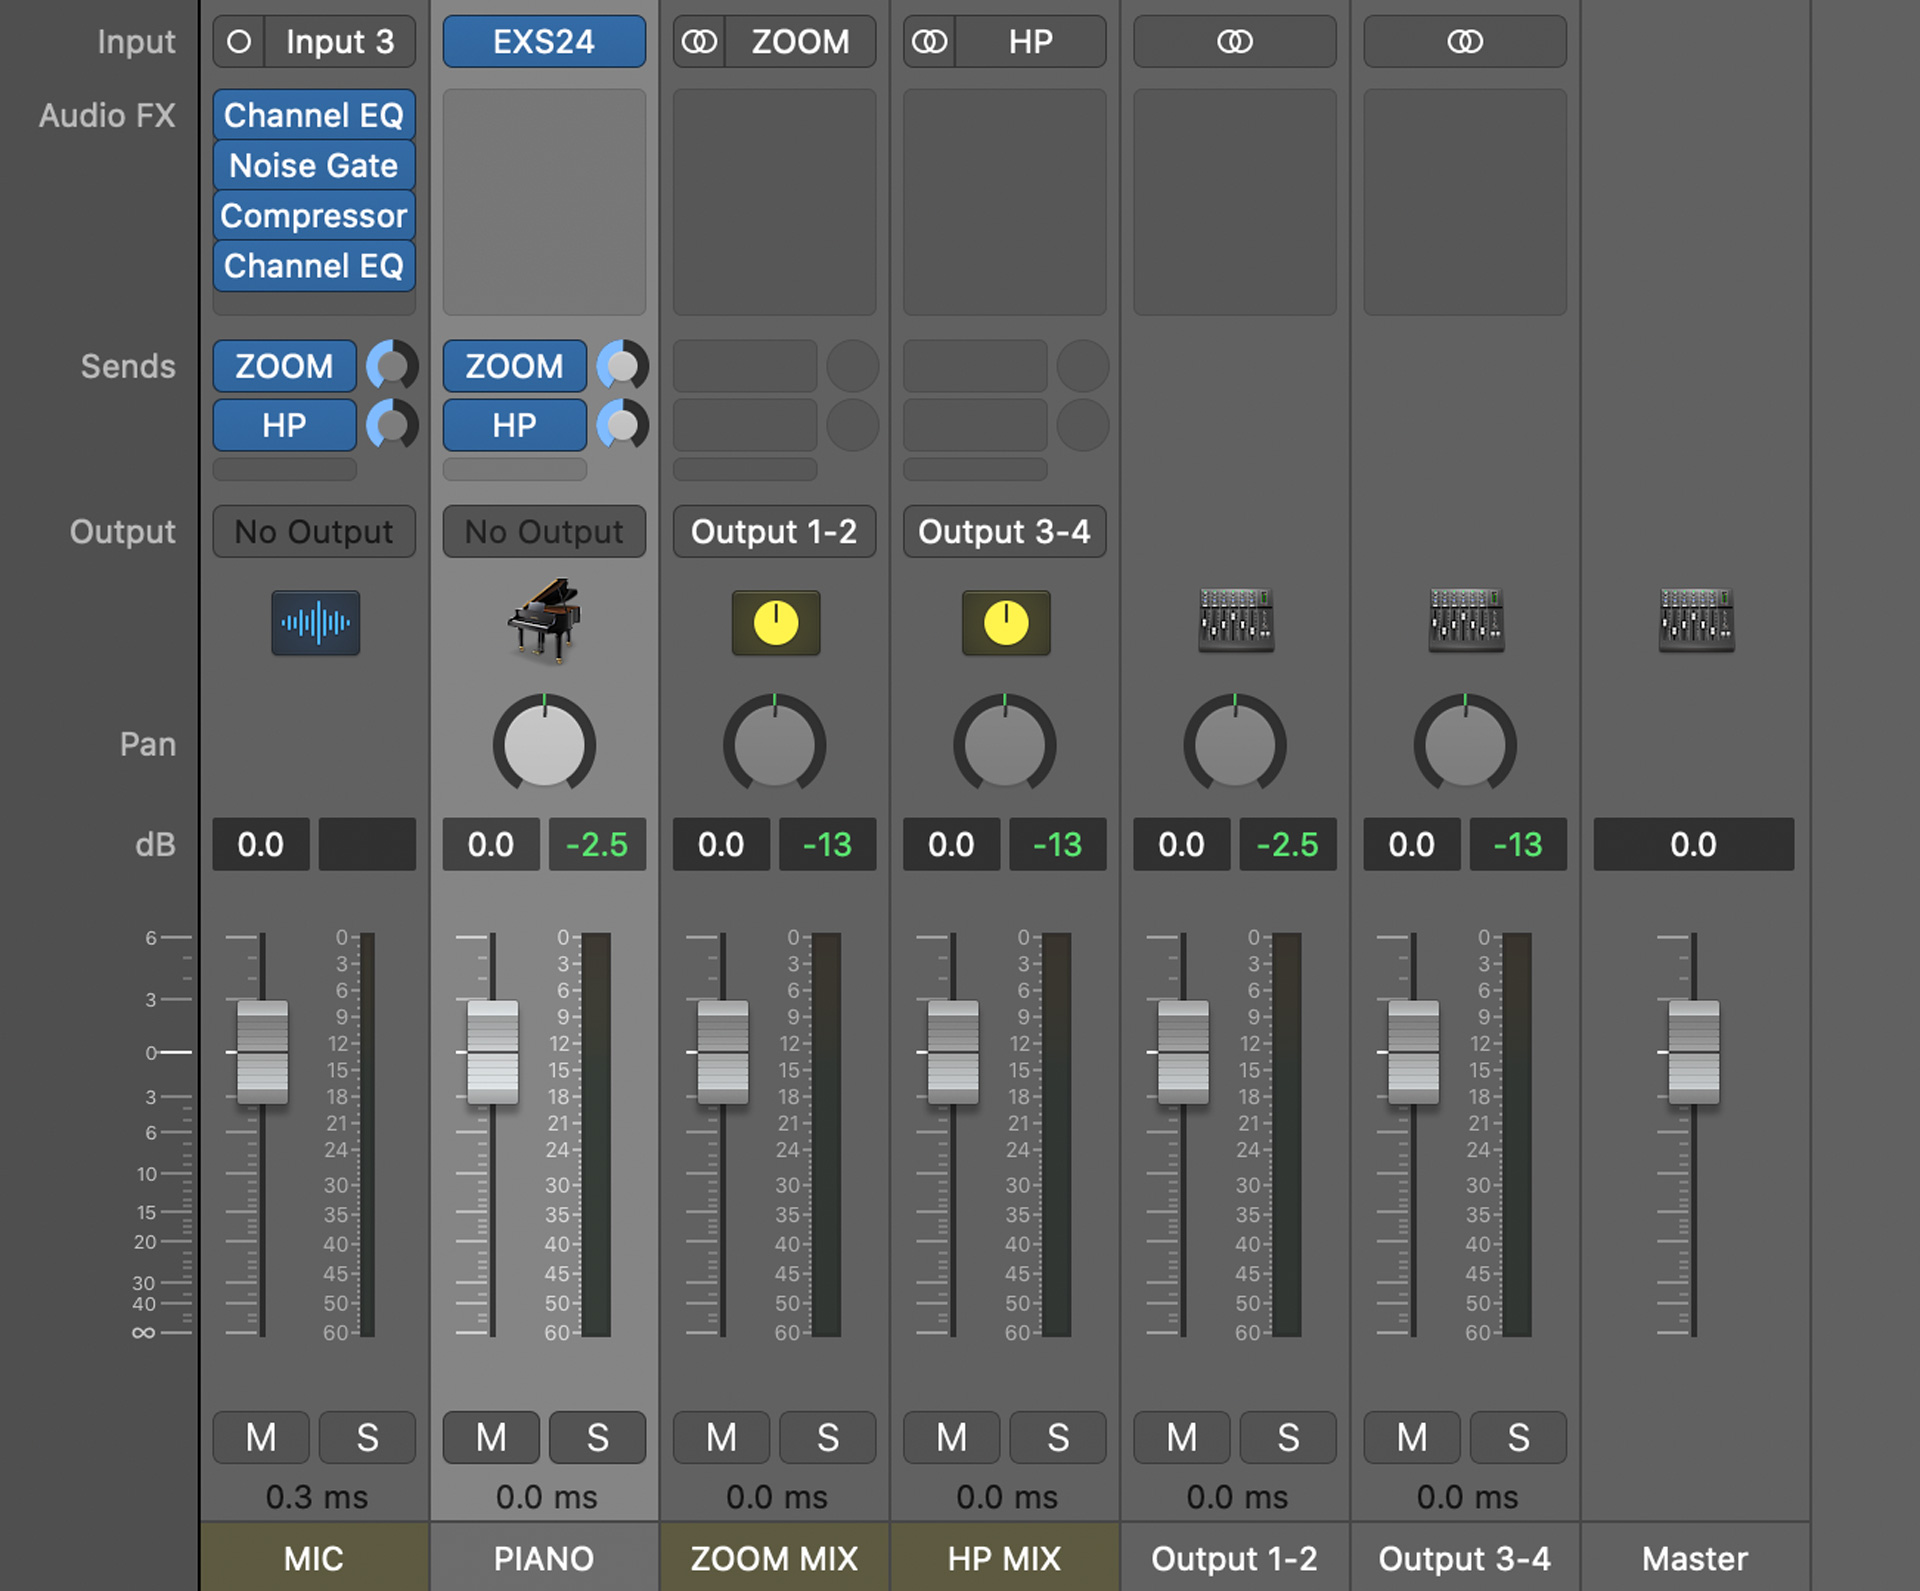
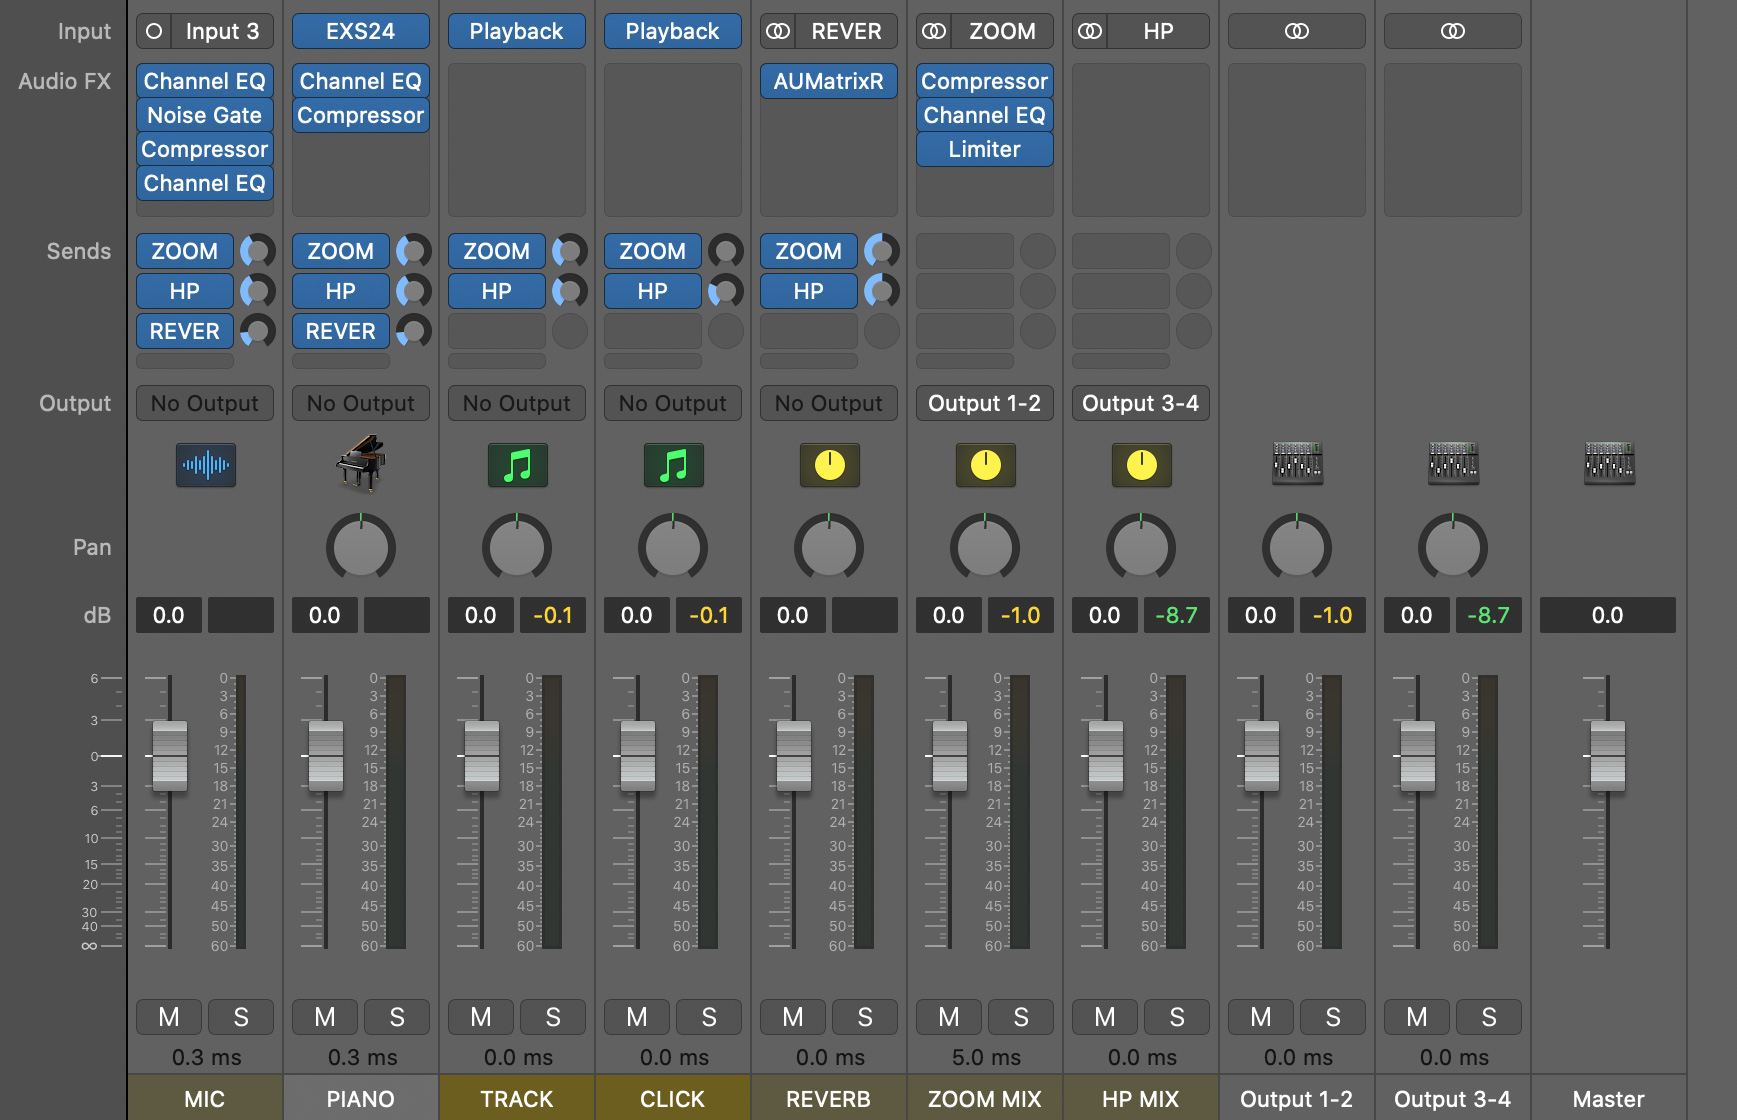
First, let's set up a channel strip for vocals. Notice how the input is set to "Input 3" – this is because MainStage's "Input 3" is the XLR microphone input of my Universal Audio Arrow audio interface.
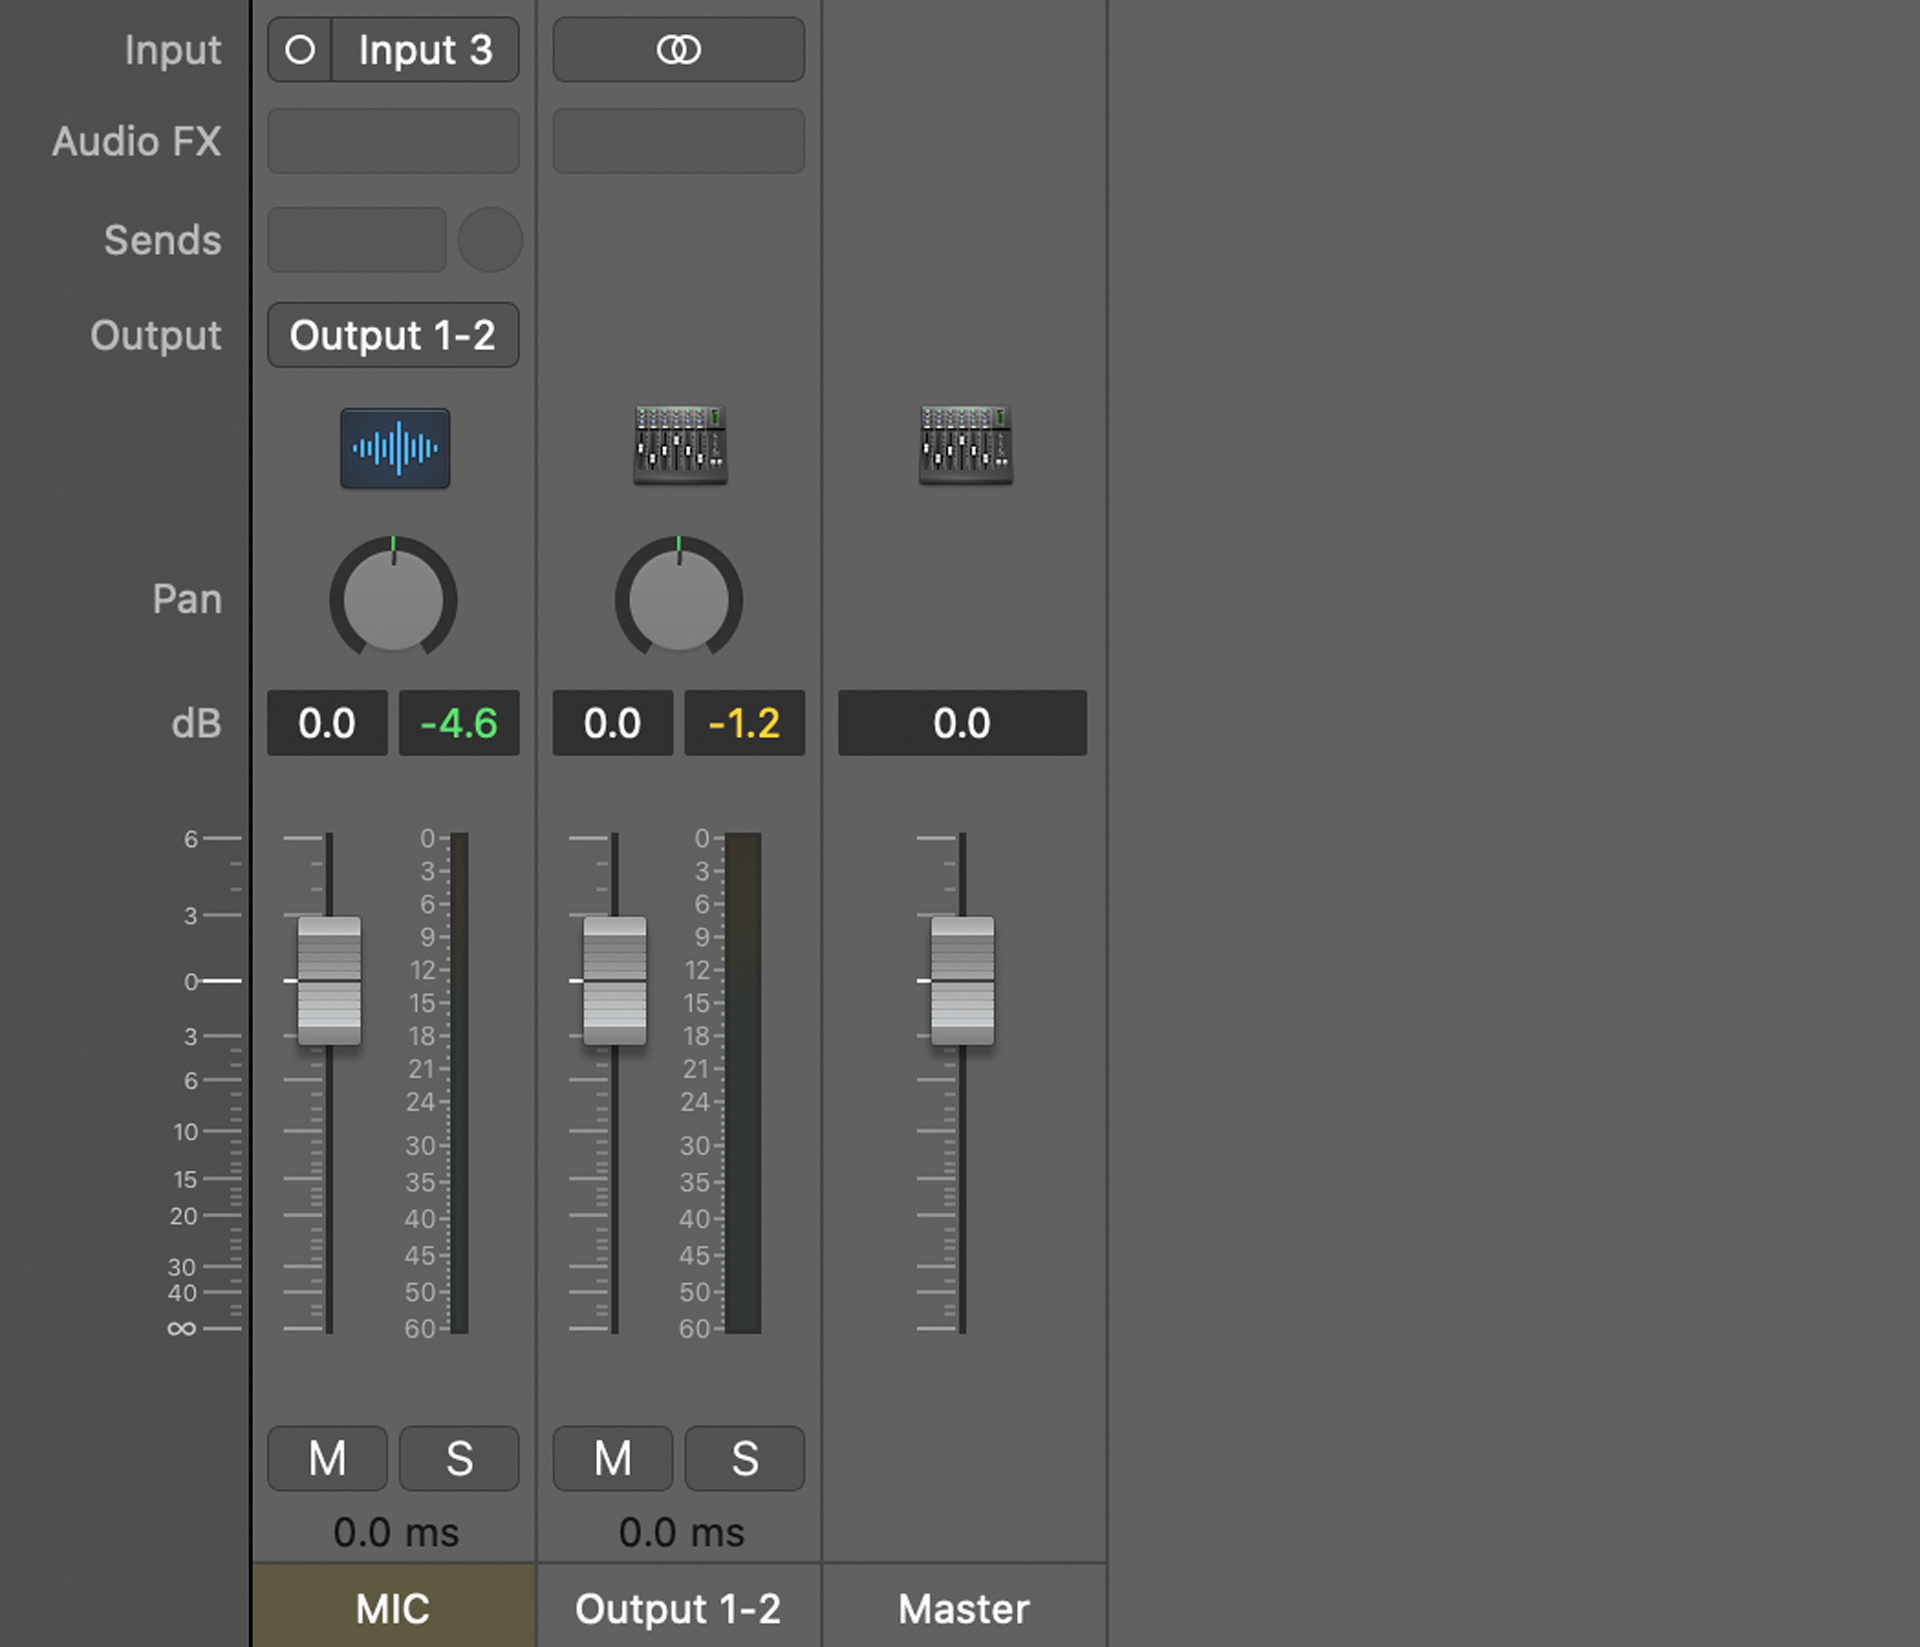
Another important thing to pay attention to is the output of the channel strip, which is set to "No Output". Instead of using channel strip outputs to route audio, we'll use auxiliary tracks instead – this makes it easier to visualize signal flow, and it also reduces the chance of making a routing mistake.
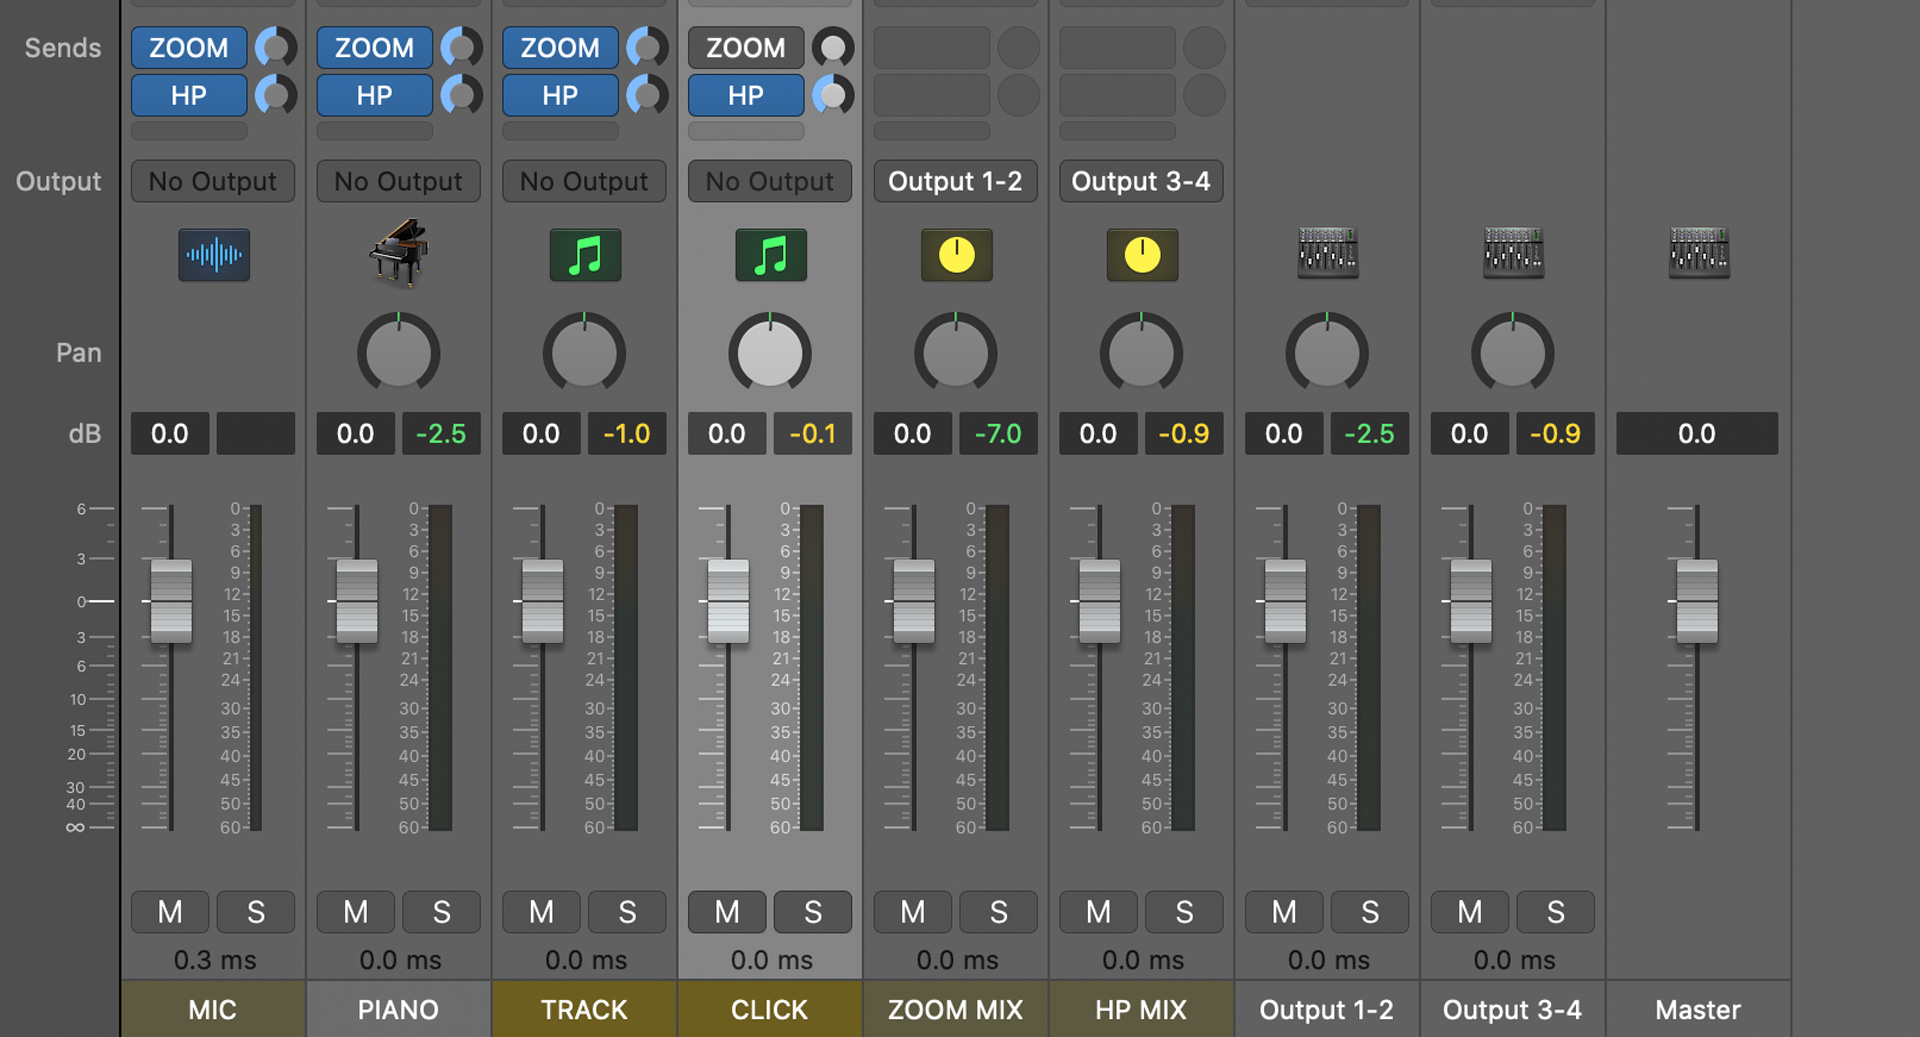
Since we are routing audio to two locations (Zoom and headphones), we'll need two auxiliary channel strips. To create an auxiliary bus, click on the "Sends" section of the channel strip and hover over "Bus". In the submenu, choose an empty bus. In the screenshot below, I've created two auxiliary buses – "Bus 63" for the Zoom mix (ZOOM MIX) and "Bus 64" for the headphone mix (HP MIX).
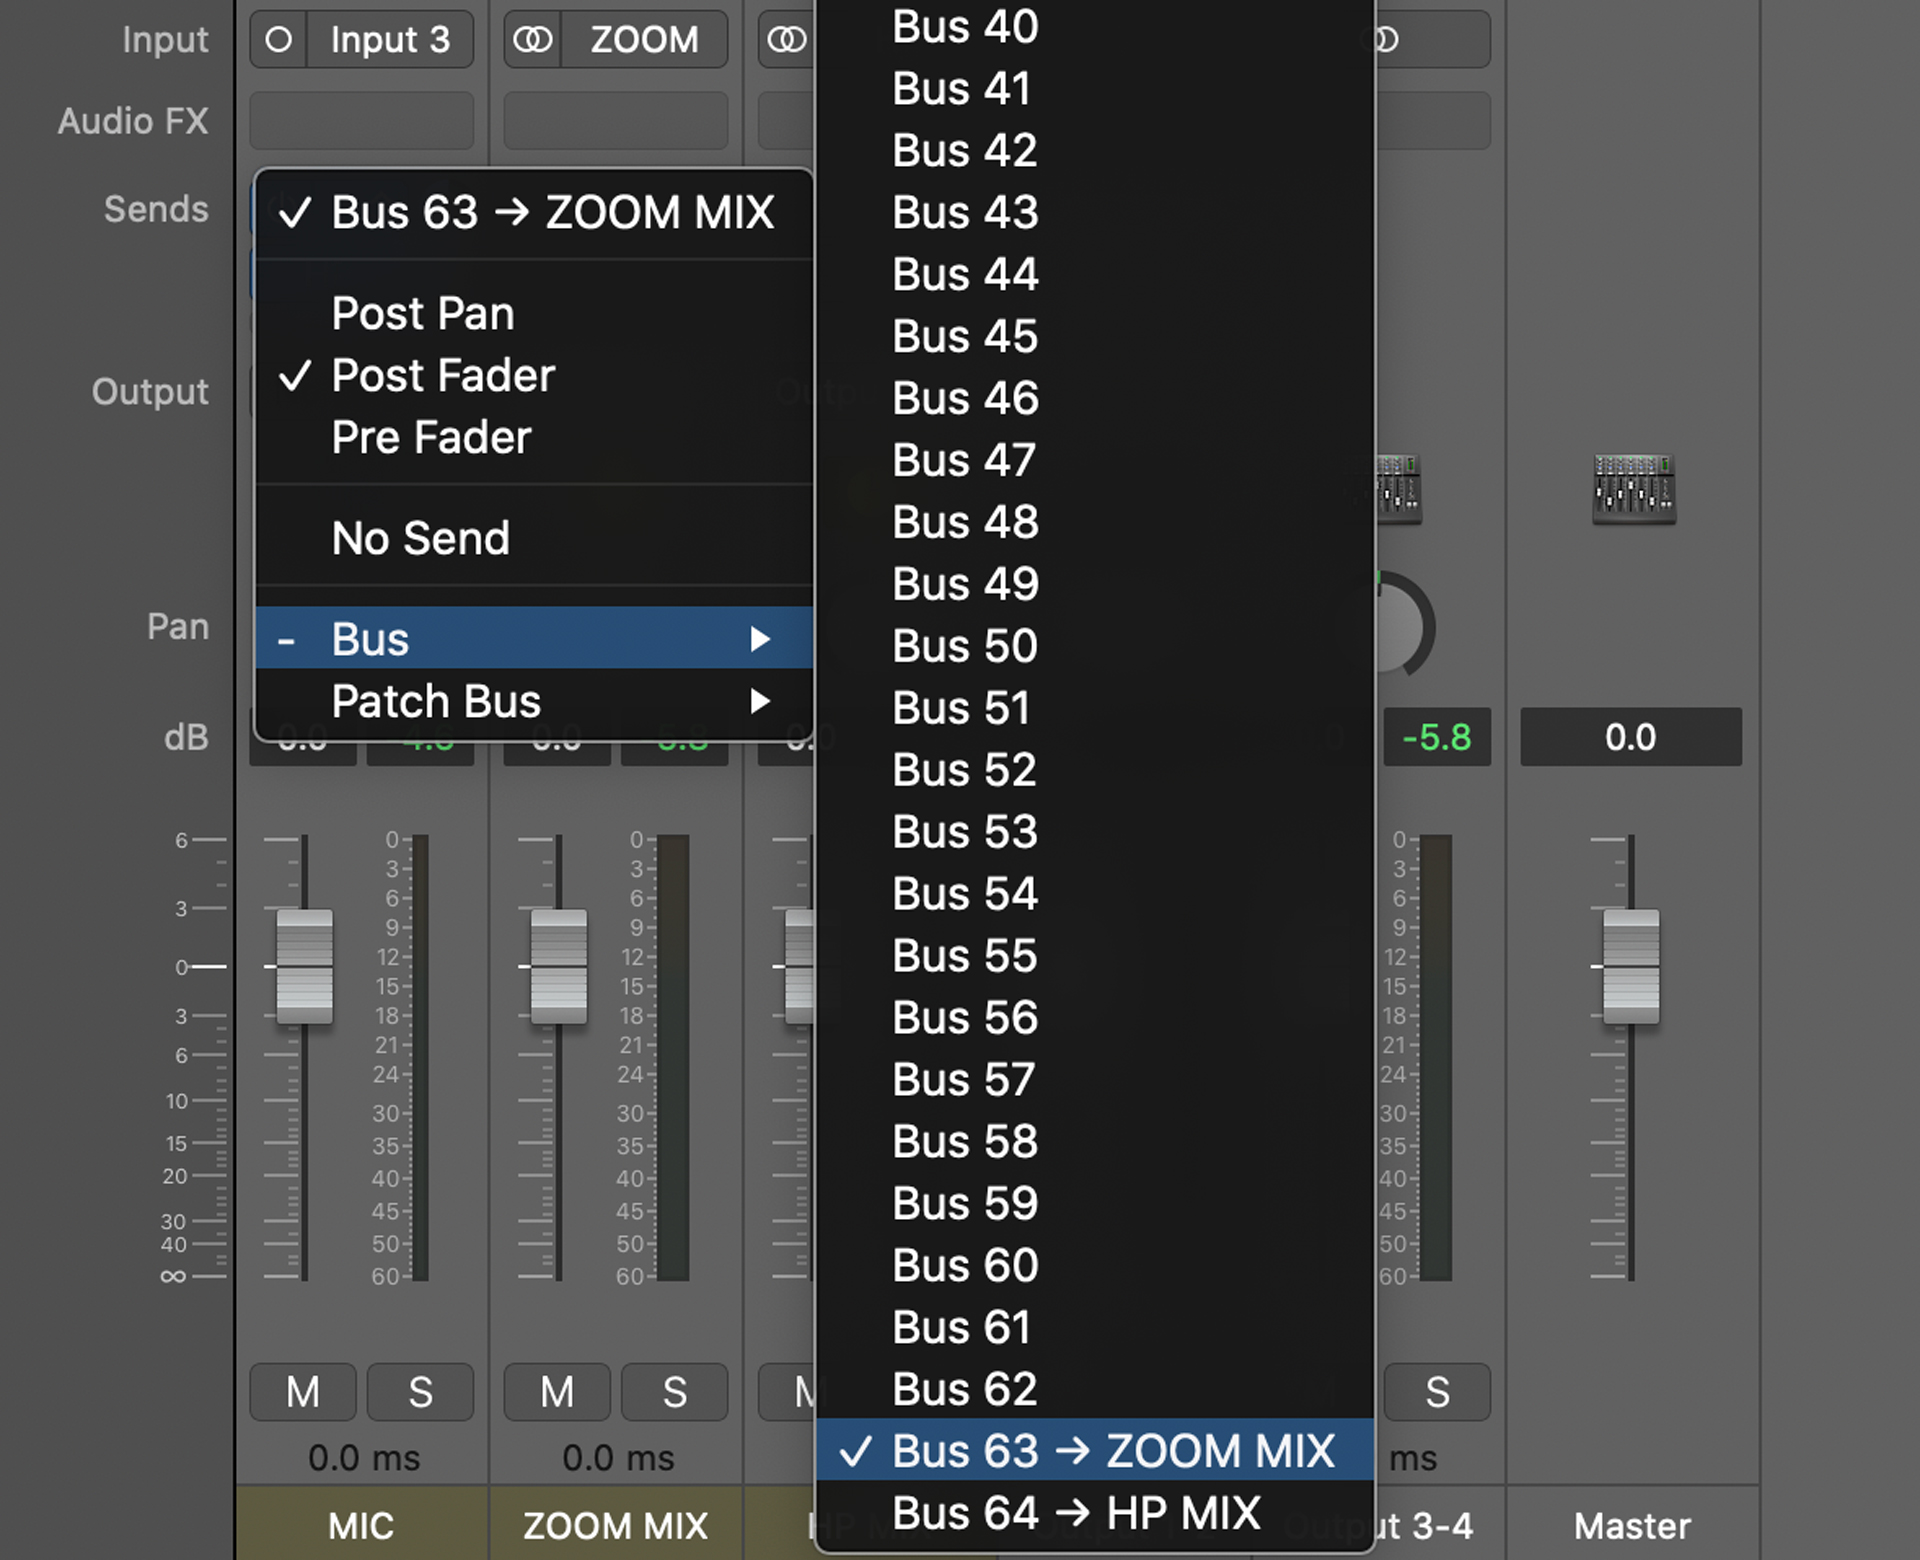
Set the volume for both ZOOM MIX and HP MIX sends to -6 dB for now. We can fine tune the mix later on. Next, set the output for the ZOOM MIX channel strip to "Output 1-2" and the output for HP MIX to "Output 3-4" – this will route the ZOOM MIX output to Zoom via Loopback, and HP MIX to your headphones.

Now, let's add some effects to the microphone input. For vocals, I'd recommend using a basic plugin chain like this – Channel EQ, Noise Gate, Compressor, and Channel EQ. If you're not familiar with these effects and what they do, I'd recommend reading Apple's support documentation. For now, we'll do a quick overview of the recommended settings.
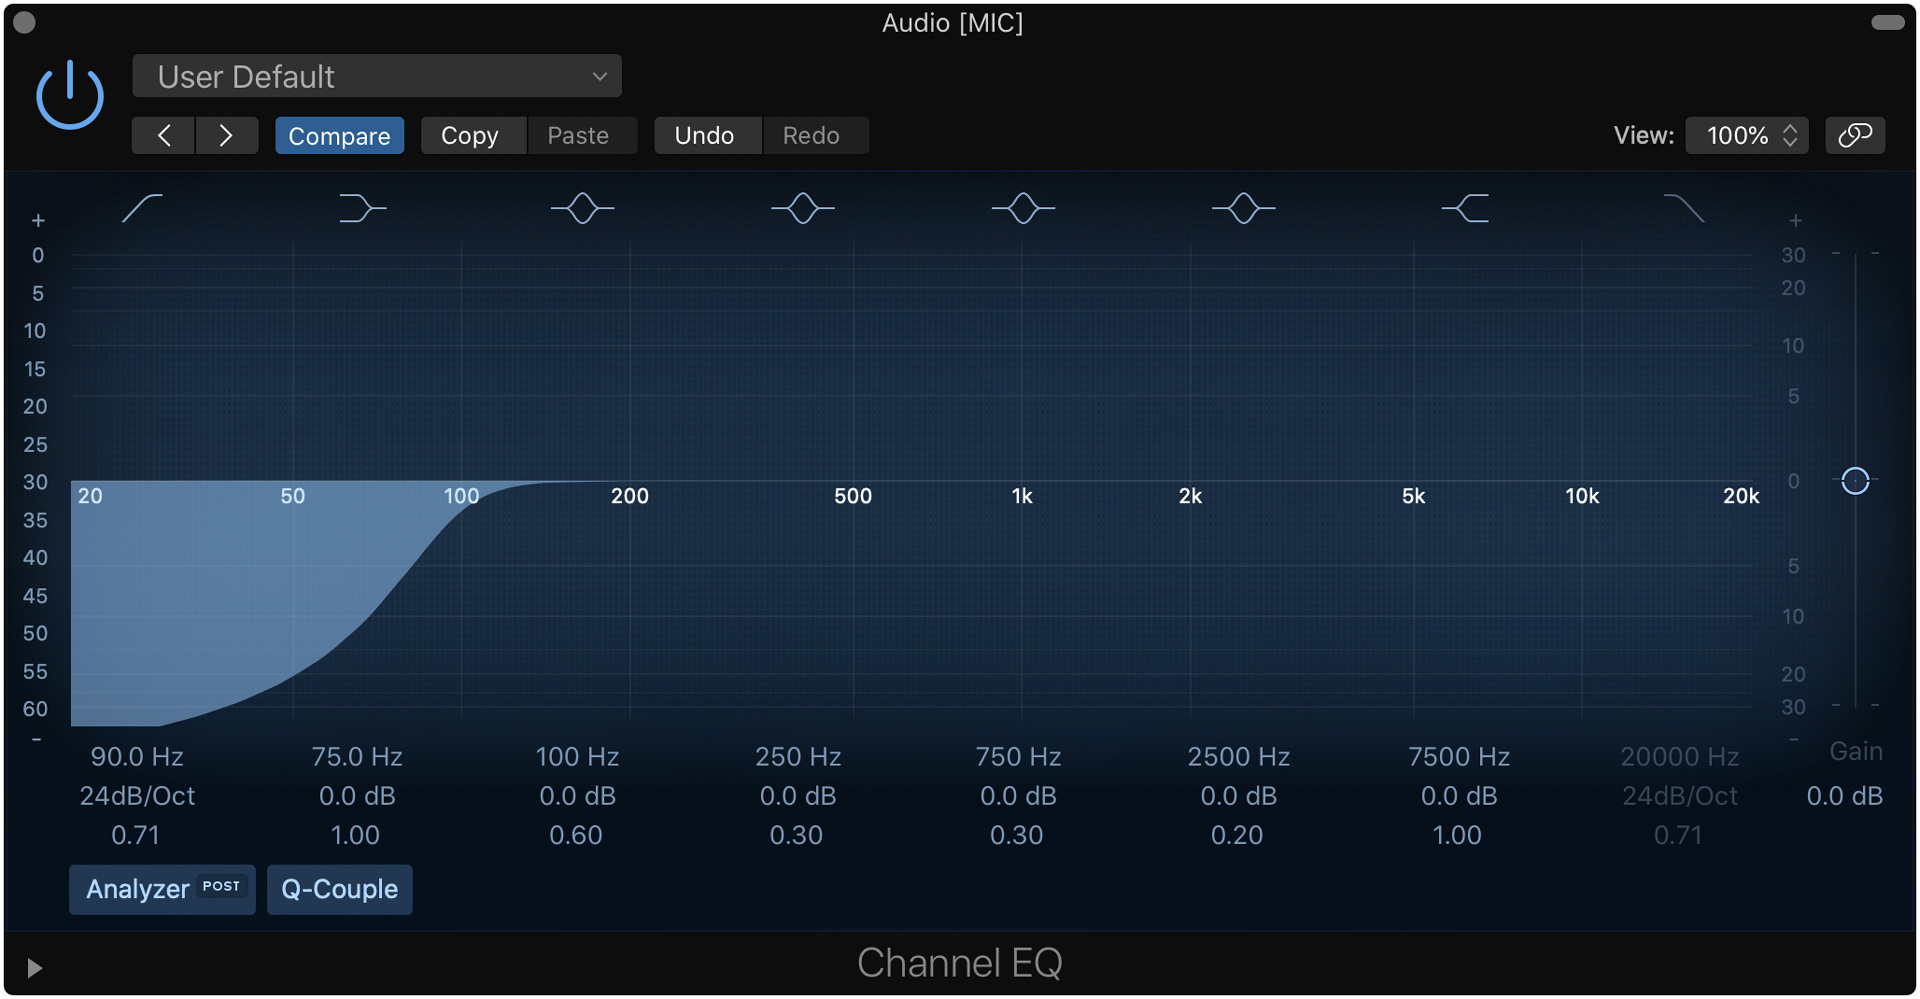
Channel EQ
The first instance of "Channel EQ" only has one purpose – to cut out unnecessary low frequencies. I'd recommend starting with a low-cut between 70-100 Hz depending on whether the singer is a male or female.
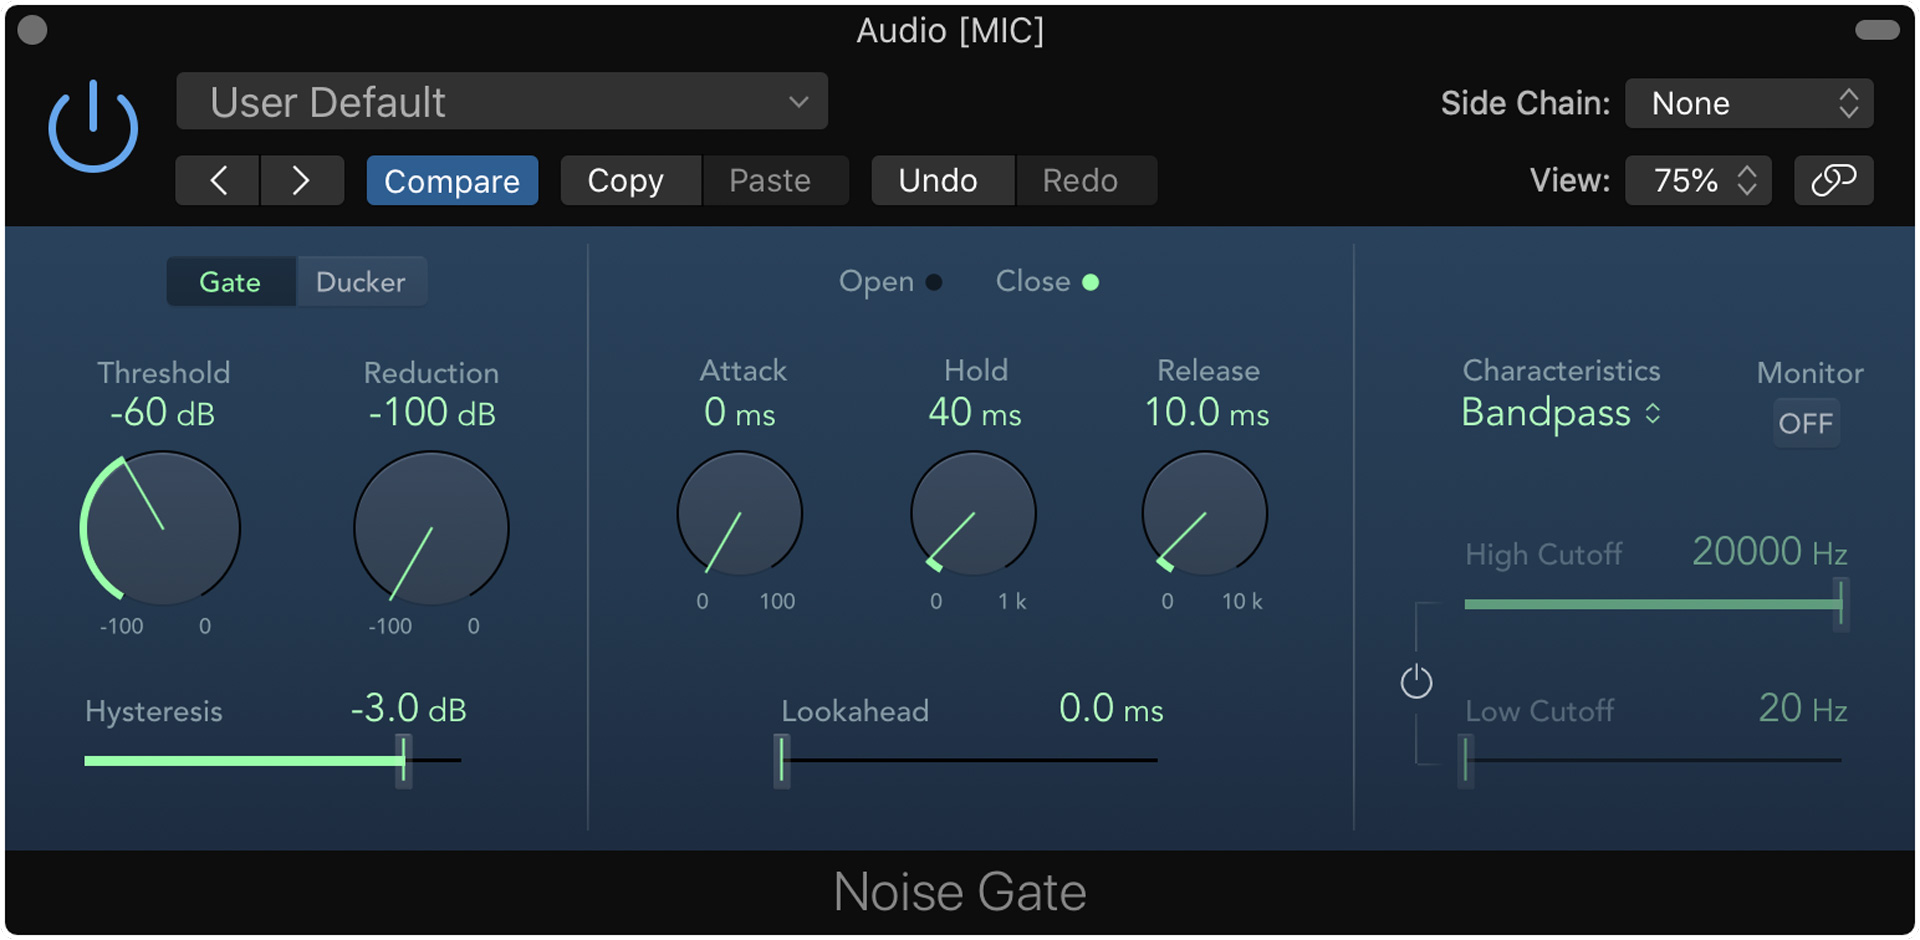
Noise Gate (Optional)
The "Noise Gate" plugin allows you to completely cut out any audio under a specific volume threshold. This can help clean up the incoming microphone signal, so I'd recommend experimenting with it – just make sure you don't set the threshold too high.
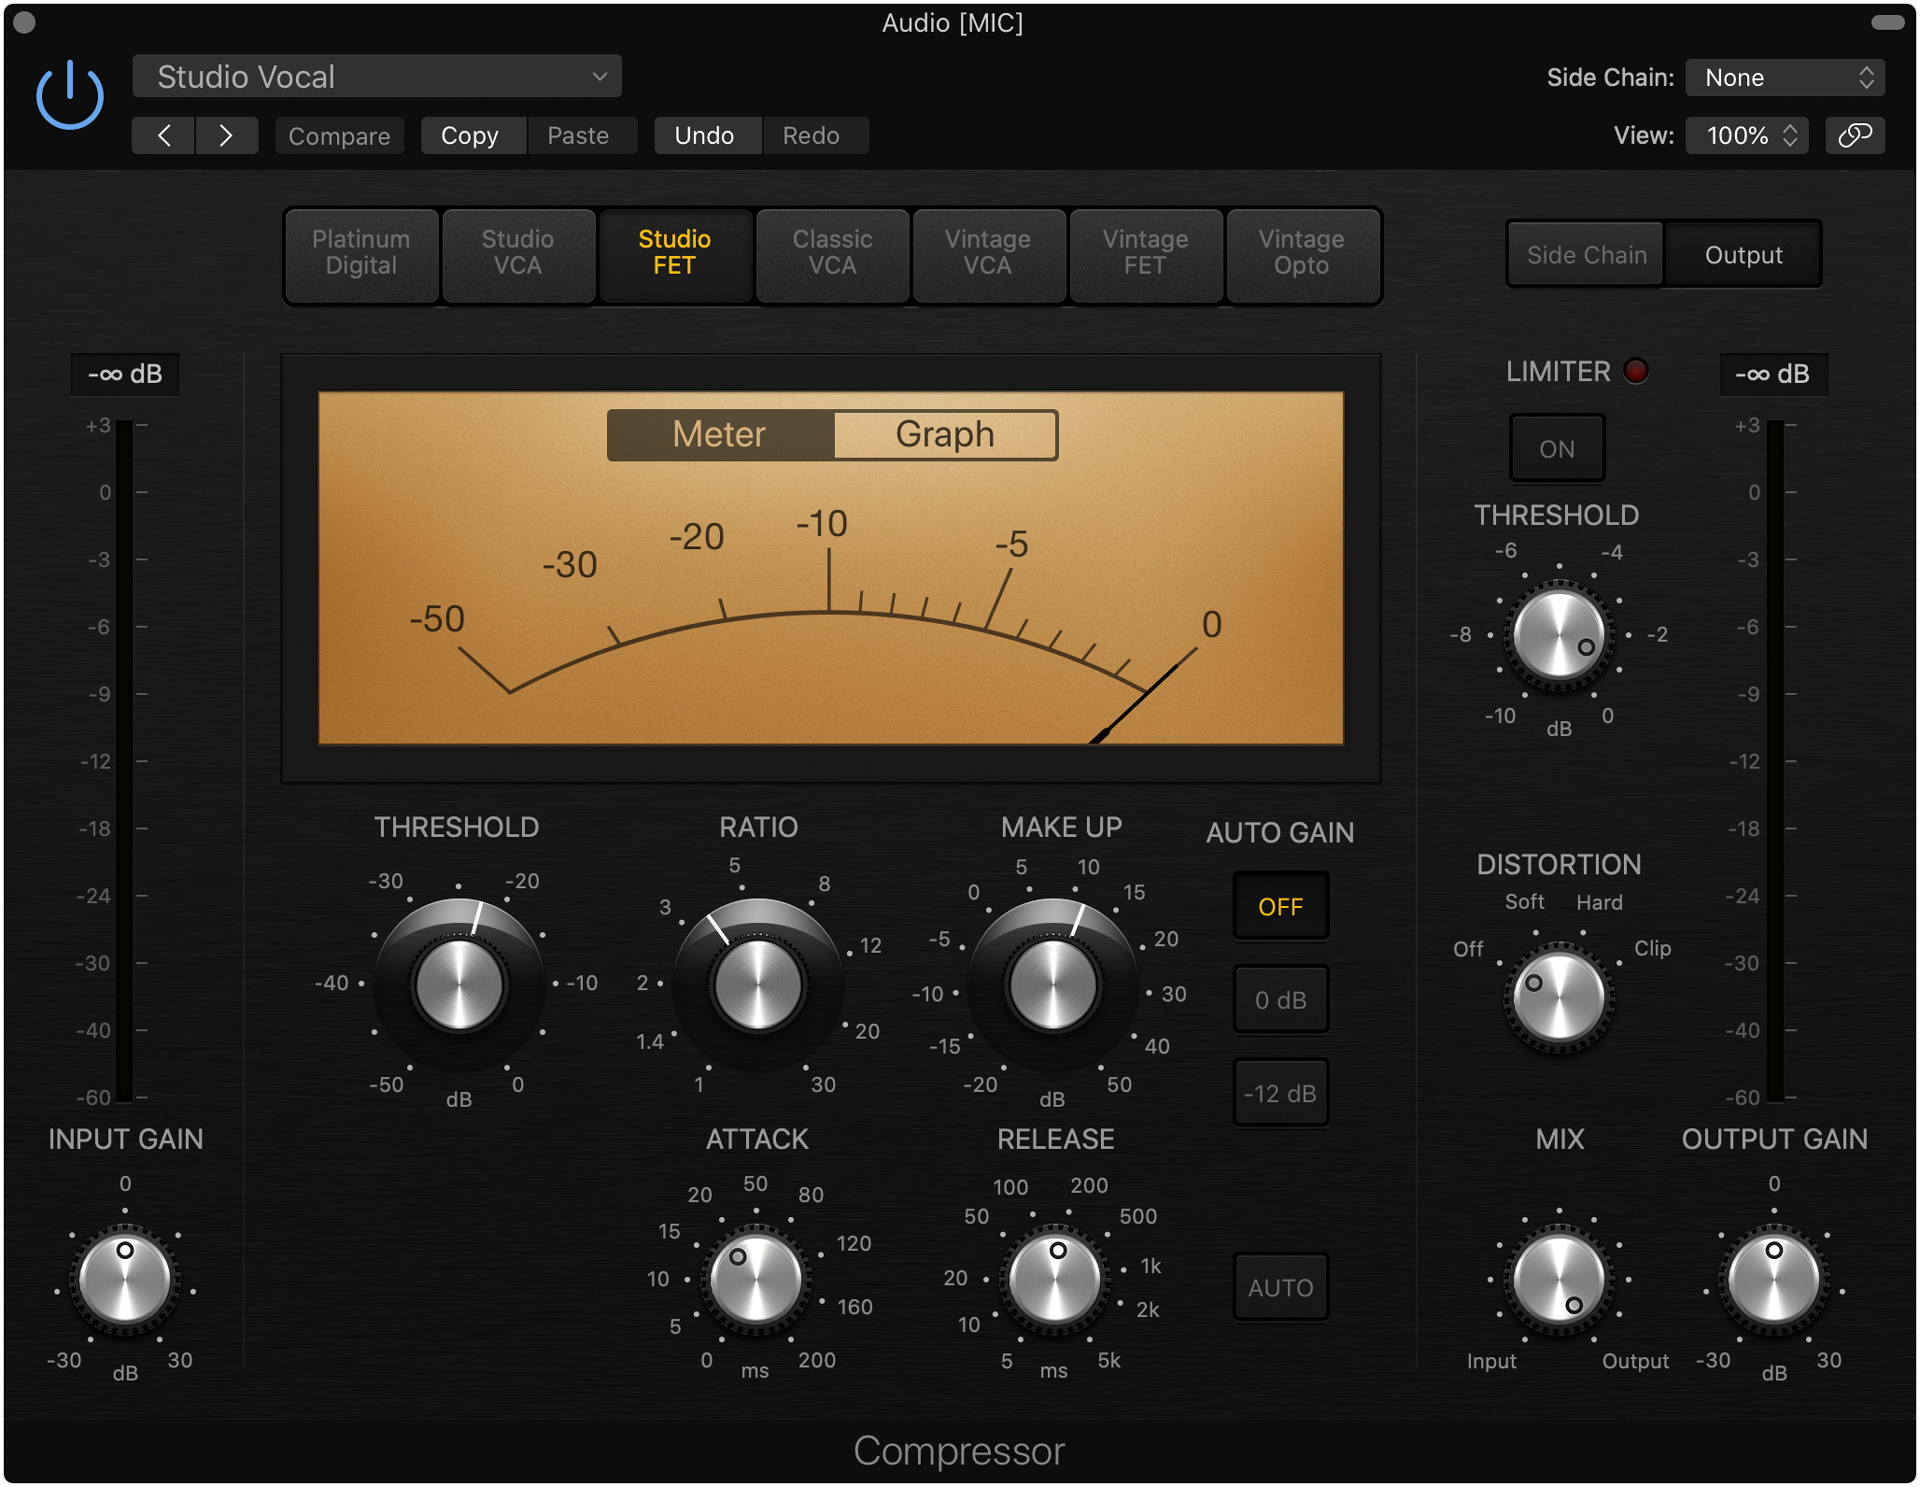
Compressor
The "Compressor" plugin allows you to reduce the dynamic range of an audio signal, and is often used for modern vocal production. I'd recommend starting with the "Studio Vocal" preset in MainStage's "Compressor" plugin with a gain reduction of 6-8 dB. To reduce gain, slowly turn up the "Threshold" knob until the visual meter peaks between -6 and -8 dB.
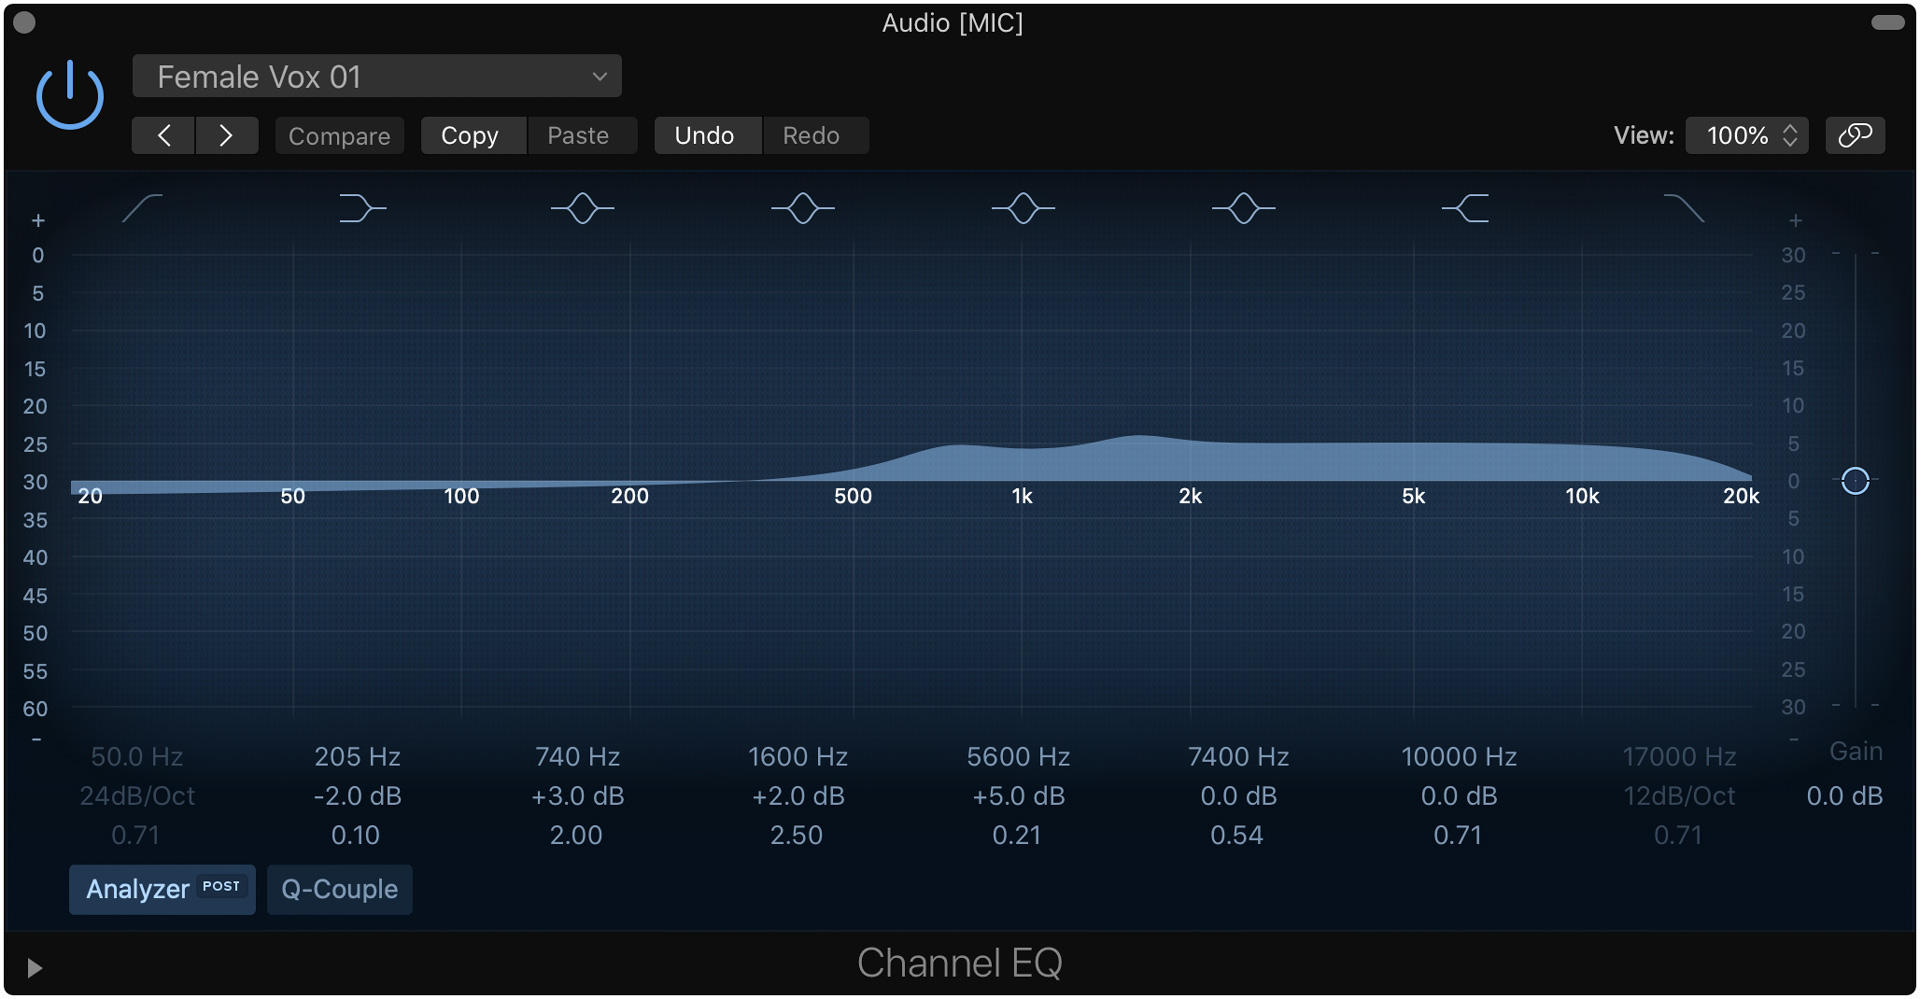
Channel EQ (optional)
The second instance of "Channel EQ" is for sweetening the audio signal to give it some character. This plugin is also optional, but I'd recommend choosing a MainStage preset that matches your signal source. For this example, I selected the "Female Vox" preset, which gives a slight boost to the high frequencies.
Setting Up a Piano Track
Now that the vocal channel strip is set up, let's create a piano channel strip. For this example, we'll just use a stock MainStage EXS24 piano sound. If you're doing a serious piano performance, I'd recommend picking up a high quality and lightweight virtual instrument plugin like Pianoteq 6.
For our use case, software instrument channel strips have a similar setup to the audio channel strip we created above. The output should be bypassed, and the ZOOM MIX and HP MIX auxiliary buses should be used to route audio.
Setting Up a Playback Track
Next, let's set up a prerecorded playback track we can sing and play along to. There a two ways to implement playback tracks into our online concert setup.
- Use MainStage's Playback plugin.
- Use MainStage to trigger an external playback app like Ableton Live.
To keep things simple, let's use MainStage's built-in Playback plugin for the purposes of this tutorial. While the Playback plugin has certain limitations, it should be good enough for most situations. If you are interested in learning how to integrate MainStage with Ableton Live for playback, please let me know and I will write a supplementary tutorial if there is enough demand.
Before we move on, ensure your audio file meets the requirements below.
- The audio file should be in a lossless format like WAV or AIFF.
- The audio file should have the sample rate as your MainStage concert. In most cases, the correct sample rate should be 44.1 kHz.
To create a playback track in MainStage, add a new software instrument channel strip and add a stereo instance of the "Playback" plugin. Next, unmap the channel strip's output and create two auxiliary buses to ZOOM MIX and HP MIX, and set them both to -6 dB.
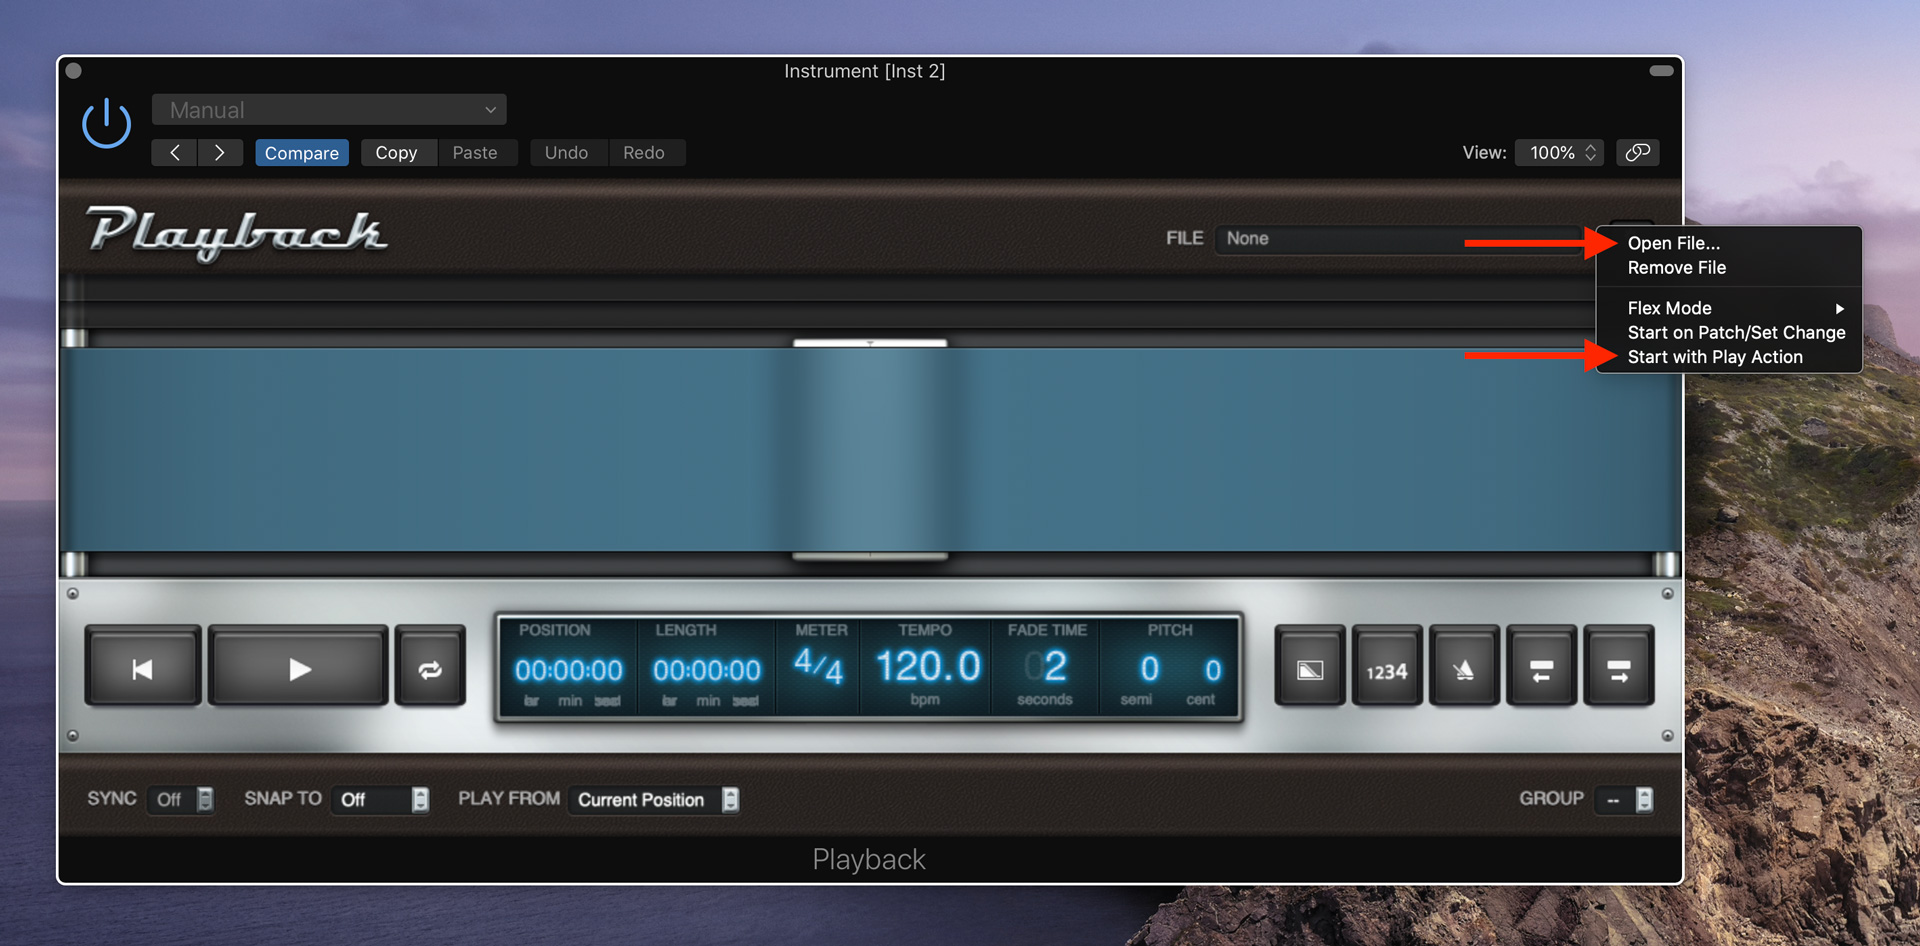
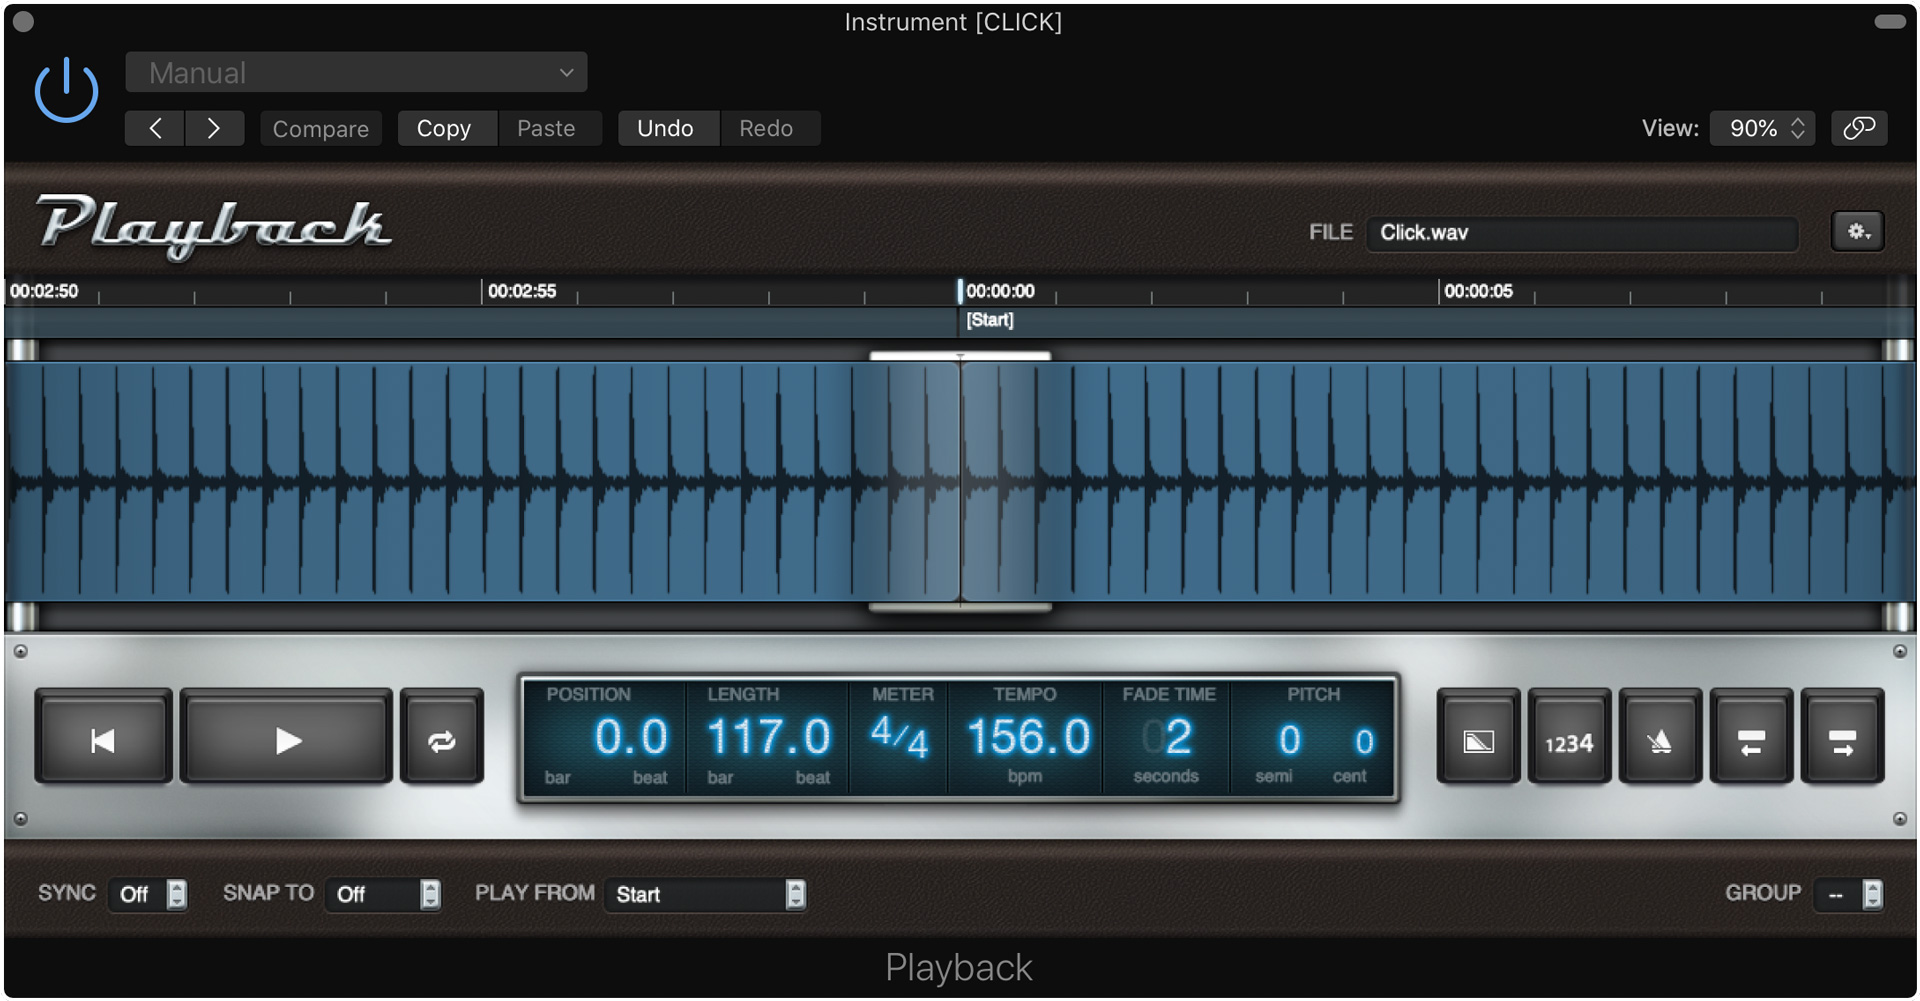
After you have initiated the Playback plugin, click on the gear icon in the top right and click "Open File" to load your audio file into the plugin. I'd recommend selecting "Start with Play Action" as well, which will let you start and stop playback with a MIDI controller or the space bar on your keyboard.
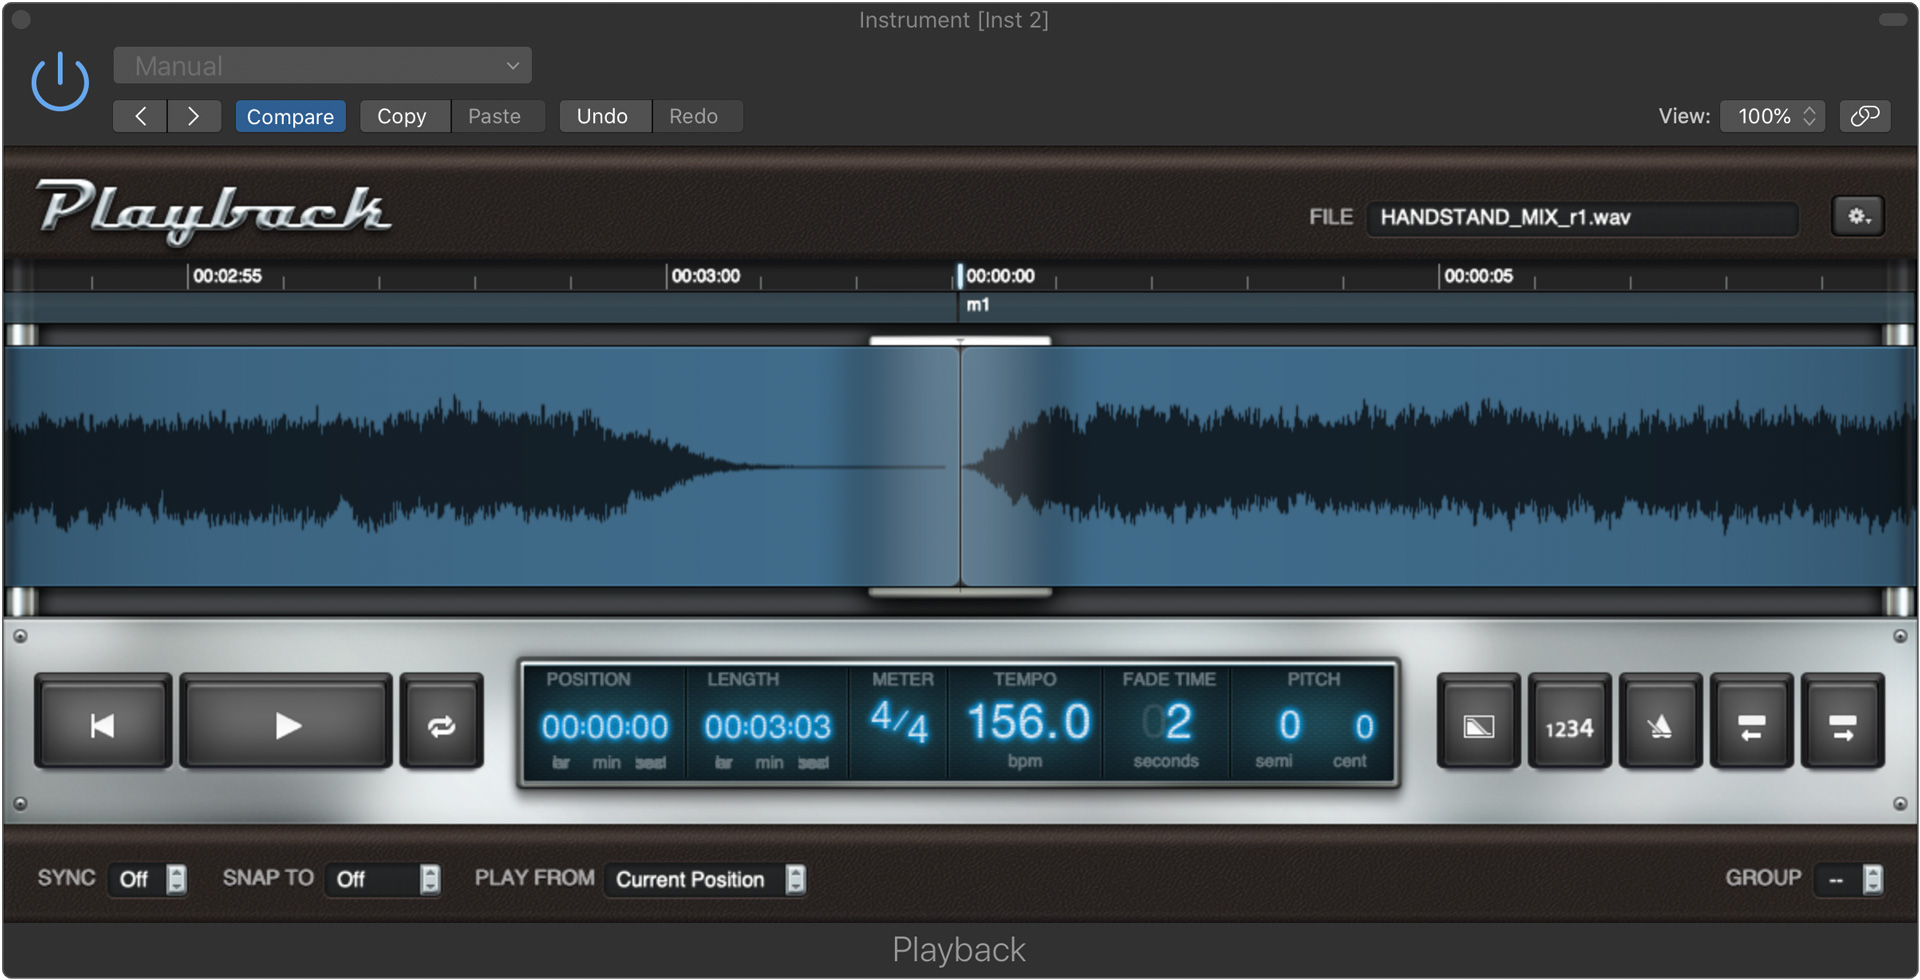
After the audio file has been imported, you should see the waveform in the Playback plugin. Depending on how your online concert is structured, you may want to change the "Play From" setting to "Start" instead of the default "Current Position". At this point, the Playback plugin is ready to go for our use case, but feel free to experiment with some other settings if you are so inclined.
Setting Up a Click Track (Optional)
Next, let's set up a click track to play along to. Depending on the type of music you're playing, a click track may not be necessary, but there is certainly a case to be made for click track usage for modern pop productions – especially if you want to sync up your concert with MIDI-triggered lighting effects!
Setting up a click track is pretty much identical to the playback track setup process. The only difference between the two is that the ZOOM MIX auxiliary send for the click track should be disabled because we don't want the audience to hear the click track unless you're performing a click quartet.
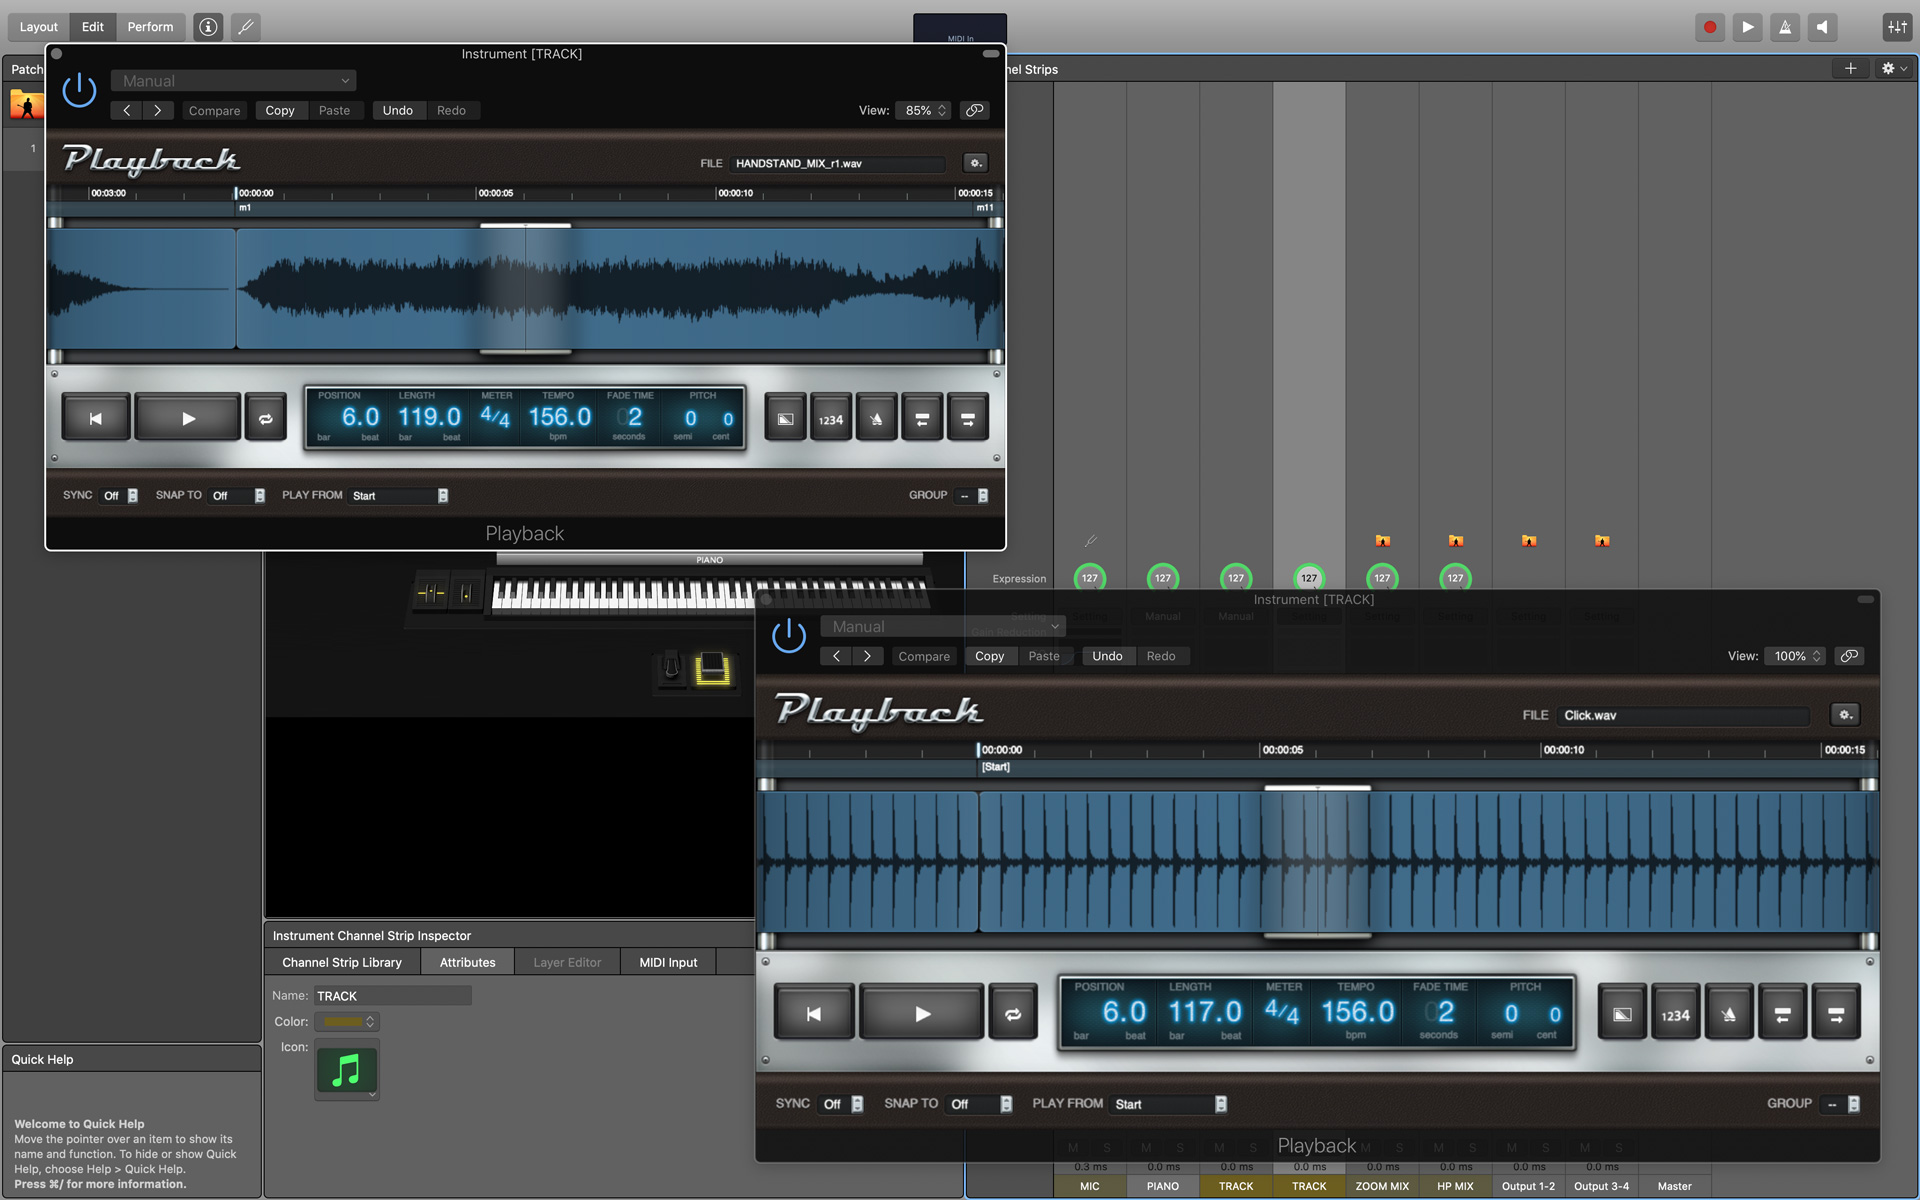
After the playback and click tracks are set up, pressing your space bar should trigger both audio files to play at the same time. As you can see in the screenshot below, both instance of the Playback plugin are in-sync at the same position.
Adding Reverb
Finally, let's add an additional auxiliary bus for reverb. To do this, simply add an auxiliary channel strip, assign a bus to it, and create sends from the channel strips to want to apply the reverb to.
As you can see in the screenshot below, I am using MainStage's built-in "AUMatrixReverb" for my reverb bus. Compared to MainStage's other reverb plugins, AUMatrixReverb is comparatively resource-efficient.
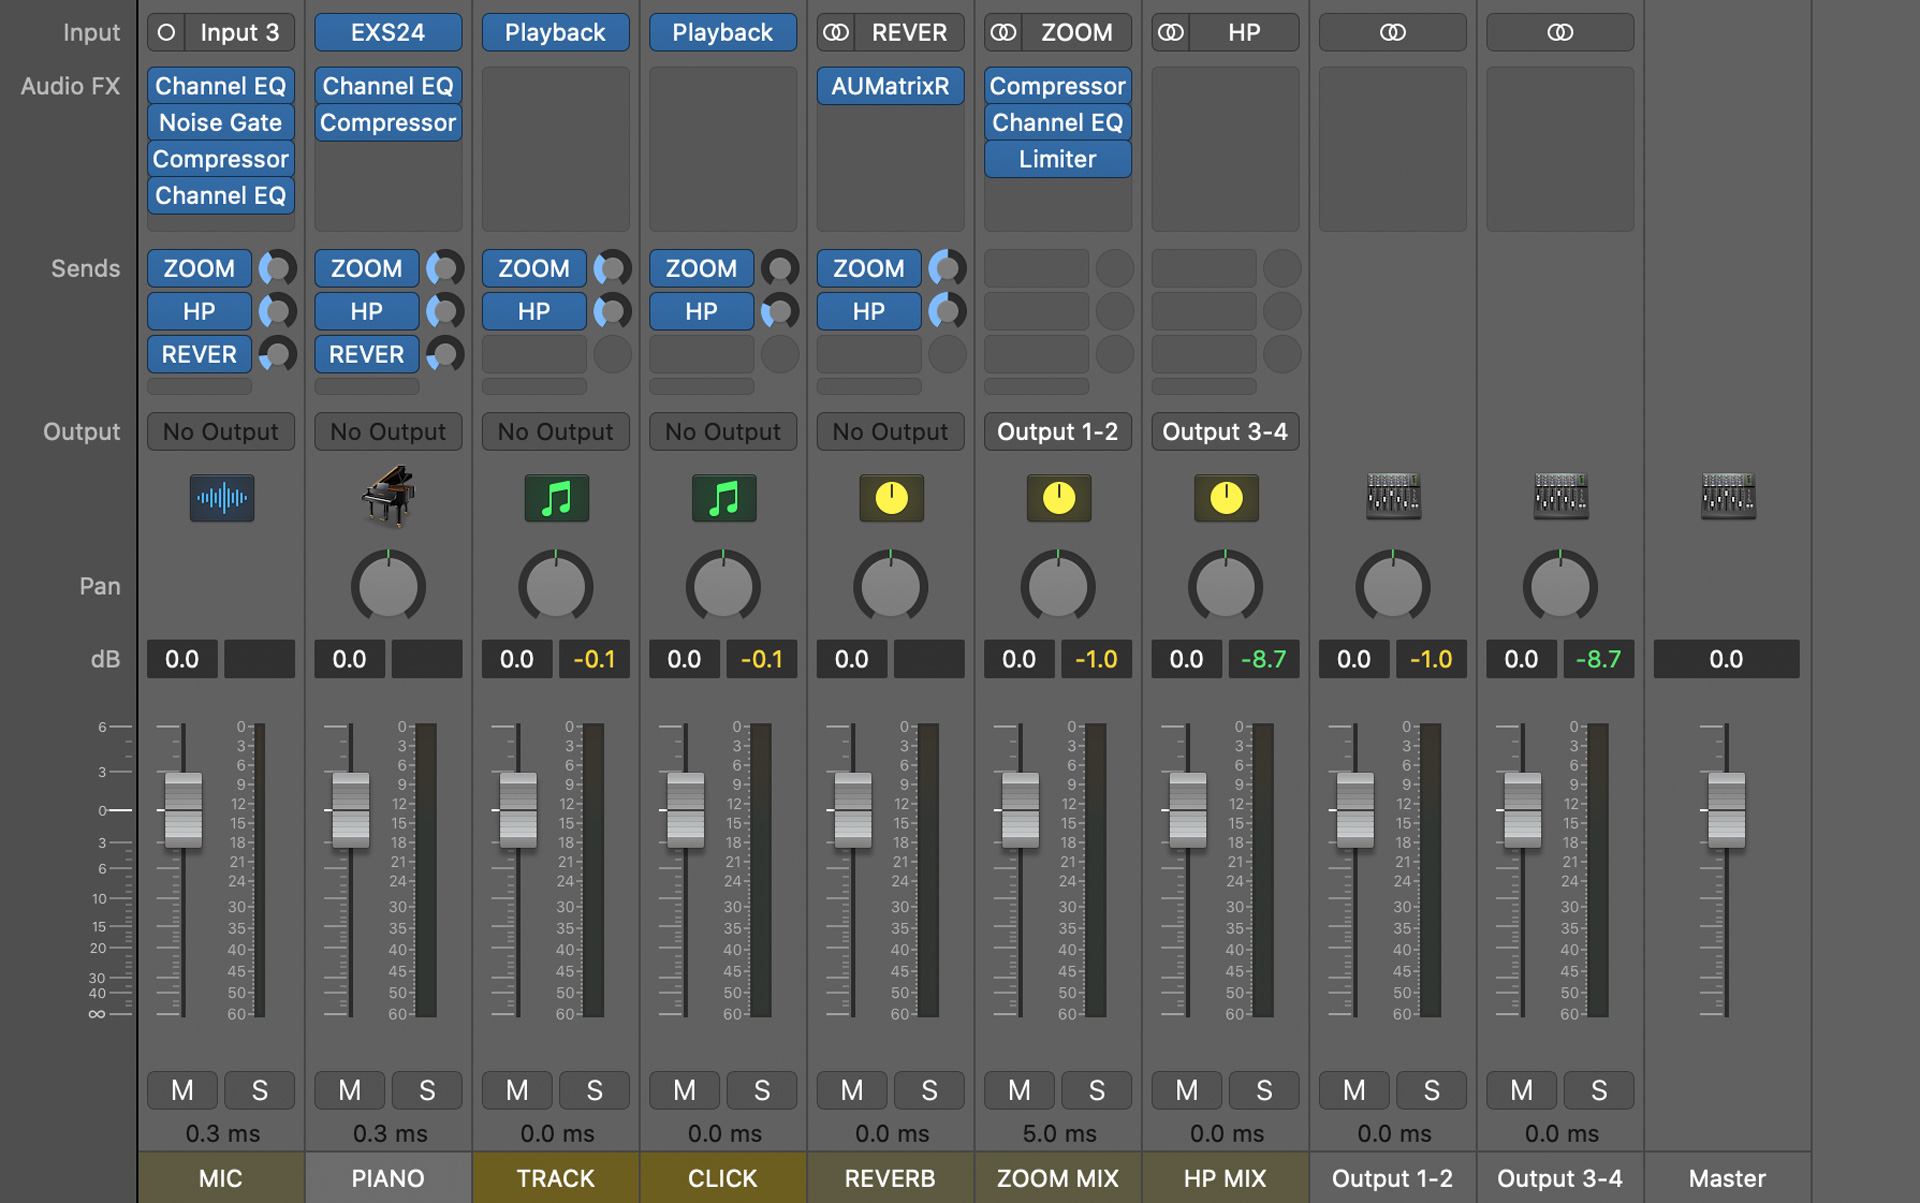
Take note that the output for the auxiliary reverb channel strip is also disabled. Similar to the other channel strips, the reverb should also use sends to ZOOM MIX and HP MIX. Lastly, you can see two additional sends on the MIC and PIANO channel strips going to the reverb channel strip. The track is not routed to the reverb because the audio file I am using already has reverb.
Mixing and Mastering
At this point, the core aspects of MainStage have been set up. The final step is to mix and master the concert. Currently, all of our auxiliary sends are set at -6 dB, which means you'll likely need to make some adjustments for your mix to sound right. Since we are summing together a number of tracks, let's treat -6 dB as our "zero". In other words, if one track needs to be louder, reduce the send levels of the other tracks. This will ensure your mix has enough dynamic headroom.
If you're listening through headphones, you can temporarily switch the output for ZOOM MIX to "Output 3-4" to craft a proper mix for your listeners. Be sure to mute the auxiliary bus for the mix you're not actively working on. Also, feel free to add additional effects plugins to your tracks if needed. As a rule of thumb, make sure your master output channels don't peak above -6 dB before adding mastering effects – EQ, compression, and limiting.
So, what is mastering? In the context of an online Zoom concert, I view mastering as additional processing to tailor audio for livestreaming purposes. In the screenshot below, you can see a plugin chain on the ZOOM MIX auxiliary bus – Compressor, Channel EQ, and Limiter.
Let's go over what these plugins do for my Zoom mix.
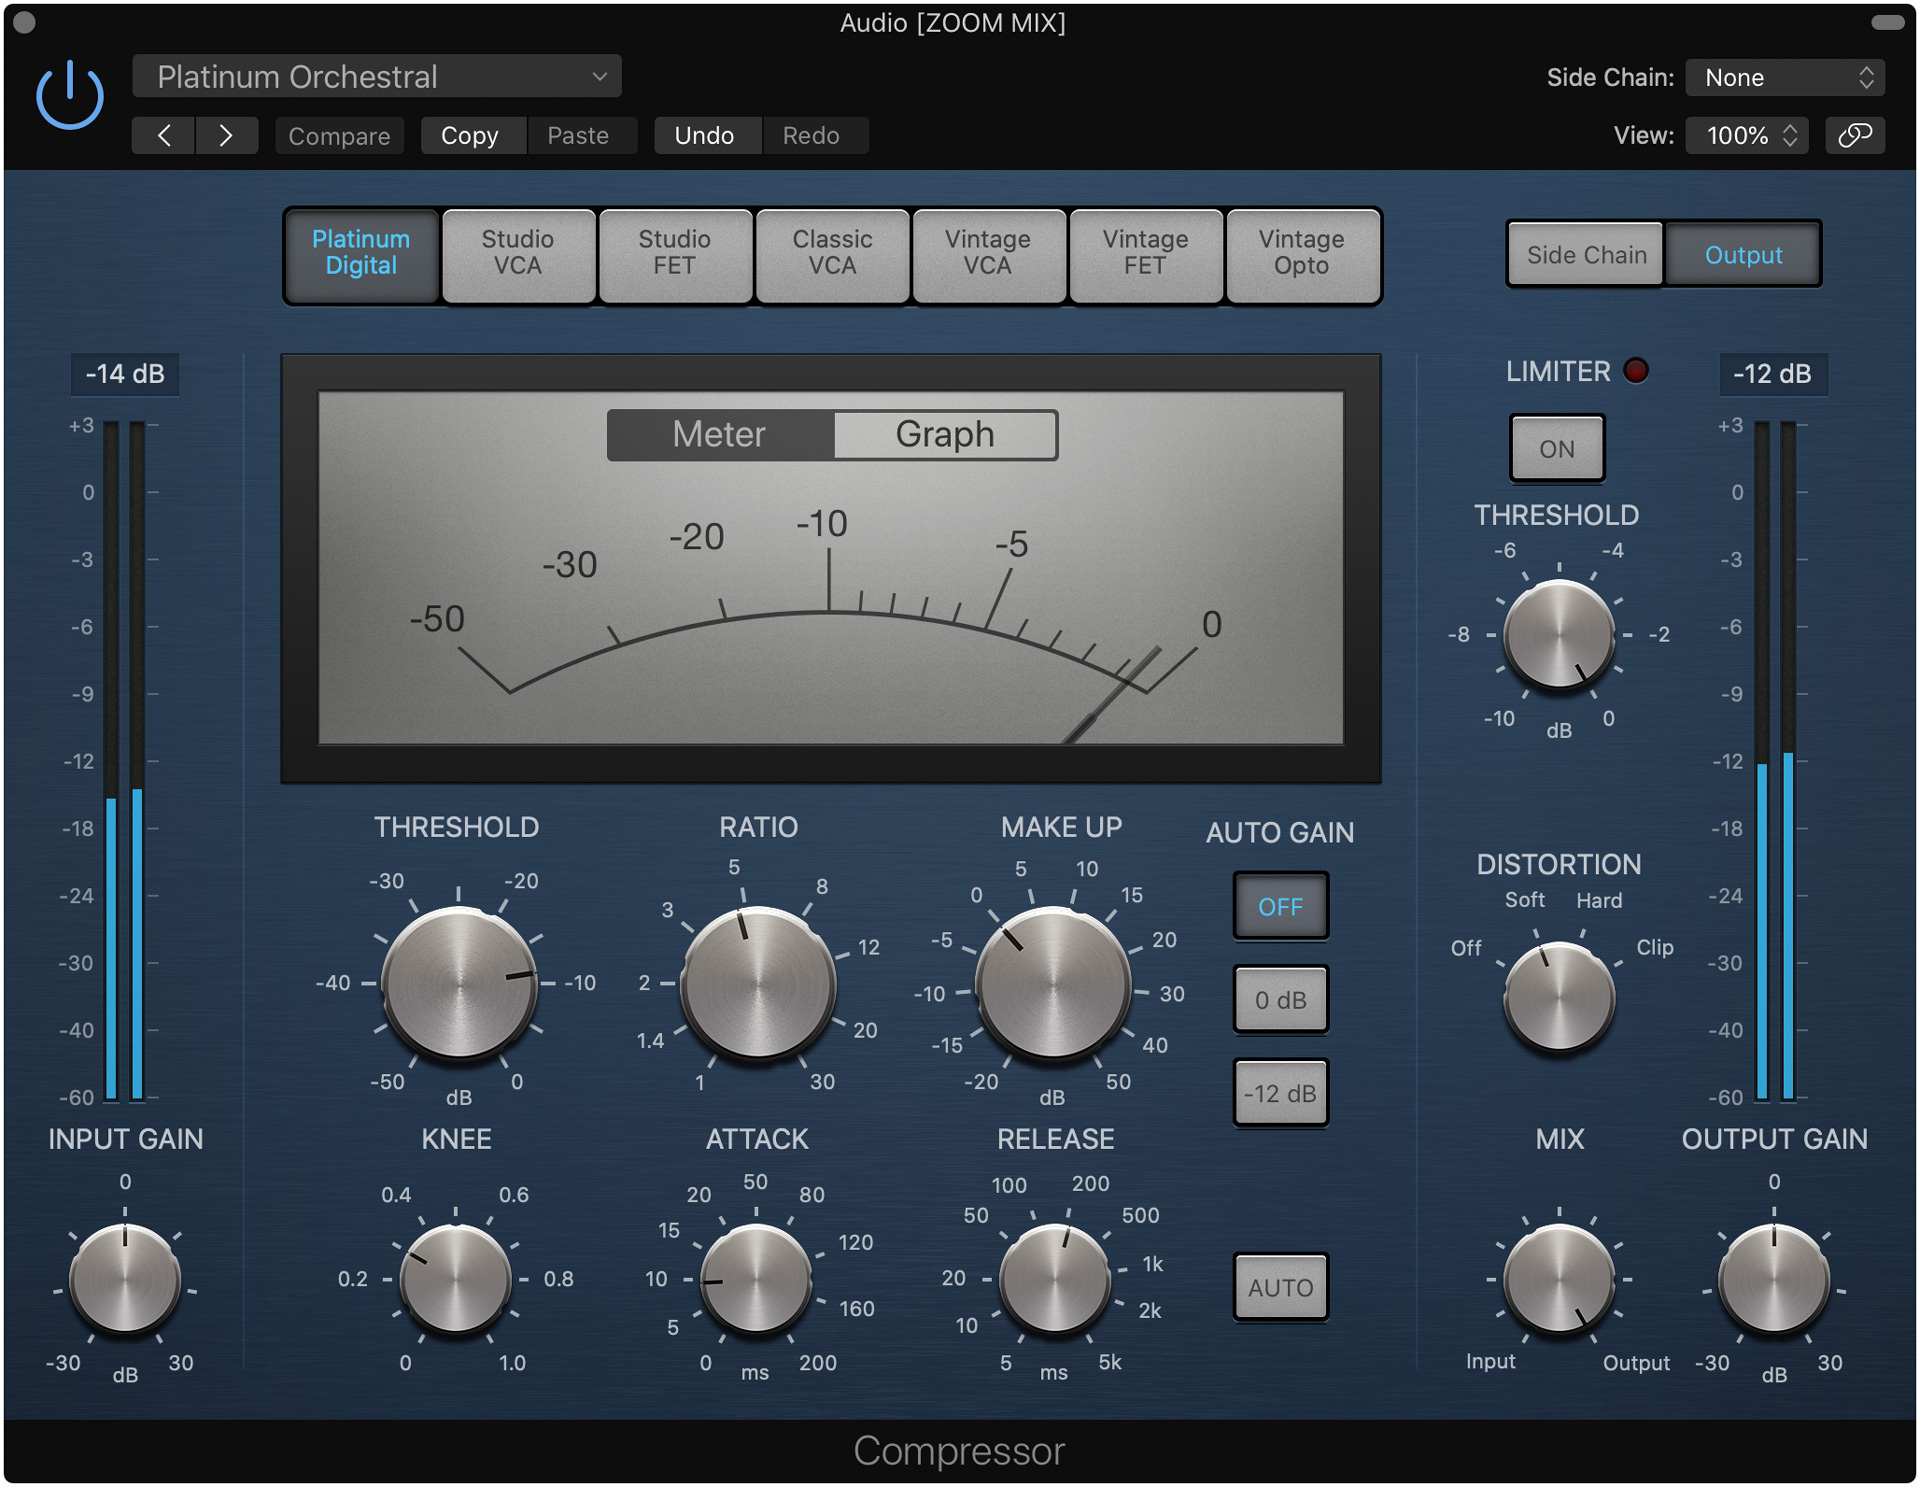
Mastering Compressor
I'm using a compressor with the "Platinu Orchestral" preset to take 1-2 dB off the peaks. This has the perceived effect of "gluing" the mix together.
Mastering EQ
I'm using an EQ with the "Final Mix - Pop" preset to add some "sparkle" to the track. I also added a low-cut filter at 60 Hz for two reasons.
- Since Zoom has limited streaming bandwidth, I often find that frequencies below 60 Hz are misrepresented or sound muddy anyway.
- Most people will be listening through their laptop speakers or consumer-grade headphones, which don't have great bass response.
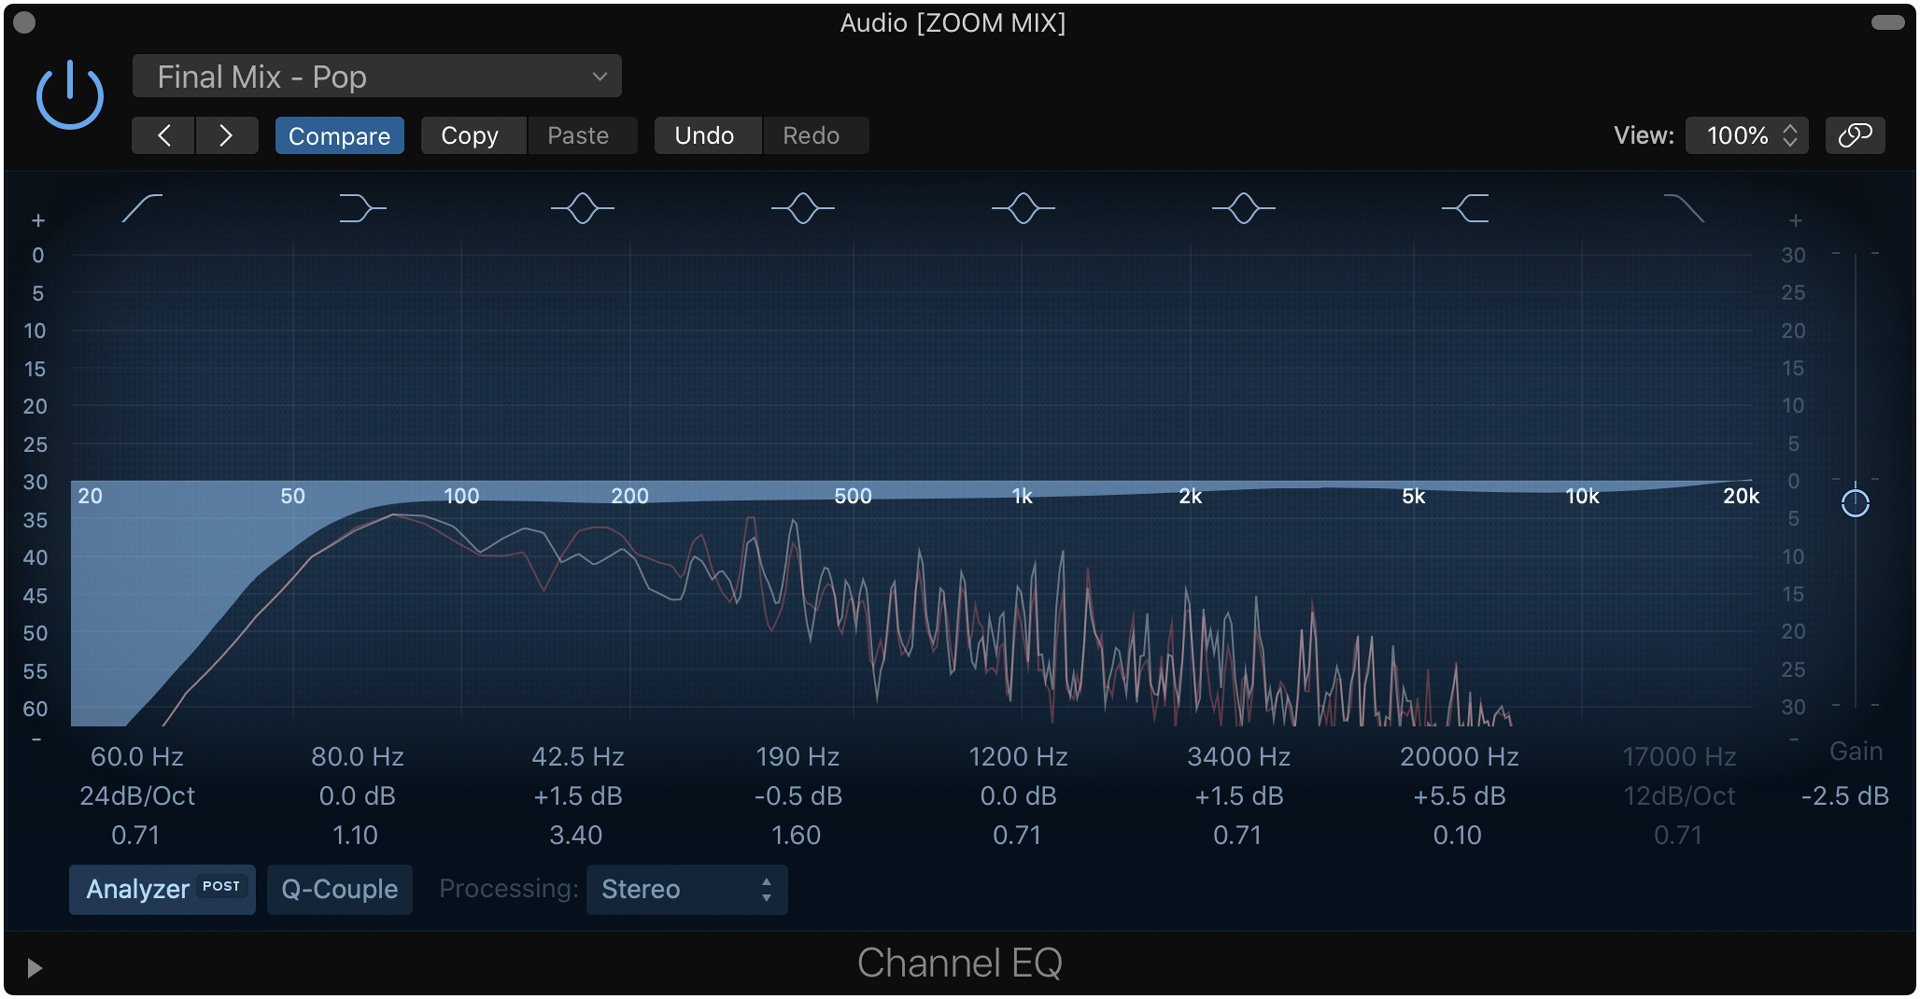
With the above two points in mind, it's best to cut out the low end completely to preserve streaming bandwidth for the rest of the frequency spectrum.
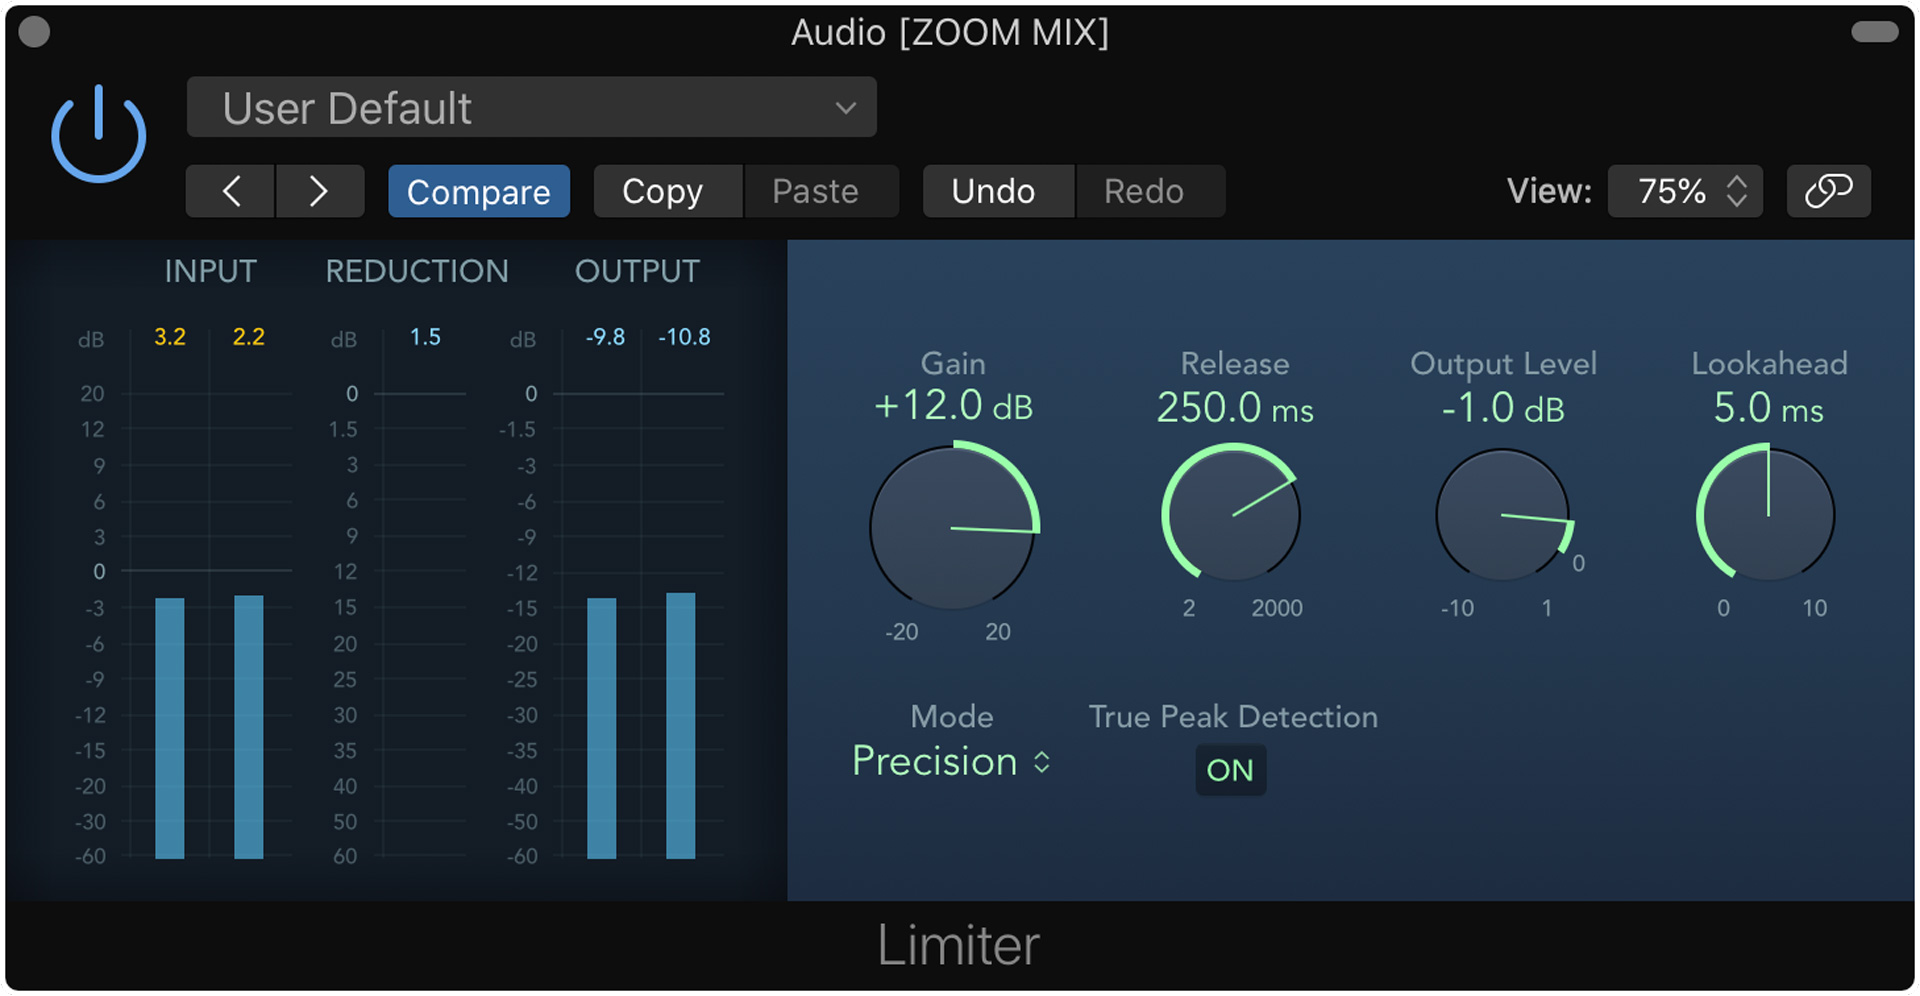
Mastering Limiter
Finally, I'm using a limiter to bring the mix up to "production volume". As you can see, my limiter is boosting gain by 12 dB with 1-2 dB of peak gain reduction.
Configuring Zoom
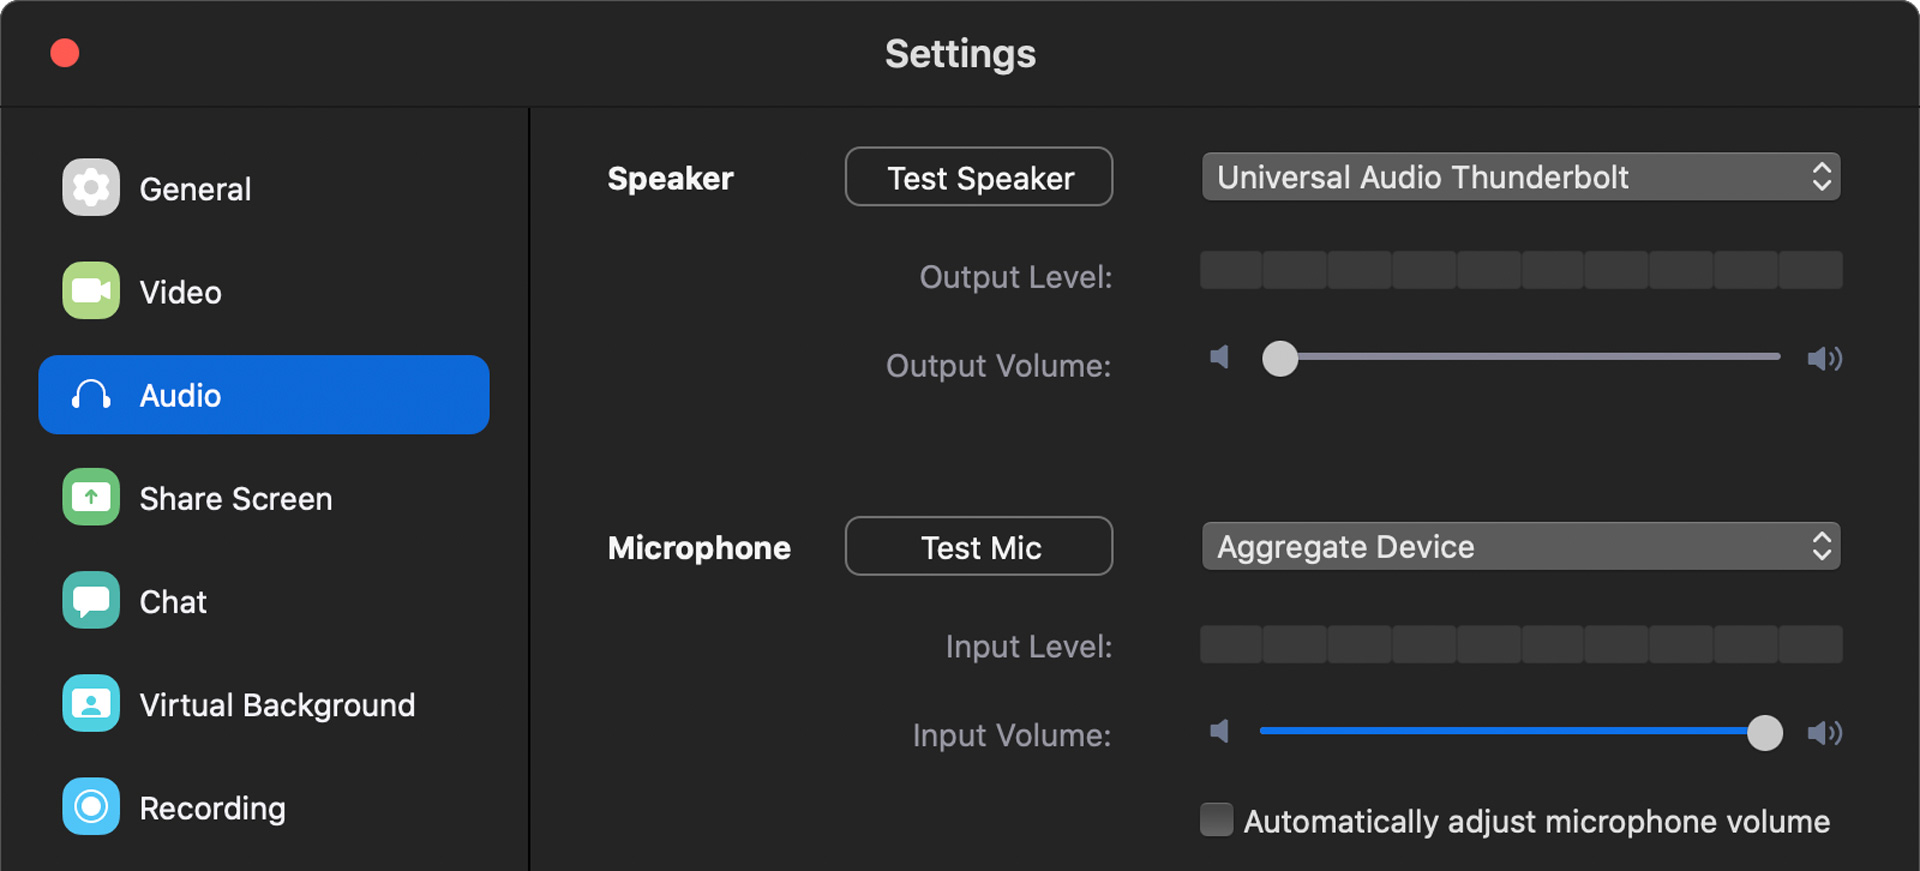
Alright, that was a lot of setup in MainStage! I promise the Zoom setup process is much easier. In Zoom preferences, navigate to the "Audio" tab and set the "microphone" device to your aggregate audio device, and make sure "automatically adjust microphone volume" is unchecked.
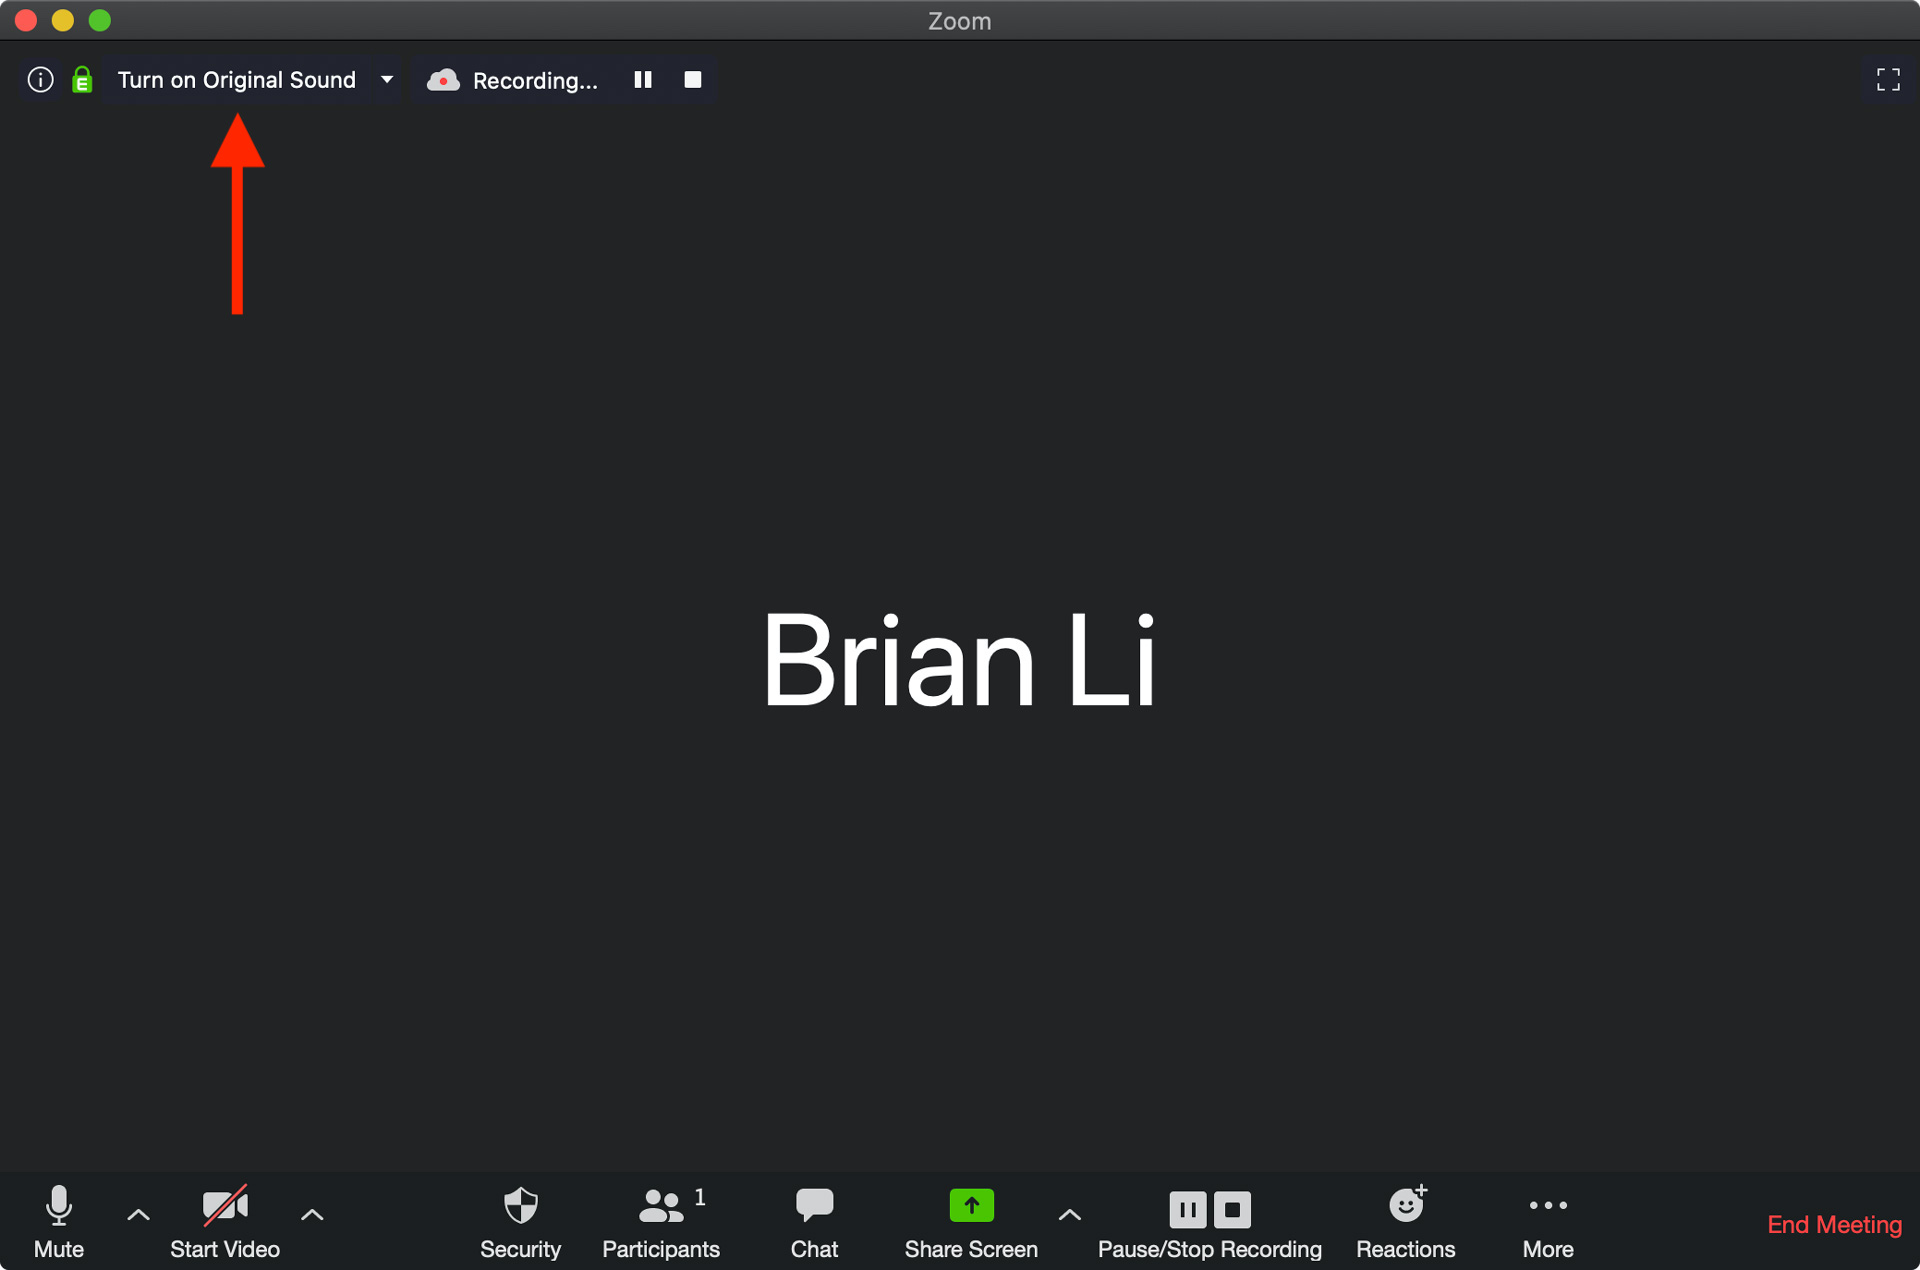
When you are in the Zoom call, be sure to click on "turn on original sound". After you click it, the button text will change to "turn off original sound". It can be a little confusing, so just remember that in order to get good sound, the button should read "turn off original sound". Turning on the original sound will bypass Zoom's echo cancellation and other audio processing features, which can cause sound degradation for our online concert use case.
That's it! Now you're ready to host your own online concert with Zoom. If you want to get an idea of the sound quality using this method, check out this audio file from a Zoom recording below. The piano in the track was played live, and the other instruments were part of the backing track. Keep in mind the audio quality while streaming is actually better than this recording.
Where to Go From Here
This setup serves as a good baseline for an online Zoom concert setup, but there is a lot of room to boost production quality even further.
Here are a few thoughts that come to mind.
- You can offload track playback to Ableton Live. This would allow you to build a more flexible playback system, automate effects in realtime, and trigger background lighting effects via MIDI.
- If you're using an audio interface with built-in DSP effects like the Universal Audio Arrow, you can set up vocal or instrumental monitoring with near-zero latency. This makes a huge difference for performers.
- You can use a live stream switcher with multiple cameras to make a more dynamic video feed for your audience to watch.
Conclusion
If you're serious about hosting amazing Zoom concerts, using MainStage with Loopback is a great way to do it! Utilizing MainStage as a performance and mixing layer allows you to use high quality virtual instruments, real-time audio processing plugins, and more. If you have any questions about this online Zoom concert setup, feel free to reach out to me on Twitter or send me an email.