In this tutorial, you’ll learn how to sample virtual software instruments with Auto Sampler in Apple MainStage and Logic Pro X. Auto Sampler allows you to recreate virtual instruments inside EXS24, MainStage’s native sampler plugin. Compared to other resource-heavy plugins like Native Instruments Kontakt and Spectrasonics Omnisphere, EXS24 offers a stripped-down experience that is perfect for live performance where system stability is critical.
Introduction to MainStage’s Auto Sampler
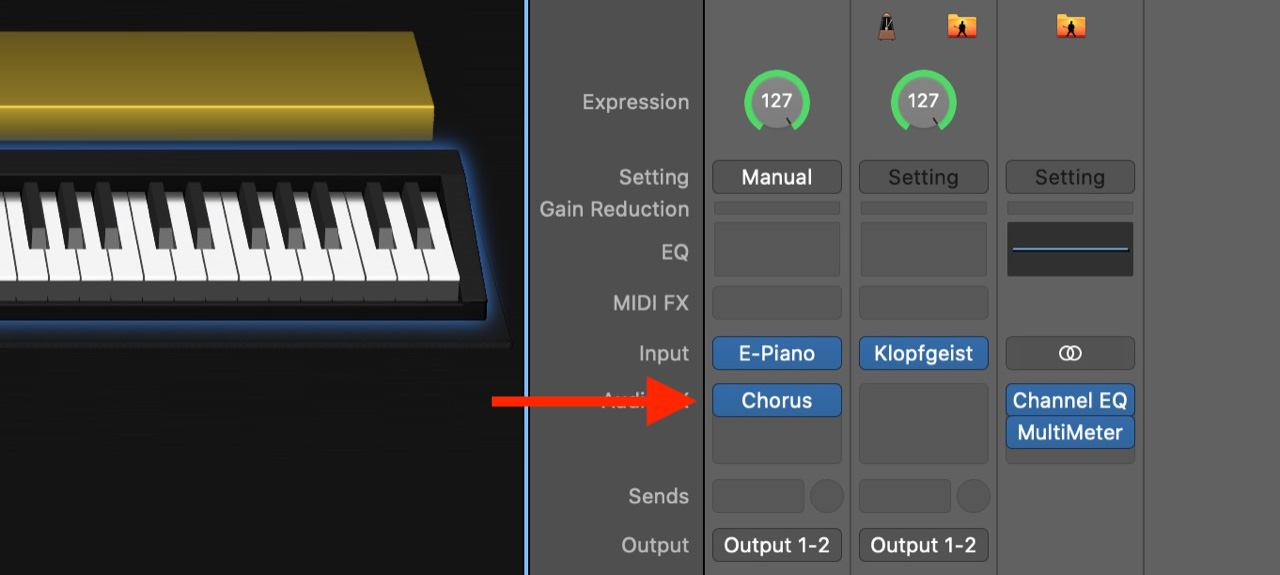
Different kinds of virtual instruments require different Auto Sampler settings, but there are a few general tips to keep in mind. Before starting the sampling process, be sure you remove all effects plugins from the instrument’s channel strip. The act of sampling immortalizes everything in the channel strip into audio files, so it’s crucial to capture the raw sound of the virtual instrument. Effects can always be added later, but they cannot always be removed with ease. If you are sampling a virtual instrument that has built-in effects, use your best judgment to determine if those should be turned off.
In the screenshot below, the Chorus plugin should be removed before starting the auto sampling process.
Now that we’ve removed all effects plugins from the channel strip, the next step is to add the Auto Sampler plugin to the channel strip. The Auto Sampler plugin can be found under Audio FX -> Utility -> Auto Sampler.
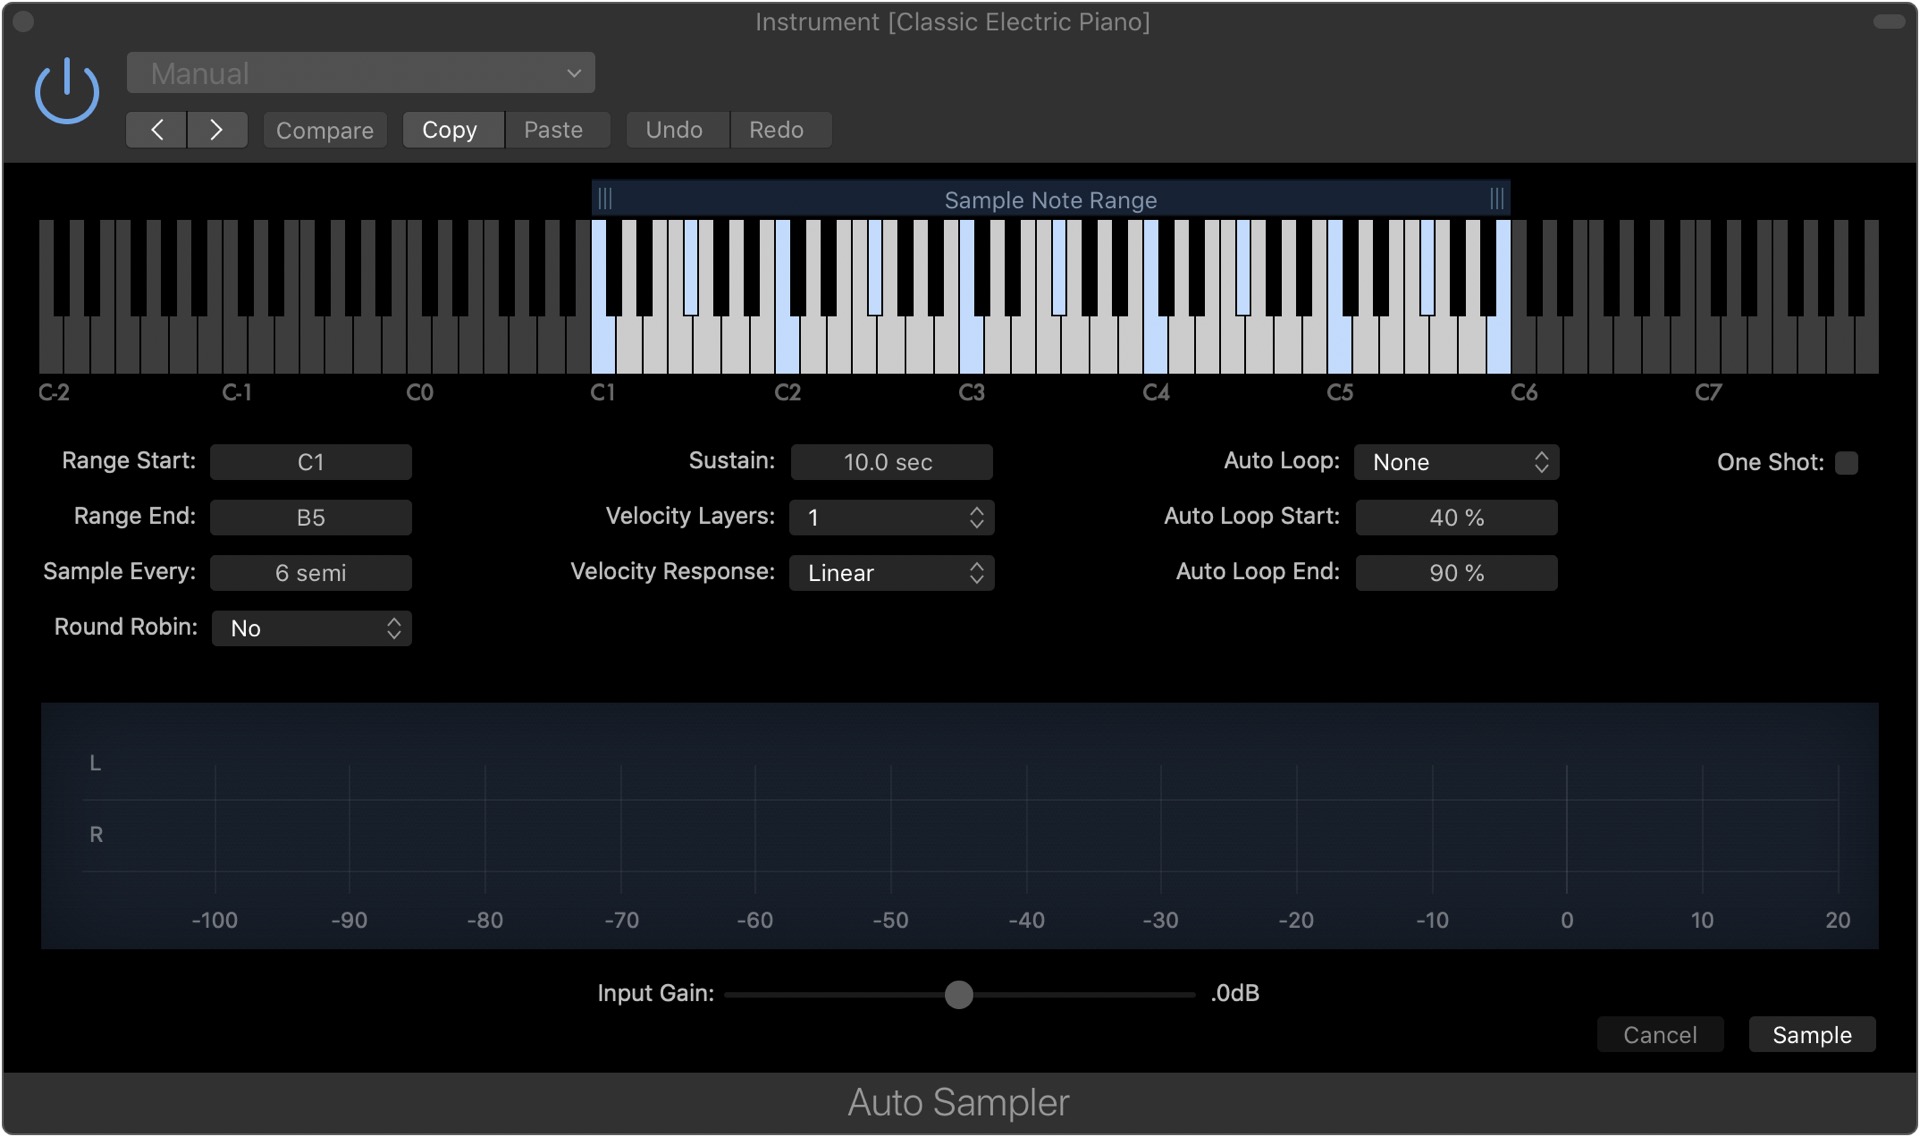
After adding the Auto Sampler plugin, you’ll see the graphical interface below. In this next section, we’ll go over the various settings in the Auto Sampler plugin, and then discuss how to configure the plugin to auto sample different kinds of virtual instruments.
Range Start/End
The range start and range end settings specify Auto Sampler’s sampling range. In most cases, I’d recommend setting the range from C-2 to C8 unless you are certain some part of the range is not needed.
Sample Every
This setting specifies the distance in semitones (half steps) between each sampled note. For example, if you select six semitones, the sampling pattern would be something like C-2, F-2#, C-1, F#-1, etc. In this situation, notes between C and F## will be pitch-shifted accordingly.
While it’s technically “best” to sample every semitone, the resulting file size of the instrument, due to the number of samples, could be unwieldly. For example, sampling every two semitones versus every semitone would result in a 50% file size reduction.
With that said, there are situations where sampling every semitone is necessary. For example, many percussion virtual instruments have a unique sound on every key. For virtual instruments that have “same sound” on each key (piano, strings, pads, etc.), sampling every 3-4 semitones is typically a good compromise between sound quality and file size
Round Robin
In the real world, acoustic instruments are dynamic. Plucking a violin string five times will result in a slightly different sound each time. Engineers take this into account when creating virtual instruments. Instead of recording a single sample of the sound source, they may record three or four samples, and program the sampler to play a different sample each time a key is played.
If you’re auto sampling a virtual instrument with round robin, you can set Auto Sampler to replicate the round robin design with up to eight samples per note.
Sustain
The sustain setting specifies how long Auto Sampler will hold a note before releasing it. It’s important to capture the entire “tail” of percussive audio samples (keyboards, percussion, pizzicato strings, etc.), so it’s best to set the sustain time liberablly. The default setting of 10 seconds is a good start, but feel free to increase the sustain time if necessary.
Velocity Layers
A piano responds differently depending on how hard you strike the key. This difference in response is what virtual instruments try to capture with velocity layers. In general, a virtual instrument with more velocity layers tend to feel more “real”. For example, Synthogy’s Ivory II piano virtual instrument has up to 18 velocity layers split across 128 MIDI values (0-127).
When you’re sampling a virtual instrument, it’s important to find a good compromise between the number of velocity layers and file size. For live performance, somewhere between four to six layers is a good start.
Velocity Response
MIDI has a range of 128 values (0-127), and this applies to velocity response for virtual instruments as well. Auto Sampler’s velocity response setting specifies the ranges for each velocity layer. If you are sampling two velocity layers, you could have the following settings
- Layer #1 (0-63)
- Layer #2 (64-127)
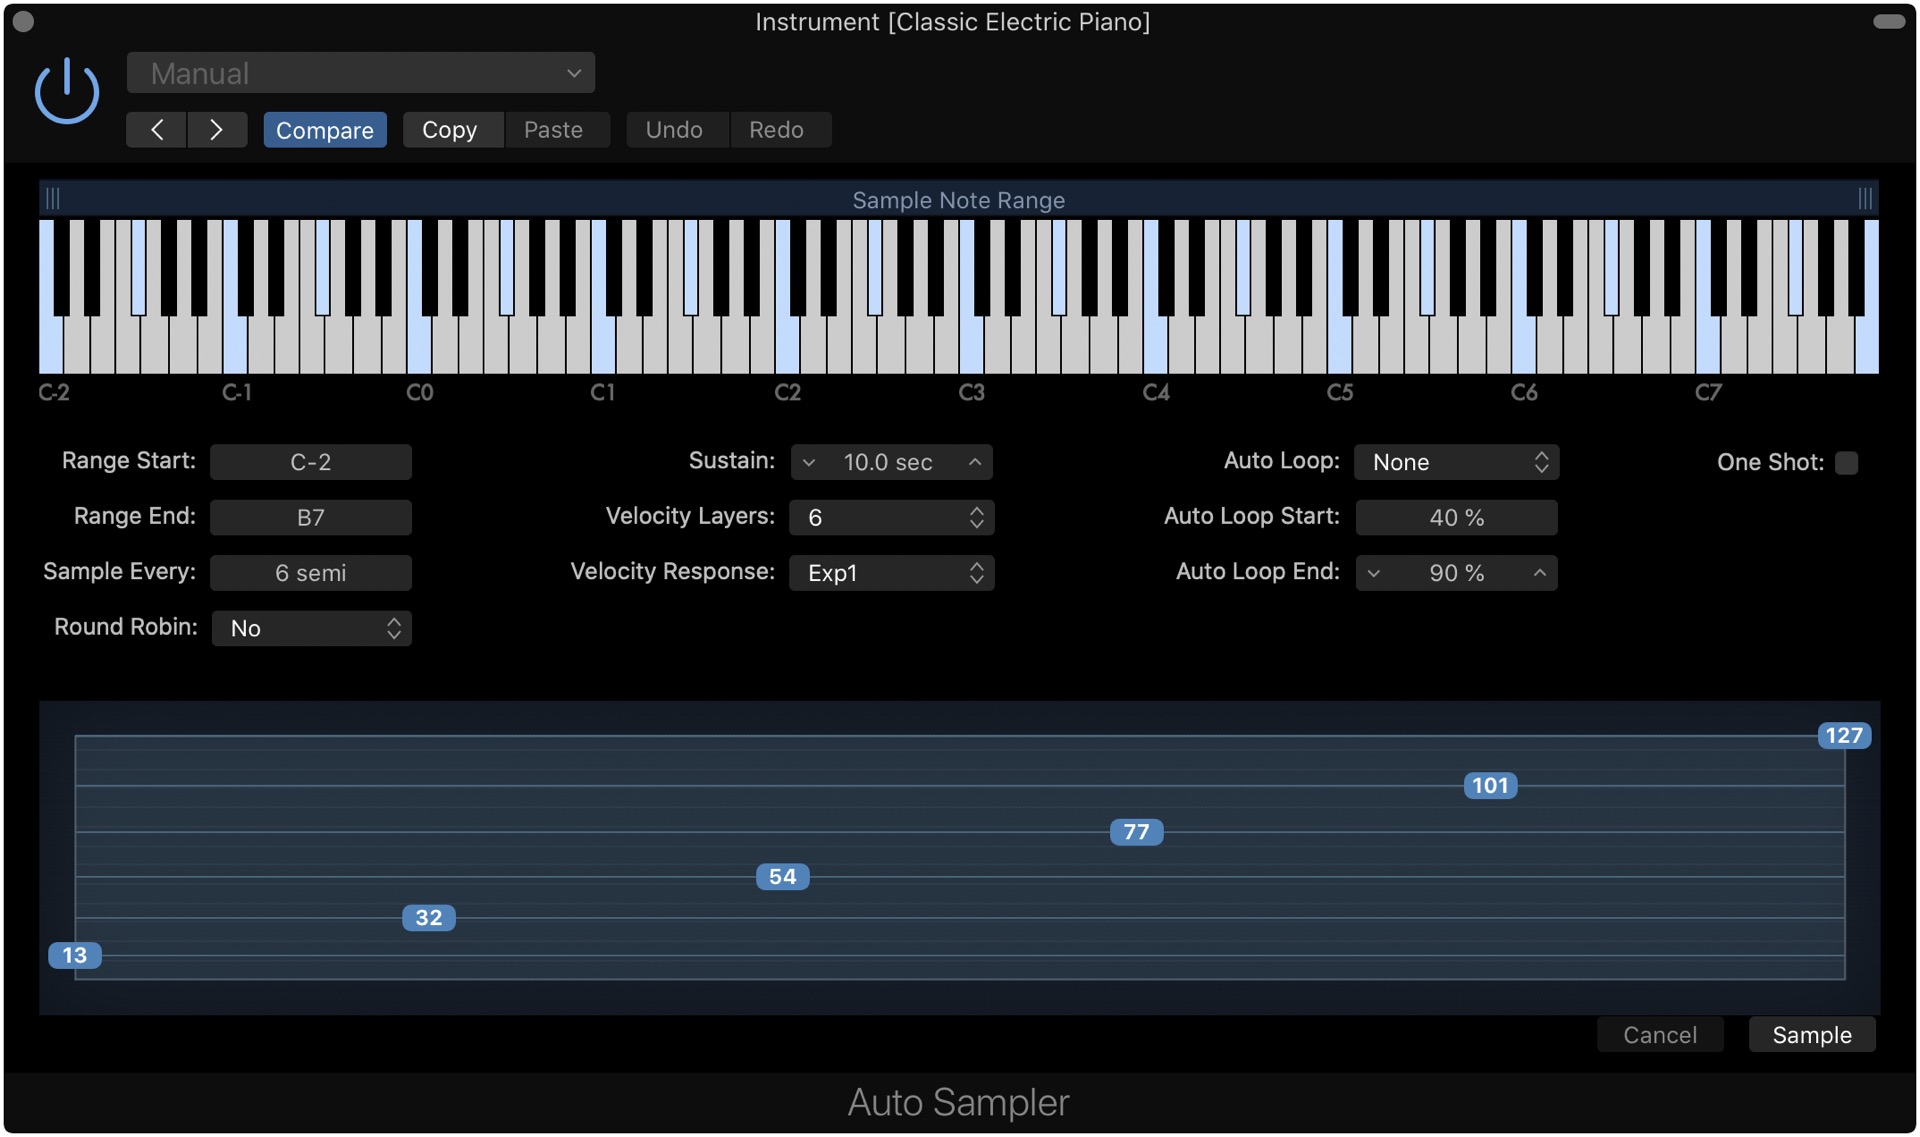
Auto Sampler offers a variety of default velocity response curves - Linear, Log1, Log2, Log3, Exp1, Exp2, Exp3. There is also a custom option, which allows you to configue specific velocity layers.
The screenshot below shows six velocity layers with the Exp1 velocity response. The velocity layers are 0-12, 13-31, 32-53, 54-76, 77-100, and 101-127.
In order to select a proper velocity response, you should first check if the virtual instrument you are sampling has predefined velocity layers. For example, the Kontakt sampler has a “mapping editor” page that shows the instrument’s velocity layers and ranges. If you are able to find the velocity ranges for the virtual instrument you are sampling, you should reproduce the settings in Auto Sampler. If you are unable to find the necessary information, go ahead and sample the instrument with a few velocity response settings to determine which one feels the most natural to play.
Auto Loop
Auto Sampler’s auto loop feature is useful for strings, pads, and other sustained instruments. You can choose between five auto looping modes - search, search with xfade, search with reverse xfade, penrose machine, and bidirectional. Personally speaking, I’ve always used the penrose machine mode, so I’d suggest starting with that option, and experimenting with the other options if needed.
Auto Loop Start/End
The auto loop start and auto loop end settings specify the looping range for an audio sample. If you set the loop start to 20% and loop end to 80% for a 10 second sample, the loop will start two seconds in and end eight seconds in. The exact loop range depends on the instrument being sampled, but in general, you’ll want to maximize the loop range without overlapping with the sample’s attack and decay. I typically use 30/70 for the start and end point, respectively.
One Shot
The one shot setting should be used when sampling an instrument where the audio sample should play in full even if the note is released. This setting is useful for sampling drums, percussion, and sound effects.
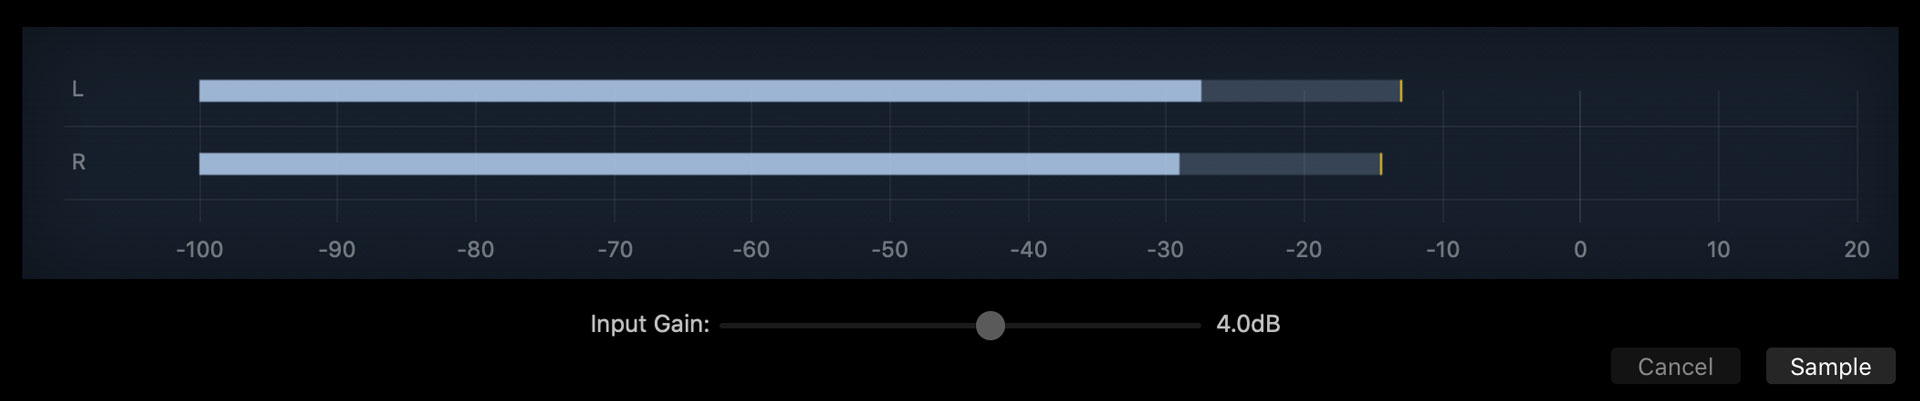
Input Gain
When sampling a virtual instrument, it’s important to set the correct input gain so the loudest samples peak around -6 dB. This ensures the instrument will have plenty of headroom. If the incoming signal is too soft, you can increase the input gain. Similarly, if the instrument is too loud, you can turn down the input gain to ensure peaks do not cross -6 dB.
How to Use Auto Sampler to Sample a Virtual Instrument
Now that you have a general understanding of the various settings in Auto Sampler, let’s walk through how to sample three kinds of virtual instruments - acoustic piano, strings, and a drum kit.
How to Sample a Piano VST in Auto Sampler
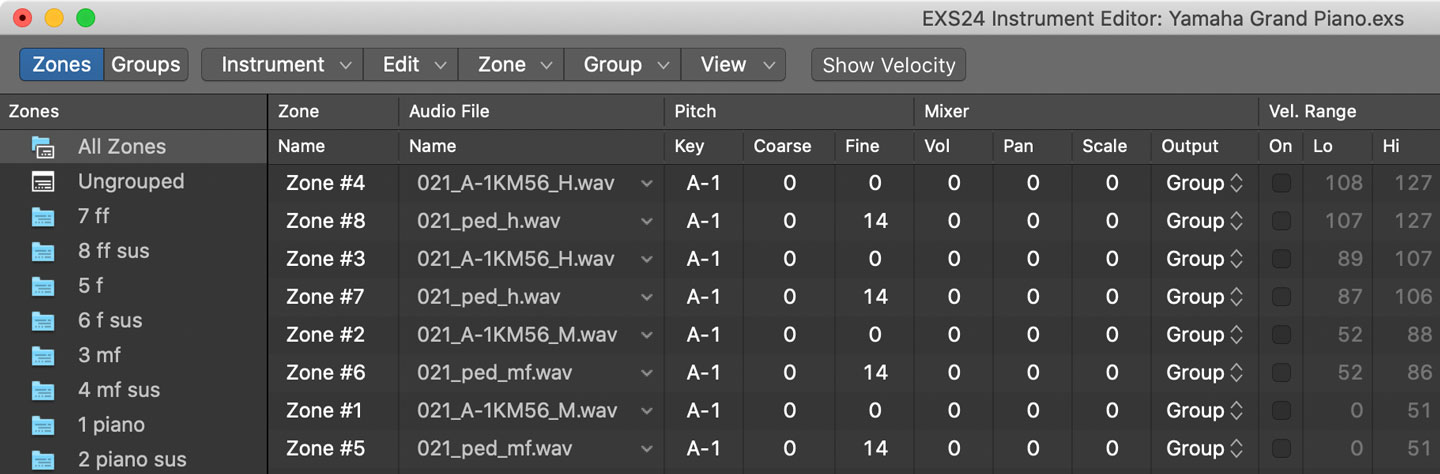
For this example, we’ll sample the Yamaha Grand Piano preset in EXS24. The first step is to identify the different velocity layers that make up this virtual instrument. In EXS24, that can be done in the Edit menu.
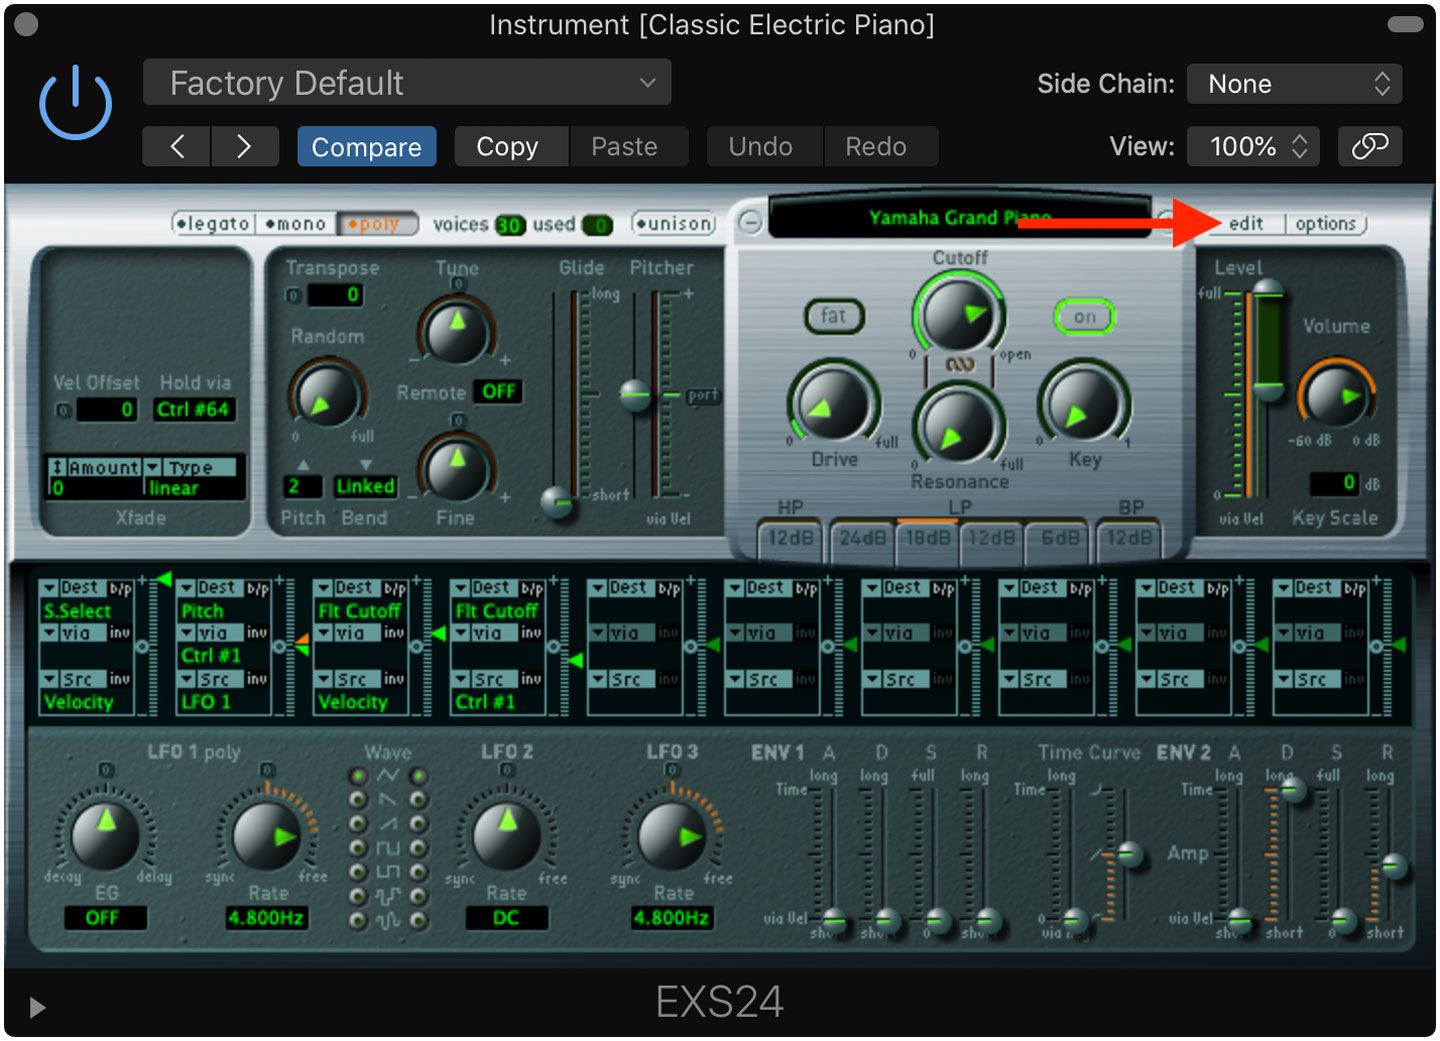
In the screenshot below, you can see the velocity ranges of this EXS24 instrument on the right hand side – 0-51, 52-88, 89-107, 108-127. These are the four velocity layers we’ll be using for the auto sampling.
The screenshot below shows the auto sampling settings.
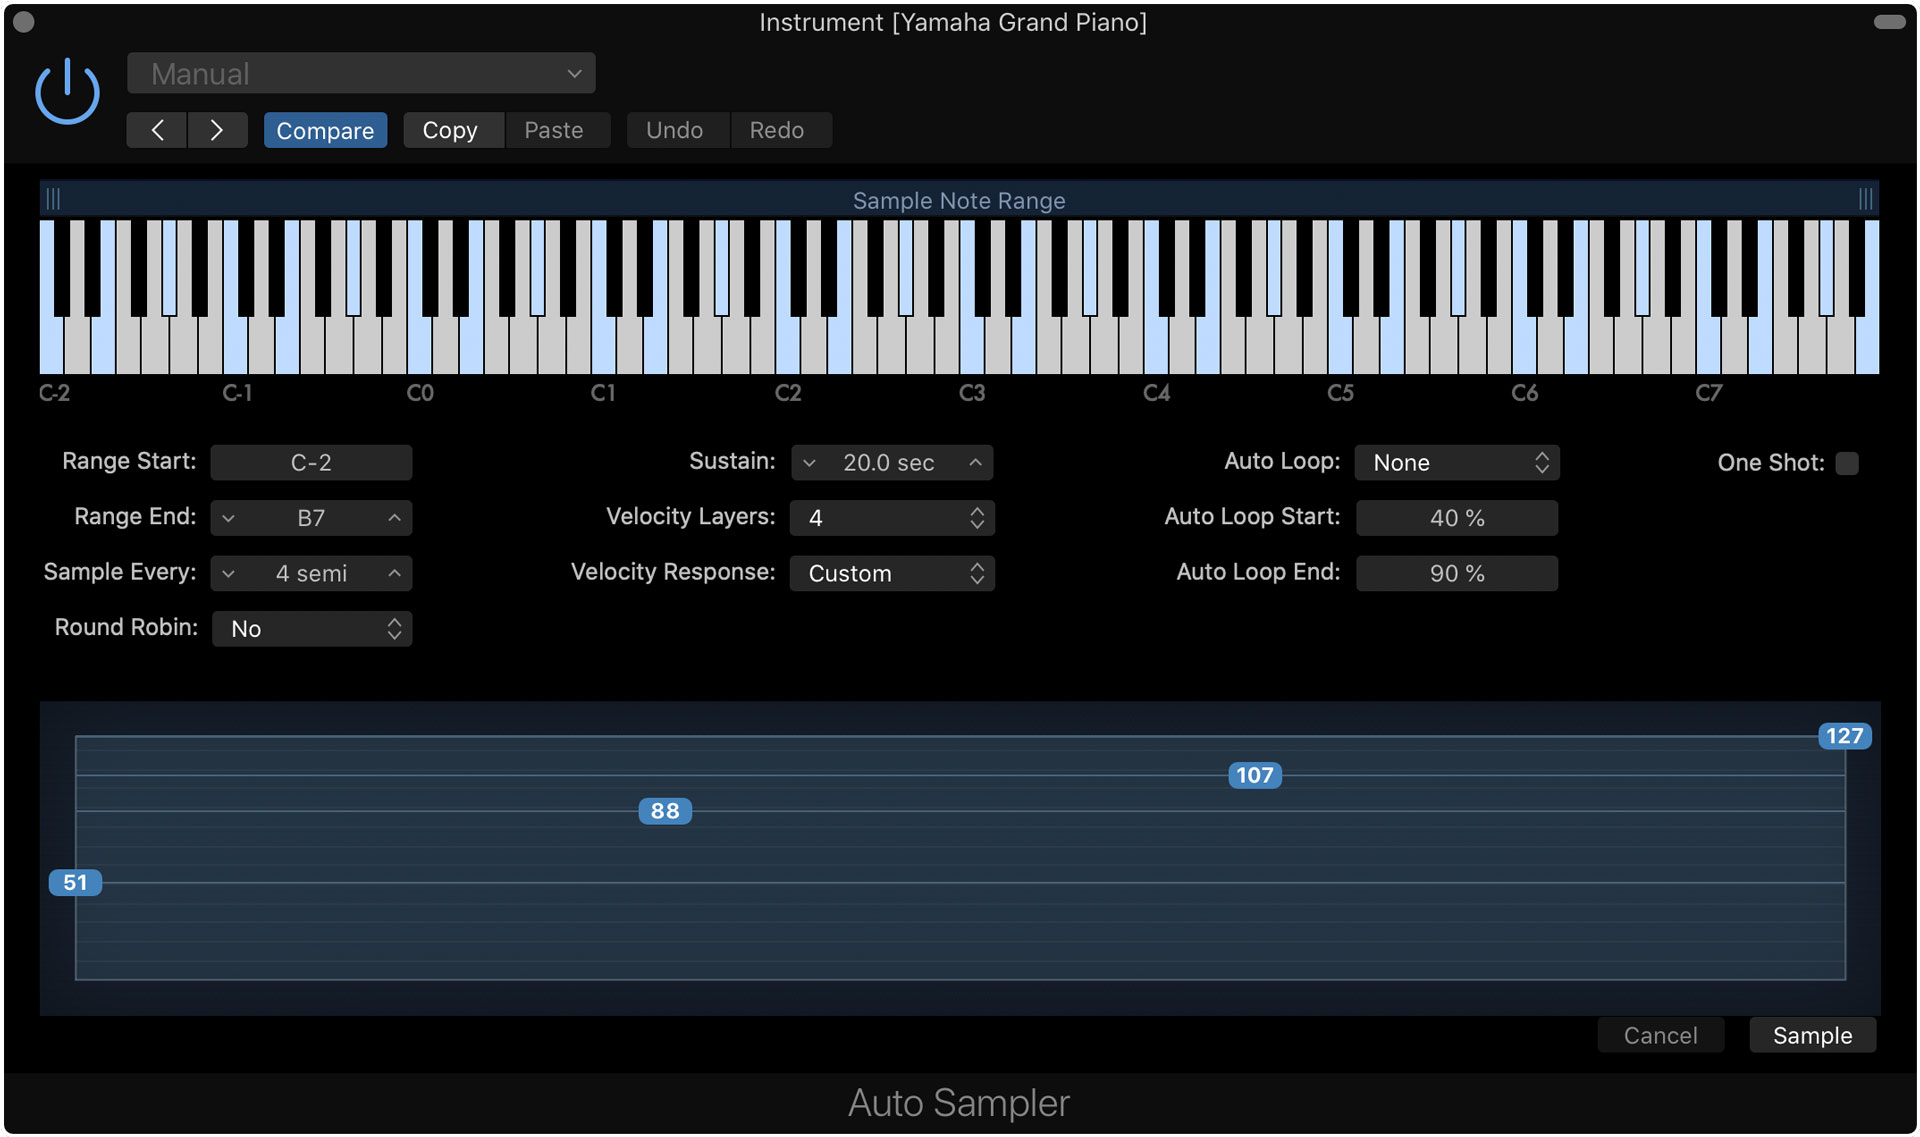
- Range Start - C-2
- Range End - B7
- Sample Every - 4 semitones
- Round Robin - Off
- Sustain - 20 seconds (enough time to capture the long tail)
- Velocity Layers - 4
- Velocity Response - Custom (the layers we defined above)
- Auto Loop - None
- Auto Loop Start - N/A
- Auto Loop End - N/A
- One Shot - Off
For this virtual instrument, I also turned up the input gain 4 dB to get a slightly hotter signal without crossing -10 dB.
Click the Sample Button when you have configured the proper settings. You’ll be prompted to name the EXS file, and the auto sampling process will begin.
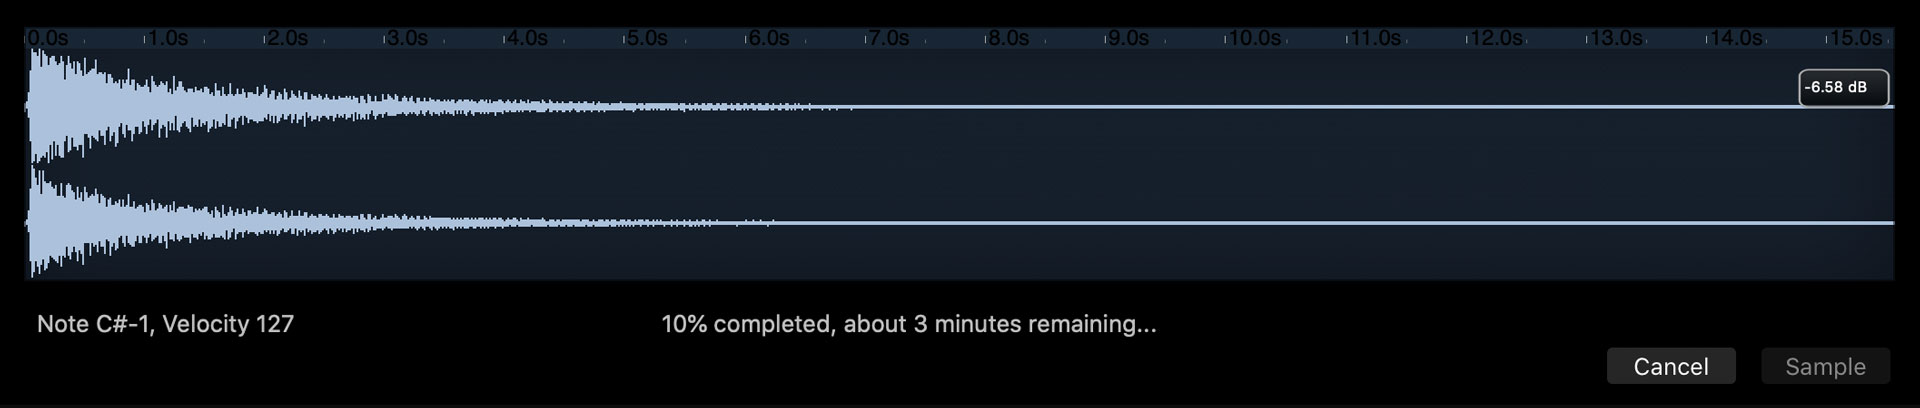
After the auto sampling is finished, you’ll find the sampled instrument in EXS24’s Auto Sampled folder.
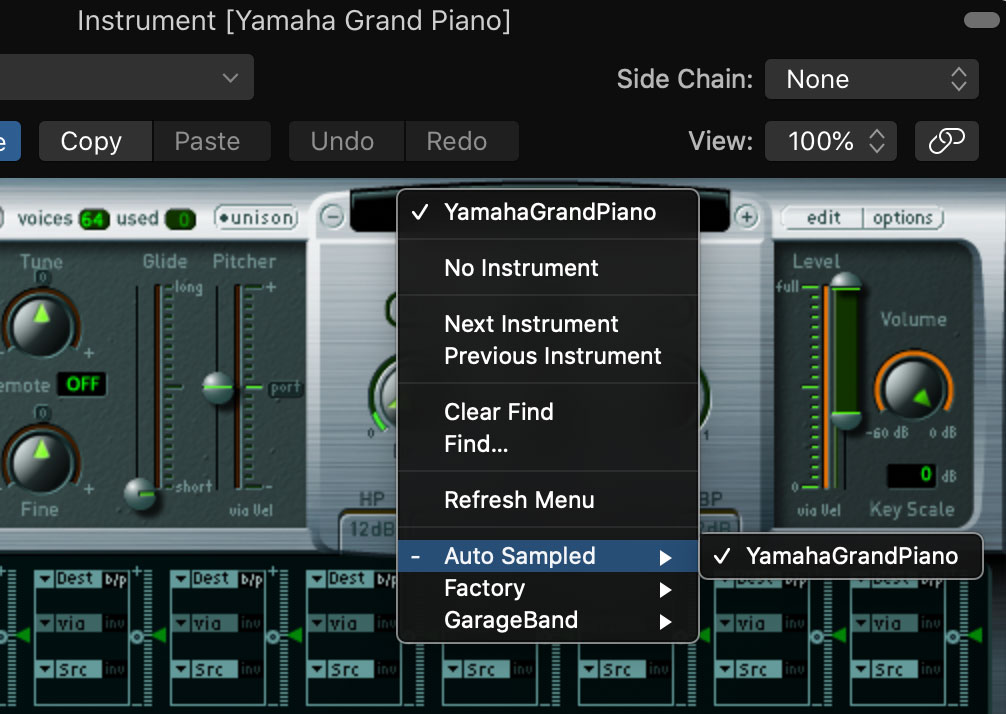
YamahaGrandPiano is our auto sampled instrument.
How to Sample a Strings VST in Auto Sampler
Next, we’ll sample the “String Ensemble” patch in MainStage’s Studio Strings plugin. Below are the auto sampling settings.
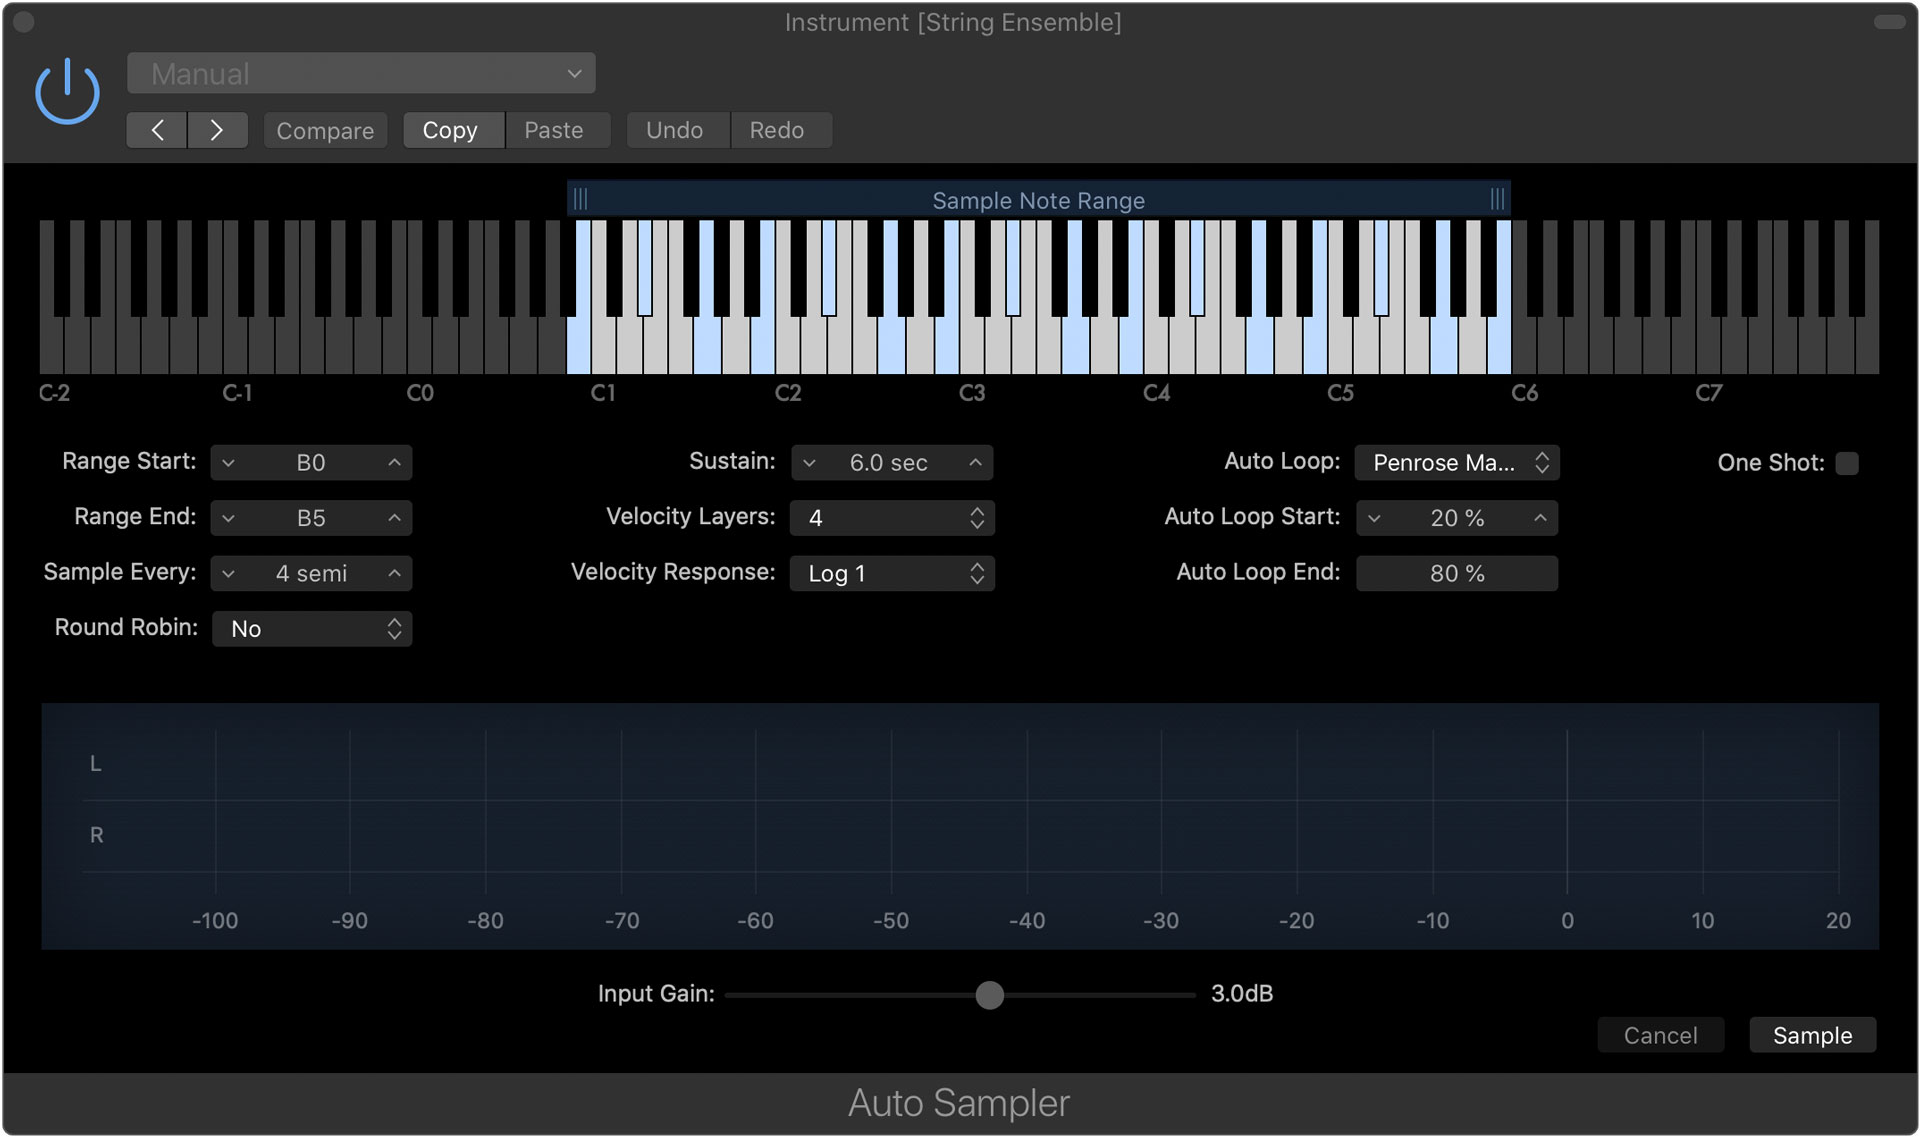
- Range Start - B0
- Range End - B5
- Sample Every - 4 semitones
- Round Robin - Off
- Sustain - 6 seconds
- Velocity Layers - 4
- Velocity Response - Log 1
- Auto Loop - Penrose Machine
- Auto Loop Start - 20%
- Auto Loop End - 80%
- One Shot - Off
To auto sample strings, the Auto Loop feature should be enabled. From my experience, the Penrose Machine option gives the best results. The sustain time is also much lower than the piano settings because we don’t need to capture a long decay. The sampling range was set to B0-B5 because that was the sounding range of the virtual instrument. Lastly, I selected four velocity layers and Log 1 for the velocity response because MainStage’s Studio Strings plugin doesn’t specify velocity layers explicitly.
How to Sample a Drum Kit VST in Auto Sampler
Finally, we’ll sample the Brooklyn Kit in MainStage’s Drum Kit Designer plugin. Below are the auto sampling settings.
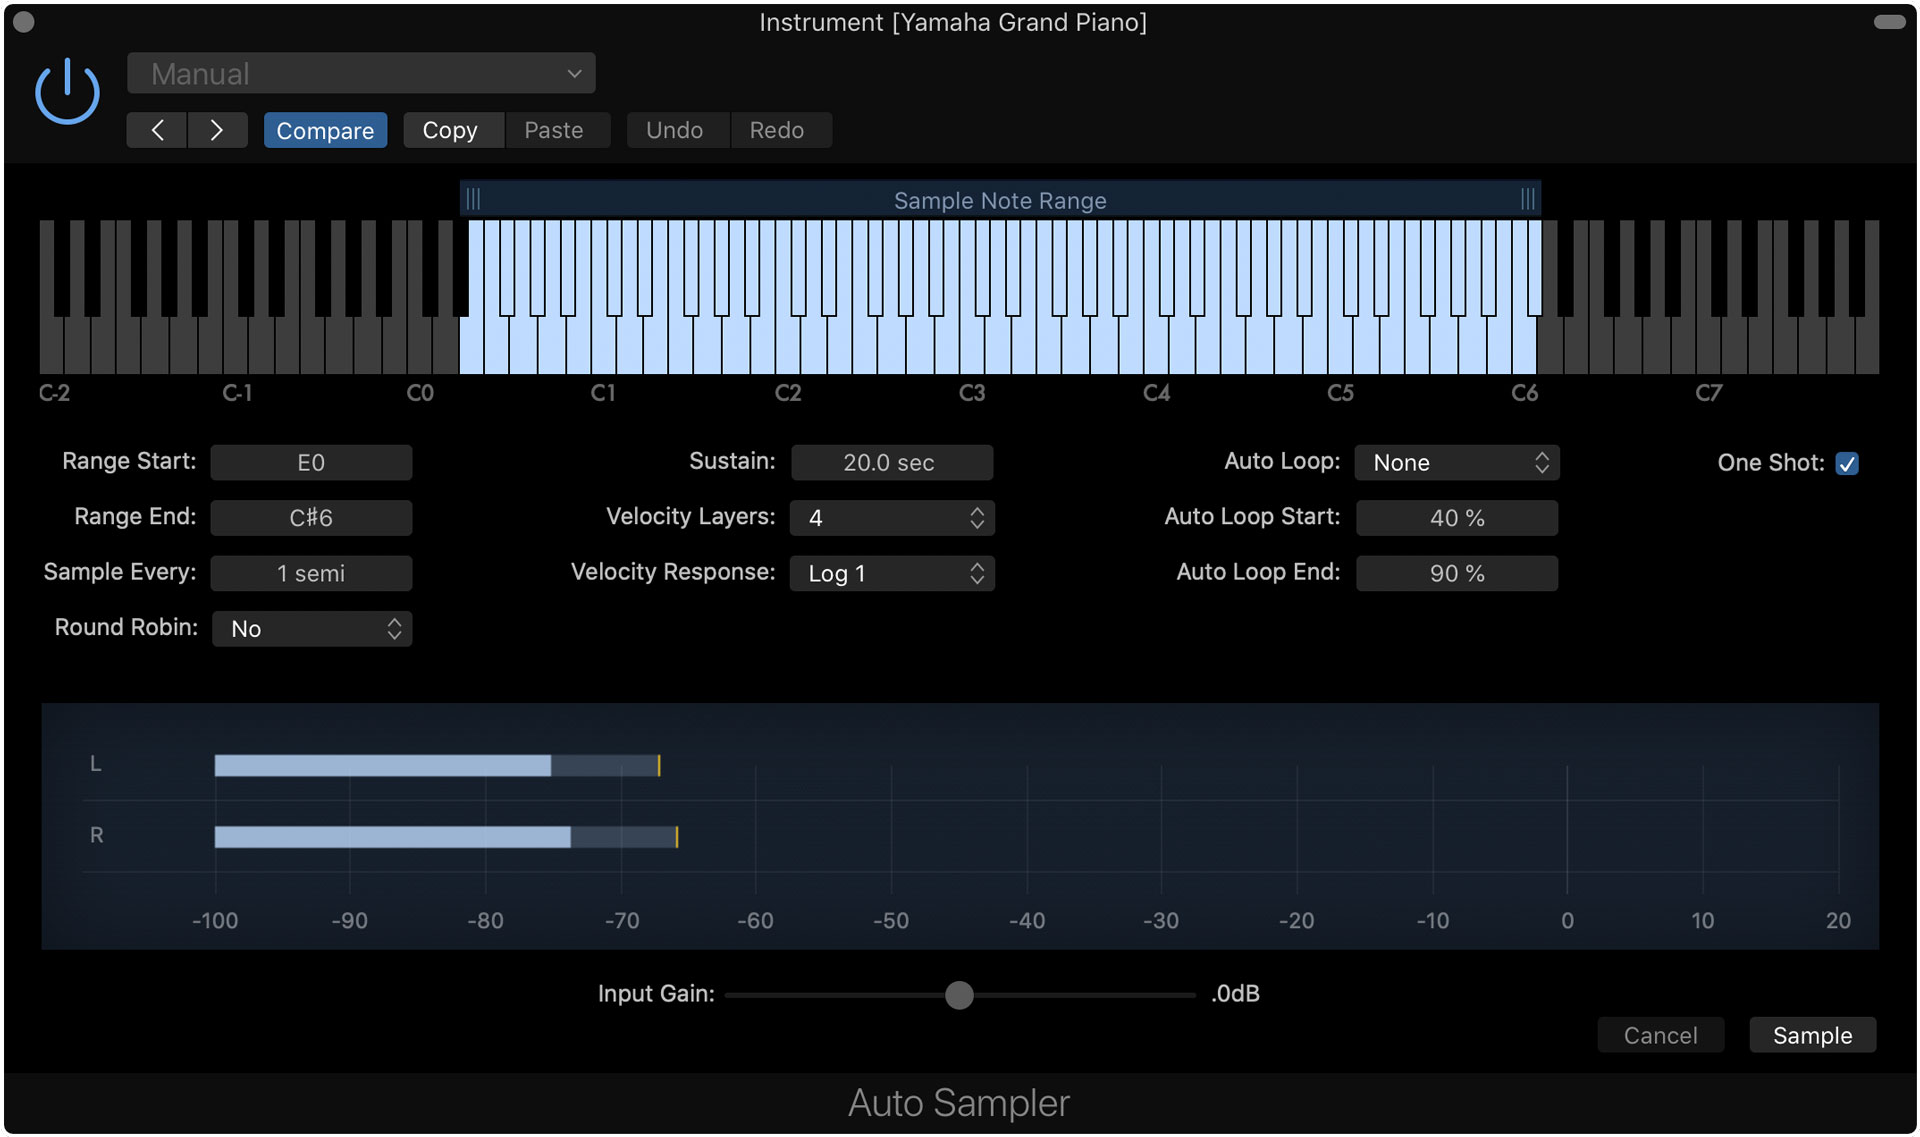
- Range Start - E0
- Range End - C#6
- Sample Every - 1 semitone
- Round Robin - Off
- Sustain - 20 seconds (enough time to capture the long tail)
- Velocity Layers - 4
- Velocity Response - Log 1
- Auto Loop - None
- Auto Loop Start - N/A
- Auto Loop End - N/A
- One Shot - On
To auto sample a drum kit, the settings to pay attention to are Sample Every and One Shot. Sample Every should be set at “1 semitone” because drum kit VSTs have unique samples on each key. The One Shot setting allows the sample to play in full even if the note is released.
Conclusion
I hope you found this tutorial on how to auto sample virtual instruments with MainStage’s Auto Sampler helpful. When auto sampling, the most important points to keep in mind are to use the correct settings and turn off all unnecessary effects plugins. If you have any questions or comments, feel free to send me an email or reach out to me on Twitter.