Like many, I have a love-hate relationship with Medium. I’m a huge fan of Medium’s editor - to the point of migrating my entire site to the platform a few years ago when custom domains were supported. At the same time, I hate how Medium dropped custom domain support, and how tech companies have flocked to it to host offficial company blogs. Companies like Auth0, ICON, and Airbnb all host blogs on a medium.com domain.
How to Run Apple MainStage on a PC
Apple MainStage is the industry-leading app for live performers. It allows musicians to design and organize sound patches, apply effects to audio in realtime, map hardware to control VSTs, and more. MainStage also comes with a large assortment of stock plugins and sound libraries, all for the low price of $29. MainStage, like other Apple-developed software, is only available for macOS. In this post, we’ll discuss how to run Apple MainStage on a PC, and take a look at other PC alternatives to MainStage.
How to Reverse Audio in Logic Pro X
If you’re a music producer, reversing audio can be a useful technique to create unique effects and soundscapes. In this tutorial, you’ll learn how to easily reverse audio in Logic Pro X.
The Difference Between Logic Pro and MainStage
Logic Pro and MainStage are two popular apps for musicians, engineers, producers, and more. While both apps are made by Apple and targeted towards users in the music industry, they also have their fair share of differences. In this post, we’ll compare and contrast Logic Pro and MainStage, so you can decide which app is best for your use case.
Going All In on Universal Audio
Back in college, I spent a lot of time researching Universal Audio interfaces and plugins. As a music recording student, I was acutely aware of the advantages of zero-latency DSP processing. At school, the recording studio was equipped with a high-end Pro Tools rig with a variety of hardware outboard gear, so there was no need to track with plugins.
Working on my own projects at home was a different story – I didn’t have a decked out studio at home. At the time, I was doing a lot of work with vocalists, so I wanted an audio interface with DSP capabilities. Universal Audio products were out of my price range, so I used a Focusrite Saffire Pro 24 DSP. It offered basic EQ, compression, and reverb effects through the onboard DSP chip, and it was good enough for tracking purposes.

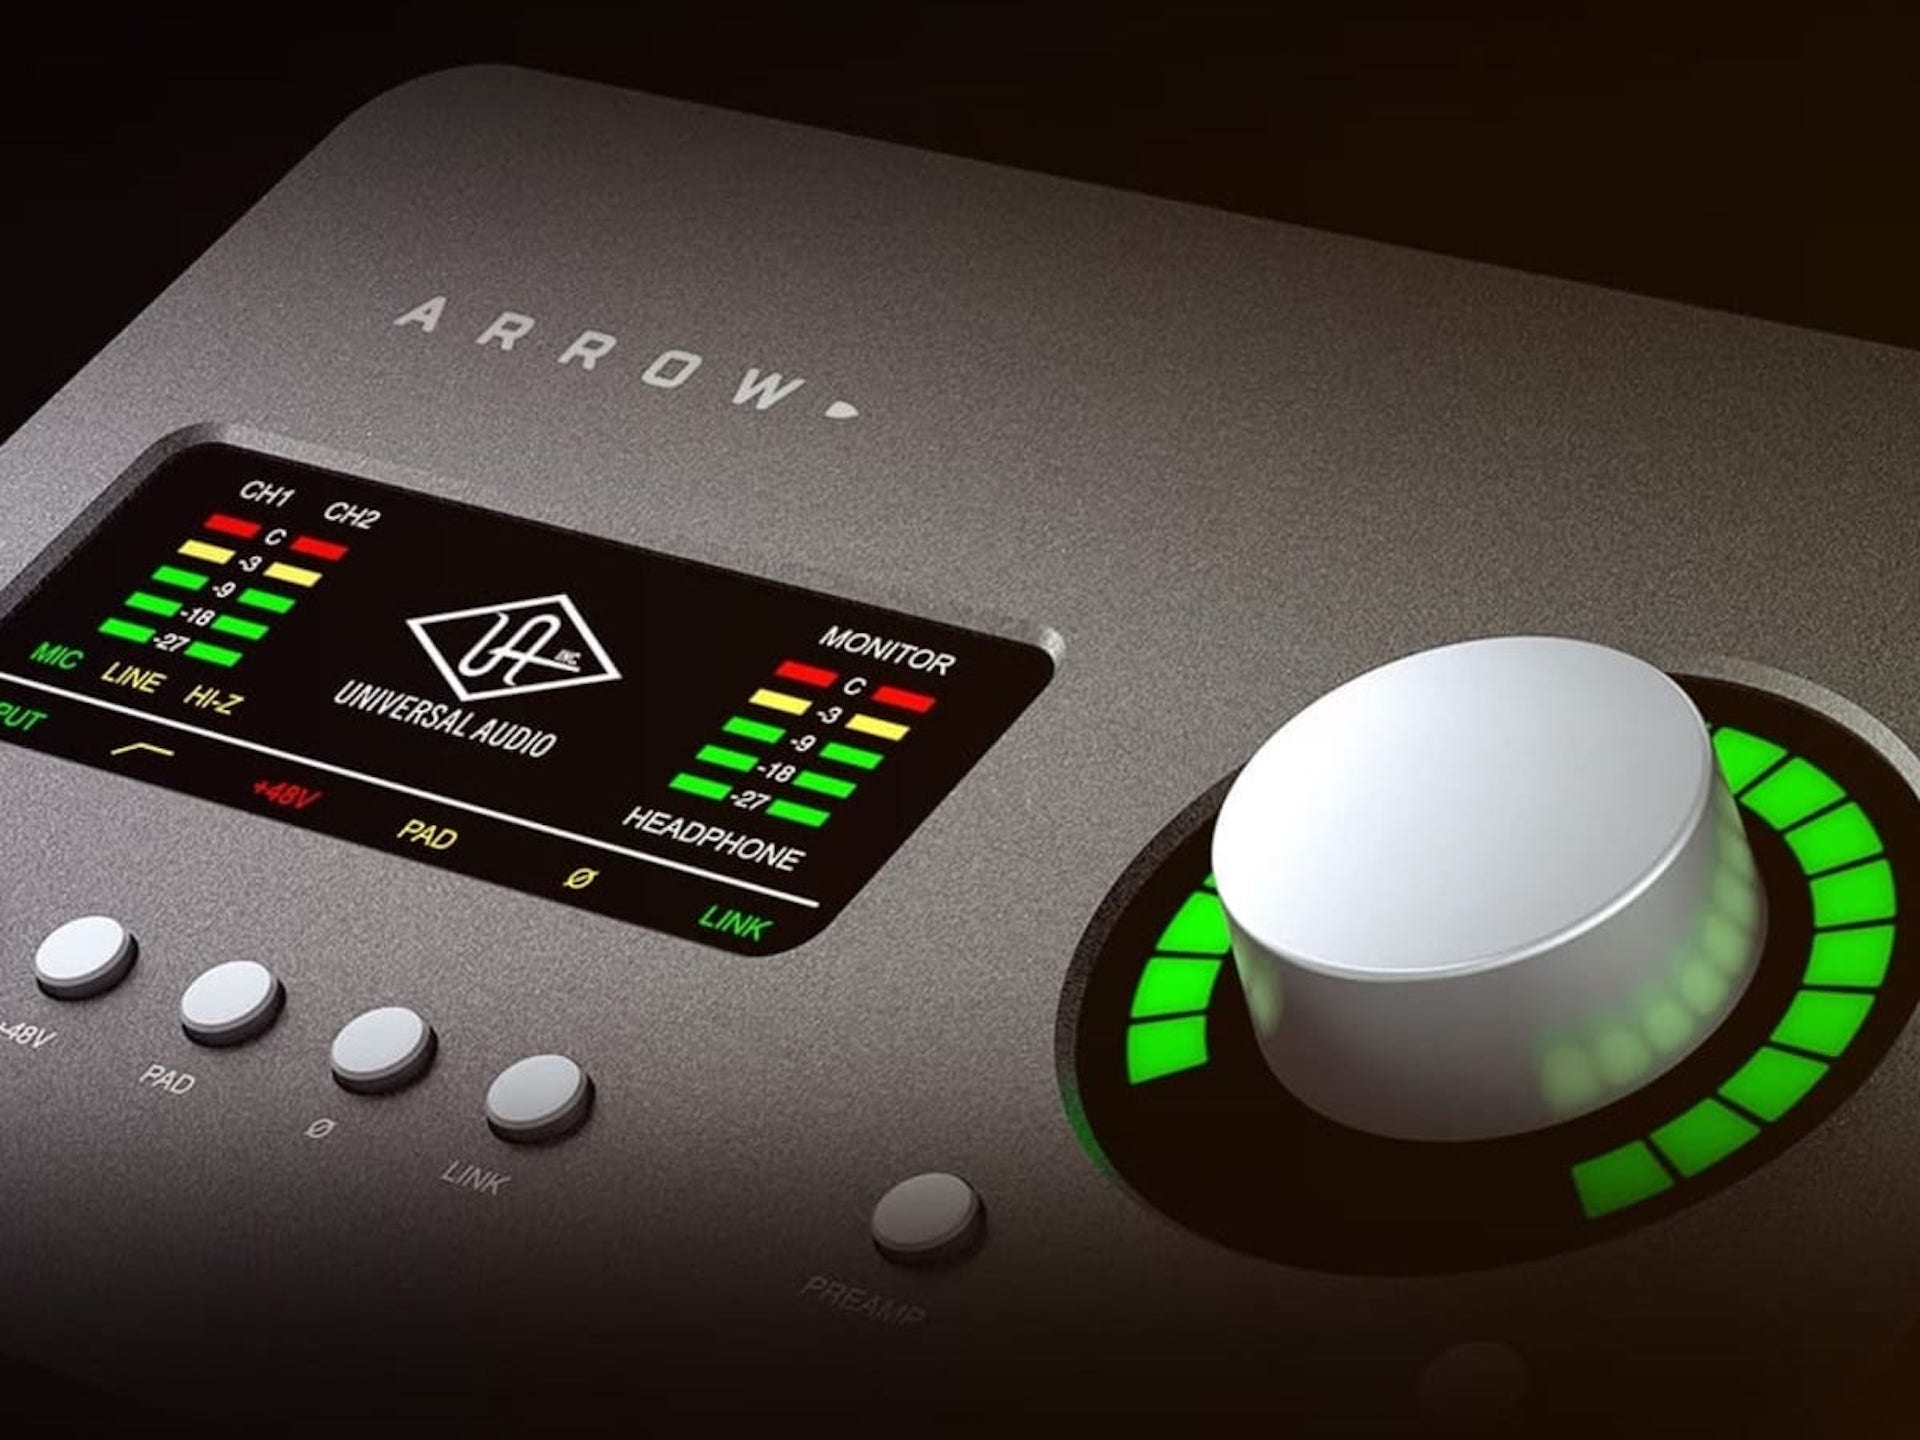
The Universal Audio Arrow's built-in DSP emulations are stellar podcasting.
Fast forward to 2020 – I finally picked up my first Universal Audio interface! I decided on the UAD Arrow because it’s a super portable and powerful unit at an attractive price. Right now, I mainly use it for podcasting, though I hope to get back to recording vocalists and producing music when life returns to normal. Right now, my favorite Universal Audio plugins are the Neve 88RS channel strip, 1176 compressor, and LA-2A limiter/compressor.
I really like this signal chain for podcasting. The Neve channel strip sounds amazing, and the included gate is great for reducing background noise. The 1176 and LA-2A are dynamics processing staples, and I use them heavily to get a broadcast-ready sound. Since all the effects are provided by the onboard DSP chip with zero latency, I don’t have to worry about messing around with plugins during post-production. After using Universal Audio’s stuff for a few weeks, I’m hooked. The presence of DSP chips and the impeccable emulations of vintage hardware is a combination that’s impossible to beat.
SSD vs. HDD for Music Production
Twenty years ago, the world of music production was dominated by romplers like the Roland JV-1080 and Yamaha MOTIF. The MOTIF Classic, which was originally released in 2001, had only 84 MB of onboard waveform ROM (read-only memory). Fast forward to 2020, the music production landscape has changed dramatically. Spectrasonics Omnisphere, a popular sample library among pop producers and film composers, weighs in at over 60 GB – that’s ~715x the size of the MOTIF’s onboard memory.
Signing Up for Google Fi
I recently signed up for Google Fi, Google’s mobile phone plan offering. Before signing up, I was using two traditional carriers – one in Japan, one in USA. I also had a separate mobile hotspot plan in Japan as a backup and “on-the-go” Internet connection for work. The hotspot has proven itself useful many times, especially during visits to my wife’s hometown in the countryside.
A few weeks ago, I started rethinking my plan for global data coverage. After a good bit of research, I ended up choosing Google Fi for the reasons below.
- I often faced SMS 2FA issues in Japan. For example, some of my online shopping accounts are tied to my USA number. If I try to log in to buy something in Japan, it send a verification code to my USA number. Since Google Fi gives me a single number that’s accessible from around the world at no extra charge, I can use that phone number to solve this problem.
- Having a separate mobile hotspot feels a little redundant. With Google Fi, I can add additional data-only SIMs for free! Since I do most of my writing for work on my iPad Pro nowadays, I can put the SIM card in my iPad directly. Hopefully future ARM Macs have built-in LTE capability as well. Best of all, Google Fi gives me unlimited data in both Japan and USA, and it’s cheaper than the mobile hotspot I was paying for.
- Google Fi is compatible with my iPhone’s eSIM. This means I can have two voice/data plans in one phone. This is very convenient because I don’t need to carry another device around for the second phone number. Furthermore, it allows me to use my iPhone as a mobile hotspot in case I need to connect to the Internet with my MacBook Pro on the go.
I’m all set up with Google Fi now, and I’ve been loving it so far. My iPhone 11 Pro Max has a physical SIM for my USA carrier and a Google Fi eSIM, and I also have a data-only SIM in my iPad Pro. Just today, I walked to a local park to get some work done on my iPad. It felt pretty awesome to be able to connect to the Internet on my iPad Pro without any kind of tethering setup. When I get back to Japan, I’ll swap out my USA carrier’s SIM for my Japanese carrier’s SIM.
Nice and easy!
The Best Audio Interface for Podcasting
Over the past few years, podcasting has grown from a niche content format that no one took seriously to a mainstream content channel ripe with top notch shows and sponsors, and millions of listeners around the world. In 2020, the podcasting industry has evolved to the point where anyone with a microphone and an idea can start a podcast with almost zero friction.
In fact, it’s a three-step process – hook up a mic, record your episode, and distribute it. In this article, we’ll discuss the first step. Specifically, you’ll learn how audio interfaces help you connect a microphone to your computer, and which audio interface is the best option for podcasting.
Terminal Stuck at "Login 80x24" in macOS 11 Big Sur
I recently upgraded my primary computer to the developer beta of macOS 11 Big Sur. I know what you’re thinking, but what can I say… I like to try the latest and greatest even if it means risking system stability. Also, let’s be honest – macOS Catalina wasn’t exactly the most stable version of macOS anyway.
The update to macOS 11 Big Sur went pretty smoothly. I downloaded the beta profile from my Apple developer account, and was able to get everything installed shortly after that. I was half expecting my various Python automation scripts to break, but all of them continued to work fine after the update.

macOS 11 Big Sur sports a fresh redesign.
The one thing that did stop working was Terminal and iTerm2. After a while, Terminal would randomly go blank and display “login 80x24” in the menu bar. The strangest part of this behavior was the fact that there weren’t any rogue login processes in the Activity Monitor, so I wasn’t sure why Terminal was getting stuck trying to login – not to mention why it logged out in the first place.
I tried a variety of fixes including rebooting, deleting Terminal preferences, rebooting again, and a few other things. In the end, the following steps worked for me to get iTerm2 working again.
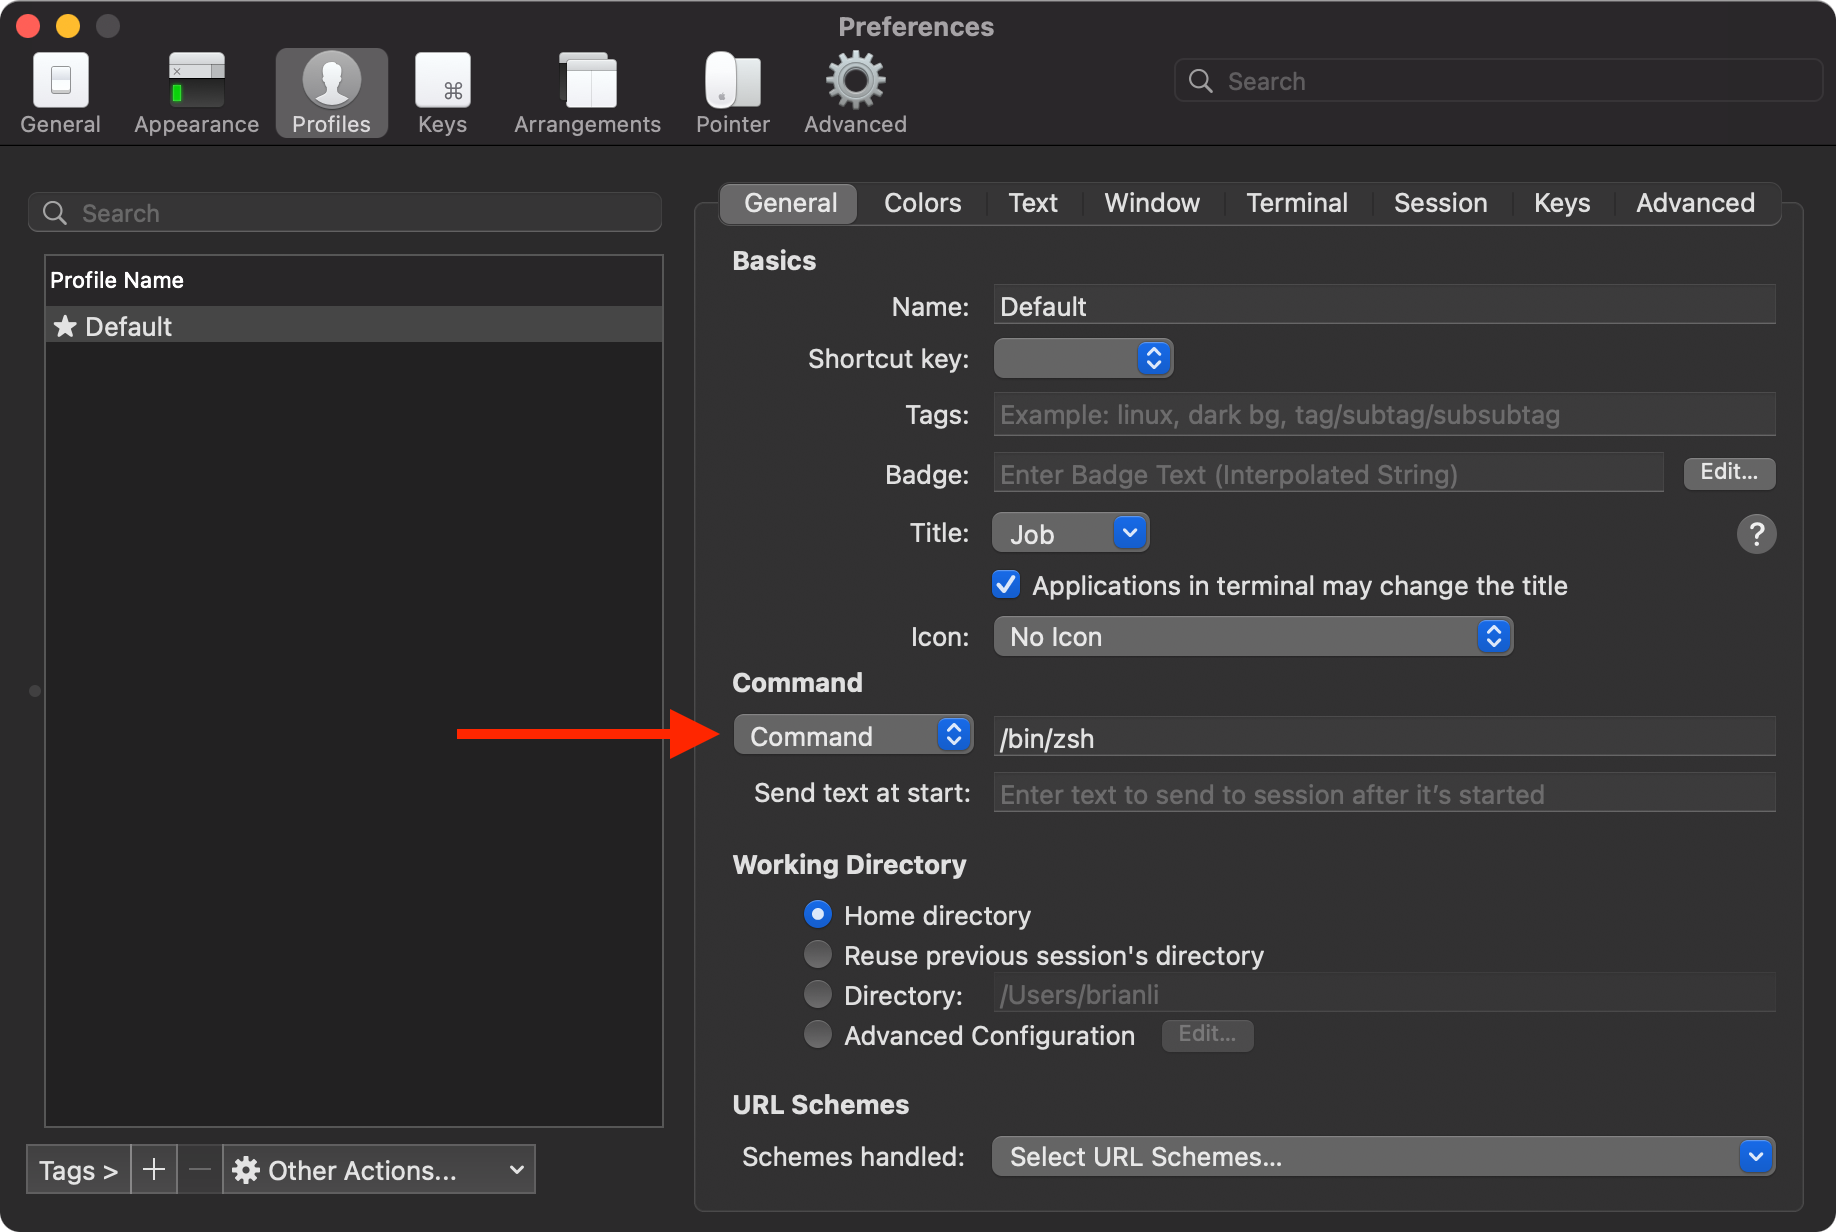
In iTerm2 preferences, I changed the Command setting in the Profiles tab from “Login Shell” to “Command”. For the command, I specified /bin/zsh.

Command setting in iTerm2.
After that, I deleted com.apple.Terminal.plist in ~/Library/Preferences, and restarted my MacBook Pro. After going through this sequence of steps, I’m no longer getting the “login 80x24” issue in Terminal or iTerm2 – YMMV.
Submitting Changed URLs to Bing Webmaster Tools with Python
One of my biggest pet peeves with Google Webmaster Tools is its lack of a complete API to programatically submit updated URLS for indexing. At the moment, Google’s Indexing API only allows submission of pages with specific kinds of structured data – JobPosting or BroadcastEvent embedded in a VideoObject. Hopefully Google will open up the Indexing API for all pages in the future, but I’m not holding my breath.