Submixing is a popular signal routing technique for both live and studio mixing. The general concept involves sending multiple signals to a “bus,” which can then be controlled by one fader. MainStage 3 makes it easy to submix with patch buses and auxiliary tracks. In this tutorial, you’ll learn why, how, and when you should submix in MainStage.
What is Submixing?
Submixing involves sending multiple audio signals to a single bus. While there are many specific reasons to submix, those reasons usually fall into one of two categories (or both) — control and processing.
Let’s say you’re mixing a live show with a singer, rhythm section (guitar, keyboards, bass, drums), and a string section (violin, viola, cello). After achieving a general relative balance of the string section, you decide you want to be able to control the volume of the string section as one unit.
Well, there are two ways to do this — move all three faders at once, or send all of the individual string channels to a bus and control the section with one fader. The latter solution is the obvious solution here. You can still adjust the relative volumes of each instrument in the submix, but now you also have global control over the whole section thanks to submixing.
At this show, you’re using five microphones for the drum kit — kick, snare top, snare bottom, and two overheads. After sending all the channels to a “drum bus,” you decide you want that awesome super compressed drum kit sound for the show. This sound can only be achieved by sticking a compressor on the drum bus because it effectively processes every element coming into the drum bus as a whole.
Submixing gives you macro-level control over your mix.
Patch Buses & Auxiliary Tracks
There are two levels of submixing in MainStage 3 — patch buses and auxiliary tracks. You can think of patch buses and auxiliary tracks as micro and macro level utilities, respectively. In other words, patch buses work on the patch level, and auxiliary tracks can work on any level.
Using Auxiliary Tracks
An auxiliary track can be used for a variety of different purposes. When it comes to submixing, I typically use auxiliary tracks as a middleman between channel strips and the master outputs. Let me explain.
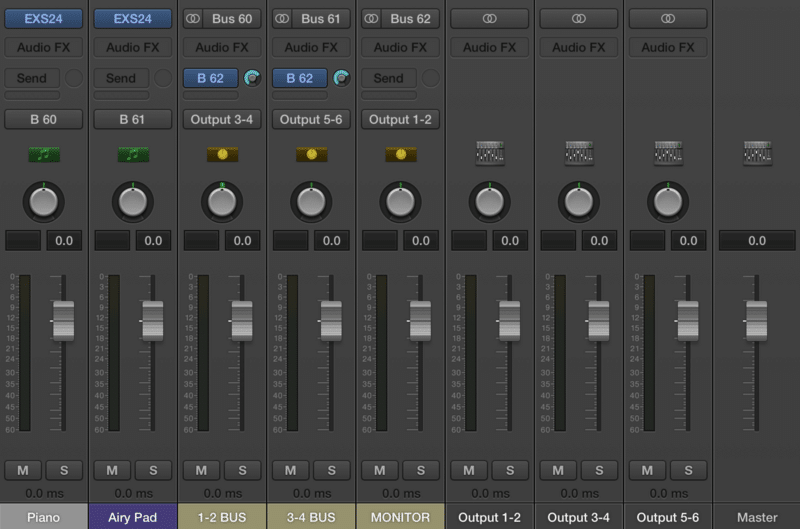
The shows I program usually use between 6 – 8 outputs. If I’m on the go, I don’t always want to bring an audio interface with me, so I just end up using my MacBook Pro’s built-in output. The problem here is the built-in sound card only offers two outputs. I don’t want to use use SoundFlower in 64-channel mode, so how do I assign outputs 3 – 8 in this situation? Here’s where auxiliary tracks come in handy.
By creating four auxiliary buses — 1 – 2 BUS, 3 – 4 BUS, 5 – 6 BUS, and 7 – 8 BUS and assigning those buses to Outputs 1 – 2, 3 – 4, etc., I can do all the necessary signal routing without having an eight output audio interface plugged in. Now you’re probably wondering how you’ll be able to hear everything except for the MONITOR BUS if I’m just using my Mac’s built-in speakers or headphone port. Just create a send on the other three buses, sending 0.0 dB to MONITOR BUS.
Depending on your concert’s gain staging, you might have to send -6dB to the MONITOR BUS to avoid signal overload. The exact amount does not matter as long as the same amount is sent from all the output channel strips, ensuring an accurate representation of your mix.

Auxiliary channel strips can also be used for effects buses. A popular use case for an effects bus is a global reverb send, where varying amounts of dry signal can be sent to a single reverb effect, instead of creating separate reverb instances for every channel strip. This has two big advantages, and pretty much no disadvantages. Firstly, CPU and RAM usage is significantly reduced, as you no longer need separate reverb instances for every sound in your concert. Secondly, patches will sound more coherent because they are being sent to the same virtual space created by the reverb.
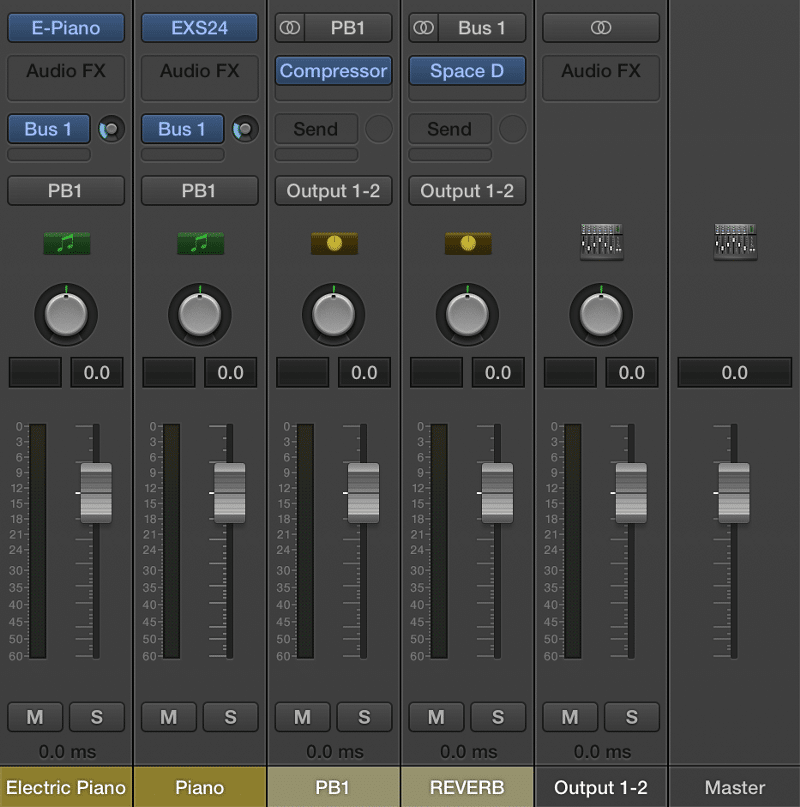
In the screenshot to the right, look at the two channel strips to the left — “Electric Piano” and “REVERB,” Electric Piano contains a -10dB send to Bus 1, the REVERB bus.
The REVERB channel strip is just a normal auxiliary channel strip with an effects plugin — Space Designer in this case. Since this channel strip was created at concert level, it’ll appear in every patch. Simply send any audio signal to the REVERB bus to get a effected wet signal.
Keep in mind the dry signal is still going through. The more you send, the more the wet signal will “cover things up,”
Using Patch Buses
Patch Buses were introduced in MainStage 3, and they’re essentially just a specific type of auxiliary buses dedicated to submixing patches. To send a channel strip to a Patch Bus, just right click on the Output selector, and select Patch Bus. In the screenshot below, you can see I’ve sent Electric Piano and Piano to PB1 (Patch Bus 1), which contains a Compressor plugin.

Patch Buses are useful for effecting the sum of a number of audio sources. A popular use case is bus compression, a popular production technique that involves compressing all the audio signals sent to a bus to create a more coherent and gluey sound.